What is the best way to vent a kitchen island sink? The best way to vent a kitchen island sink depends on your specific situation, including the distance to the main drain, access to existing plumbing, and local plumbing codes. Common solutions include using an Air Admittance Valve (AAV), a loop vent, or connecting to an existing vent stack. This guide will explore each option in detail.
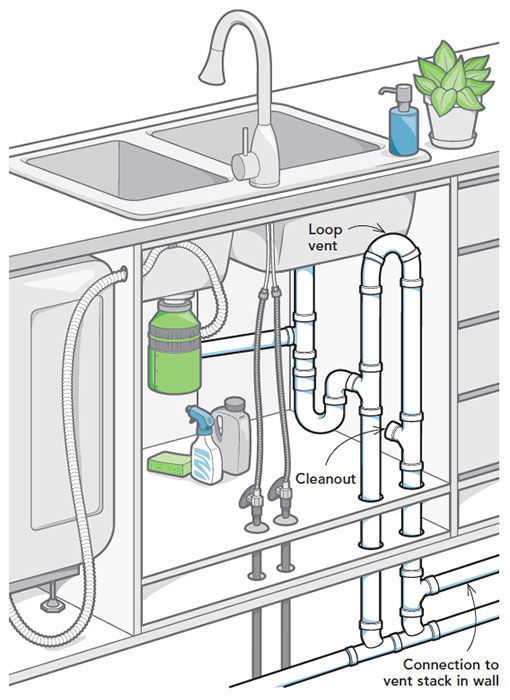
Image Source: images.finehomebuilding.com
Why Island Sink Venting Matters
Venting is a crucial part of any plumbing system, but it’s especially important for kitchen island sinks. Without proper venting, your sink can experience slow draining, gurgling noises, and unpleasant odors. This is because the vent allows air to enter the drainpipe, equalizing pressure and preventing a vacuum from forming, which would impede water flow. Island sinks are often located far from a wall, which can make traditional venting methods challenging.
Island Sink Plumbing Code Considerations
Before starting any plumbing work, it’s essential to familiarize yourself with your local plumbing codes. Plumbing codes exist to ensure safety and proper functionality. They dictate the approved methods and materials for venting, as well as the required pipe sizes and distances.
- Research Local Codes: Contact your local building department or plumbing inspector to obtain a copy of the relevant plumbing codes.
- Permits: Check if a permit is required for the plumbing work you plan to undertake.
- Inspections: Schedule an inspection after completing the work to ensure it complies with the code.
- Material Approval: Verify that the venting method and materials you intend to use are approved by your local code.
Island Sink Drain Venting Methods
Several island sink drain venting methods can be employed to properly vent your kitchen island sink. Here’s a detailed look at each:
Air Admittance Valve (AAV) for Kitchen Island Sink
An Air Admittance Valve (AAV), also known as a Studor vent is a one-way valve that allows air to enter the drainpipe when negative pressure develops, preventing siphoning. It is a popular and often simpler kitchen island sink venting solution, especially when venting a kitchen island sink without wall access.
How AAVs Work:
When water drains from the sink, it creates a vacuum in the drainpipe. The AAV opens, allowing air to enter and equalize the pressure. Once the pressure is equalized, the valve closes, preventing sewer gases from escaping into the room.
Advantages:
- Easy Installation: AAVs are relatively easy to install, making them a great DIY island sink vent option.
- Cost-Effective: They are often less expensive than other venting methods.
- Space-Saving: AAVs take up minimal space, which is beneficial in tight spaces.
Disadvantages:
- Not Approved Everywhere: Some local plumbing codes do not allow the use of AAVs.
- Maintenance: AAVs can fail over time and may need to be replaced.
- Accessibility: They must be accessible for inspection and replacement.
Installation Steps:
- Location: Install the AAV as high as possible under the sink, above the horizontal drainpipe.
- Connection: Connect the AAV to the drainpipe using a threaded adapter or rubber coupling.
- Secure: Ensure the AAV is securely attached and in an upright position.
- Check Code: Verify that the installation meets local plumbing code requirements.
Considerations When Using an AAV:
- The AAV must be installed in an accessible location.
- The AAV must be installed at least 6 inches above the drain line it is serving.
- AAVs are mechanical devices and can fail, so periodic inspection and replacement may be necessary.
Loop Vent Kitchen Island
A loop vent kitchen island, also known as a Chicago loop, is another common method for alternative venting for island sink. It involves creating a loop of pipe that rises above the flood rim of the sink before connecting to a vent stack or AAV.
How Loop Vents Work:
The loop vent creates an air break that prevents siphoning. As water drains from the sink, air can enter the loop, equalizing pressure and allowing the water to flow freely.
Advantages:
- Reliable: Loop vents are a reliable venting method that is less prone to failure than AAVs.
- Code Compliant: Loop vents are generally accepted by plumbing codes.
Disadvantages:
- More Complex Installation: Installing a loop vent can be more complex than installing an AAV.
- Space Requirements: Loop vents require more space than AAVs.
Installation Steps:
- Run Drain Line: Run the drain line from the sink to the cabinet base.
- Create Loop: Extend the pipe upward, forming a loop that rises above the flood rim of the sink.
- Connect to Vent: Connect the top of the loop to a vent stack or an AAV.
- Slope: Ensure the horizontal drainpipe has a proper slope (typically ¼ inch per foot).
Table: Comparing AAVs and Loop Vents
| Feature | Air Admittance Valve (AAV) | Loop Vent |
|---|---|---|
| Installation | Easy | More Complex |
| Cost | Lower | Higher |
| Code Approval | Not always approved | Generally Approved |
| Space | Minimal | More Required |
| Reliability | Can fail over time | More Reliable |
Connecting to an Existing Vent Stack
If you have an existing vent stack nearby, you can connect your island sink drain to it. This is often considered the best way to vent island sink when feasible.
How it Works:
By connecting the island sink drain to an existing vent stack, you provide a direct path for air to enter the drainpipe, preventing siphoning.
Advantages:
- Reliable: Connecting to an existing vent stack is a reliable venting method.
- Code Compliant: It is generally accepted by plumbing codes.
Disadvantages:
- Accessibility: It may be difficult or impossible to access an existing vent stack.
- Cost: The cost of connecting to an existing vent stack can be high if it requires extensive plumbing work.
Installation Steps:
- Locate Vent Stack: Identify the nearest vent stack.
- Run Drain Line: Run the drain line from the sink to the vent stack.
- Connect: Connect the drain line to the vent stack using appropriate fittings.
- Slope: Ensure the horizontal drainpipe has a proper slope.
Venting a Kitchen Island Sink Without Wall Access – Other Alternatives
When traditional methods are challenging, several other alternatives exist:
-
Island Vent: This involves running a vent pipe under the floor to a nearby wall and then up to the attic or roof. This method can be costly and time-consuming, but it provides a reliable venting solution.
-
Branch Vent: If there is another fixture nearby with an existing vent, you may be able to tie into that vent. However, this must be done in accordance with local plumbing codes.
-
Combination Waste and Vent System: In some cases, a combination waste and vent system may be allowed. This system uses a single pipe for both drainage and venting.
Step-by-Step Guide: DIY Island Sink Vent Installation (AAV Example)
This guide will walk you through installing an Air Admittance Valve (AAV) – a common DIY island sink vent solution. Always check local codes before starting.
Tools and Materials:
- Air Admittance Valve (AAV)
- PVC pipe
- PVC primer and cement
- Measuring tape
- PVC cutter
- Fittings (adapters, couplings, etc.)
- Level
- Safety glasses
- Gloves
Step 1: Plan the Layout
- Measure the distance from the sink drain to the location where you will install the AAV.
- Plan the layout of the PVC pipe and fittings, ensuring a proper slope for drainage (¼ inch per foot).
Step 2: Cut the PVC Pipe
- Use the PVC cutter to cut the PVC pipe to the required lengths.
- Ensure the cuts are clean and straight for proper fitting.
Step 3: Assemble the Drainpipe
- Dry-fit the PVC pipe and fittings to ensure they fit properly.
- Apply PVC primer to the inside of the fittings and the outside of the pipe.
- Apply PVC cement to the same areas and quickly assemble the pieces.
- Hold the pieces together for a few seconds to allow the cement to set.
Step 4: Install the AAV
- Connect the AAV to the drainpipe using a threaded adapter or rubber coupling.
- Ensure the AAV is installed in an upright position and is securely attached.
- The AAV should be installed as high as possible under the sink, above the horizontal drainpipe.
Step 5: Check for Leaks
- Turn on the water and check for leaks at all connections.
- If you find any leaks, tighten the connections or disassemble and reassemble the joint.
Step 6: Secure the Pipes
- Use pipe straps or clamps to secure the PVC pipes to the cabinet walls or floor.
- This will prevent the pipes from moving and causing leaks.
Troubleshooting Common Venting Problems
Even with a properly installed vent, problems can sometimes arise. Here are some common issues and how to address them:
- Slow Draining: This can be caused by a clogged drainpipe or a malfunctioning AAV. Check the drainpipe for obstructions and replace the AAV if necessary.
- Gurgling Noises: Gurgling noises indicate that the vent is not functioning properly. This can be caused by a blocked vent pipe or a faulty AAV.
- Odors: Unpleasant odors can be caused by sewer gases escaping into the room. This can be due to a loose-fitting drainpipe or a malfunctioning AAV.
Fathoming Kitchen Island Sink Venting Solutions: A Summary
Choosing the right kitchen island sink venting solutions is vital for a functional and code-compliant plumbing system. Whether you opt for an AAV, a loop vent, or connecting to an existing vent stack, proper planning and installation are crucial. Don’t forget to consult your local plumbing codes and obtain any necessary permits before starting your project. Venting a kitchen island sink without wall access can be tricky, but with the right knowledge and tools, it’s a manageable DIY task.
FAQ: Kitchen Island Sink Venting
Q: Can I install an AAV horizontally?
No, AAVs must be installed in an upright, vertical position to function properly.
Q: What is the maximum distance an island sink can be from a vent?
The maximum distance varies depending on local plumbing codes, but it’s typically a few feet. Consult your local code for specific requirements.
Q: Who is qualified to install a kitchen island sink vent?
A qualified plumber is always the best choice. However, a homeowner with plumbing experience can install an AAV or other simpler venting systems after checking local codes.
Q: What happens if I don’t vent my kitchen island sink?
Without proper venting, your sink will likely experience slow draining, gurgling noises, and unpleasant odors. It can also lead to damage to your plumbing system.
Q: What if my local code doesn’t allow AAVs?
If AAVs are not permitted, you’ll need to explore other venting options, such as a loop vent, connecting to an existing vent stack, or installing an island vent.
Q: How often should I replace my AAV?
AAVs should be inspected periodically and replaced every few years, or as needed, depending on usage and environmental conditions.
Hi, I’m Scott Fischer, the voice behind SliceItRight. My passion for food started in my grandmother’s kitchen, where I learned the art of slicing, dicing, and creating delicious meals. Over the years, I’ve explored everything from the perfect kitchen gadgets to mastering culinary techniques, and I’m here to share all of it with you. Whether you’re a beginner or an experienced home chef, my goal is to make cooking easier, more enjoyable, and a lot more fun. So, let’s slice it right and cook up something amazing together!