Can you stain kitchen cabinets without sanding? Yes, you can! While sanding provides the best surface for stain adhesion, it’s a time-consuming and dusty process. Fortunately, there are effective methods for achieving beautiful, stained cabinets without the need for sanding. This guide will walk you through each step of the process, ensuring a professional-looking finish while saving you time and effort. Forget all the dust – here’s how to update cabinets without sanding.
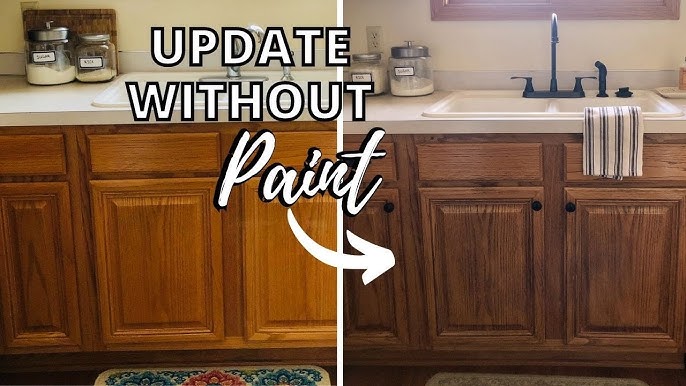
Image Source: i.ytimg.com
The Appeal of No Sand Cabinet Staining
Choosing to stain cabinets without sanding offers several advantages:
- Saves Time and Effort: Skipping the sanding step significantly reduces the project’s duration.
- Less Mess: Eliminates the hassle and cleanup associated with sanding dust.
- Preserves Detail: Avoids potentially damaging intricate details or delicate veneers.
- Beginner-Friendly: Simplifies the process, making it accessible to DIYers of all skill levels.
Preparing for No Sand Cabinet Staining
Proper preparation is key to successful no sand cabinet staining. This ensures the stain adheres properly and provides a long-lasting finish. This is crucial for a good no sanding cabinet makeover.
Step 1: Thorough Cleaning
The first step is to remove all hardware (knobs, pulls, hinges) from your cabinets.
- Degreasing: Use a strong degreaser to remove grease, grime, and food splatters. Kitchen cabinets accumulate a lot of buildup over time, and the stain will not adhere to a dirty surface. Some good options include:
- TSP (Trisodium Phosphate) – follow product instructions carefully and wear gloves and eye protection.
- Dish soap and warm water – a milder option for less greasy cabinets.
- Commercial degreasers designed for kitchen use.
- Scrubbing: Use a non-abrasive scrub pad or sponge to thoroughly clean every surface of the cabinets, including doors, drawers, and frames.
- Rinsing: Rinse all surfaces thoroughly with clean water to remove any degreaser residue.
- Drying: Allow the cabinets to dry completely before proceeding to the next step.
Step 2: Evaluating the Existing Finish
The type of existing finish will influence your approach to stain cabinets without sanding.
- Varnished or Painted Cabinets: These surfaces typically require a bonding primer or a liquid deglosser.
- Laminate Cabinets: Laminate surfaces require special primers designed for adhesion to non-porous materials.
- Previously Stained Cabinets: If the existing stain is in good condition, a thorough cleaning and a bonding primer may be sufficient. If not, you may need to consider a product designed to remove the existing finish chemically.
Step 3: Applying a Liquid Deglosser or Bonding Primer
This step is crucial for creating a surface that the new stain can adhere to. This is the heart of how to update cabinets without sanding.
- Liquid Deglosser: Liquid deglossers chemically etch the surface of the existing finish, creating a slightly rougher texture that promotes adhesion.
- Apply the deglosser according to the manufacturer’s instructions, typically using a clean cloth or sponge.
- Allow the deglosser to sit for the recommended time before wiping it off with a clean cloth.
- Bonding Primer: Bonding primers are specifically formulated to adhere to slick or glossy surfaces, providing a base for the new stain.
- Choose a high-quality bonding primer recommended for use on kitchen cabinets.
- Apply the primer in thin, even coats using a brush, roller, or sprayer.
- Allow the primer to dry completely according to the manufacturer’s instructions. Multiple coats may be necessary.
Here’s a table summarizing the surface preparation steps:
| Surface Type | Cleaning Method | Deglosser/Primer Recommendation |
|---|---|---|
| Varnished Cabinets | Degreaser, scrub, rinse, dry | Liquid Deglosser or Bonding Primer |
| Painted Cabinets | Degreaser, scrub, rinse, dry | Liquid Deglosser or Bonding Primer |
| Laminate Cabinets | Degreaser, scrub, rinse, dry | Laminate Primer |
| Previously Stained Cabinets | Degreaser, scrub, rinse, dry | Bonding Primer (if needed) |
Choosing the Right Stain for No Sand Cabinet Staining
Selecting the right stain is crucial for achieving the desired look and ensuring proper adhesion. Consider these factors:
Gel Stain vs. Other Stains
Gel stain is often the preferred choice for no sand cabinet staining because of its thicker consistency, which allows it to sit on top of the existing finish rather than soaking in. This helps to create a more even color and minimize the appearance of any imperfections. This is an essential fact to remember when considering cabinet refinishing no sanding.
- Gel Stain Advantages:
- Excellent adhesion to non-porous surfaces.
- Provides a uniform color.
- Minimizes blotchiness.
- Available in a wide range of colors.
- Other Stain Options:
- Consider oil-based or water-based stains if you’ve successfully applied a bonding primer that creates a porous surface. However, these may require more coats and careful application to avoid unevenness.
Color Selection
Choose a stain color that complements your kitchen decor and existing finishes.
- Consider the undertones: Warm tones (reds, oranges, yellows) create a cozy and inviting atmosphere, while cool tones (grays, blues, greens) offer a more modern and sophisticated look.
- Test the stain: Always test the stain on an inconspicuous area or a sample piece of wood to ensure you like the color and how it looks on your cabinets.
Staining Cabinets Without Sanding: The Application Process
With the preparation complete and the stain chosen, it’s time to apply the stain to your cabinets. This part is crucial to how to stain kitchen cabinets without sanding.
Step 1: Applying the Stain
- Gel Stain Application:
- Apply a small amount of gel stain to a clean cloth or foam brush.
- Work in small sections, applying the stain in thin, even coats.
- Wipe off the excess stain with a clean cloth, following the grain of the wood (if applicable).
- Allow the stain to dry completely according to the manufacturer’s instructions.
- Other Stain Application:
- Follow the manufacturer’s instructions for application. Usually applying with a brush, foam pad, or rag, working in the direction of the wood grain.
Step 2: Applying Additional Coats (If Necessary)
Depending on the desired color intensity and the type of stain used, you may need to apply multiple coats.
- Light Coats: Applying multiple light coats is better than applying one thick coat, as it helps to prevent drips, runs, and uneven color.
- Drying Time: Allow each coat to dry completely before applying the next.
- Lightly Buffing (Optional): After each coat, you can lightly buff the surface with a fine-grit sanding sponge (320-grit or higher) to smooth out any imperfections and improve adhesion for the next coat. Be very gentle, and avoid sanding through the stain.
Step 3: Applying a Topcoat
A topcoat protects the stained finish and adds durability.
- Types of Topcoats:
- Polyurethane: A durable and water-resistant option, available in oil-based and water-based formulas. Oil-based polyurethane tends to yellow over time.
- Acrylic: A water-based option that dries clear and is less likely to yellow.
- Lacquer: A fast-drying option that provides a smooth, durable finish. Requires proper ventilation and safety precautions.
- Application:
- Apply the topcoat in thin, even coats using a brush, roller, or sprayer.
- Allow each coat to dry completely before applying the next.
- Lightly sand between coats with fine-grit sandpaper (320-grit or higher) to smooth out any imperfections.
Here’s a table summarizing the staining and finishing process:
| Step | Material | Application Method | Drying Time | Notes |
|---|---|---|---|---|
| Stain Application | Gel Stain/Other Stain | Cloth/Brush/Pad | Per Manufacturer | Apply thin, even coats. Wipe off excess. |
| Additional Stain Coats (Optional) | Gel Stain/Other Stain | Cloth/Brush/Pad | Per Manufacturer | Allow each coat to dry completely. Lightly buff between coats (optional). |
| Topcoat Application | Polyurethane/Acrylic/Lacquer | Brush/Roller/Sprayer | Per Manufacturer | Apply thin, even coats. Lightly sand between coats (optional). |
Troubleshooting Common Issues
Even with careful preparation and application, you may encounter some common issues when staining cabinets without sanding.
- Uneven Color: This can be caused by uneven surface preparation or inconsistent stain application. Ensure the cabinets are thoroughly cleaned and primed, and apply the stain in thin, even coats.
- Blotchiness: This can occur when the existing finish is not properly sealed or if the stain penetrates unevenly. Using a gel stain can help minimize blotchiness.
- Peeling or Chipping: This is often due to poor adhesion. Ensure the cabinets are properly cleaned, primed, and that the stain and topcoat are compatible with the existing finish.
- Drips or Runs: This can occur if the stain or topcoat is applied too thickly. Apply thin, even coats and wipe off any excess.
Cabinet Staining Without Sanding Preparation: A Checklist
Before you begin, ensure you have everything you need.
- Cleaning Supplies: Degreaser, scrub pad, clean cloths, water.
- Surface Preparation: Liquid deglosser or bonding primer.
- Staining Supplies: Gel stain or other stain, applicator (cloth, brush, foam brush), gloves.
- Finishing Supplies: Topcoat (polyurethane, acrylic, lacquer), applicator (brush, roller, sprayer), fine-grit sandpaper.
- Safety Gear: Gloves, eye protection, respirator (if using lacquer).
- Other Tools: Screwdriver (for removing hardware), drop cloths, painter’s tape.
Maintaining Your Newly Stained Cabinets
Proper maintenance will help keep your newly stained cabinets looking their best for years to come.
- Regular Cleaning: Clean your cabinets regularly with a mild soap and water solution. Avoid harsh chemicals or abrasive cleaners.
- Touch-Ups: Repair any scratches or chips promptly to prevent further damage.
- Avoid Excessive Moisture: Wipe up any spills immediately to prevent water damage.
Paint Over Stained Cabinets Without Sanding
If you decide that stain isn’t for you, can you paint over stained cabinets without sanding? Absolutely! The preparation steps are very similar. Thorough cleaning is essential, followed by a bonding primer designed for slick surfaces. Then, apply your chosen paint in thin, even coats, just as you would with stain.
Fathoming Gel Stain Cabinets No Sanding: Is It the Best Option?
Gel stain is a popular choice for no-sand projects because of its excellent adhesion and ability to provide even color coverage. However, it’s not the only option. The best choice depends on the existing finish, desired look, and your personal preference. Experimentation on a small, inconspicuous area is always recommended.
Frequently Asked Questions (FAQ)
- How long does it take to stain cabinets without sanding? The total time will vary depending on the size of your kitchen, the number of coats applied, and the drying time of the products used. However, it typically takes 2-4 days to complete the project.
- What if my cabinets have a very glossy finish? For very glossy surfaces, a liquid deglosser is highly recommended before applying a bonding primer. This will help to ensure proper adhesion.
- Can I use a spray gun to apply the stain? Yes, you can use a spray gun to apply gel stain or other stains. However, you will need to thin the stain according to the manufacturer’s instructions and practice your technique to avoid drips and runs.
- How do I clean up gel stain? Clean up gel stain with mineral spirits or paint thinner.
- What is the best type of topcoat to use on stained cabinets? The best type of topcoat depends on your desired level of durability and the type of stain used. Polyurethane is a durable and water-resistant option, while acrylic is a water-based option that dries clear.
- Can I stain my laminate cabinets? Staining laminate cabinets requires careful preparation and the use of a specialized laminate primer.
- How can I make my stained cabinets look more modern? Consider using a dark stain color or adding new hardware with a sleek, modern design.
By following these steps and tips, you can achieve a beautiful, professional-looking stain finish on your kitchen cabinets without the hassle of sanding. Enjoy your updated kitchen!
Hi, I’m Scott Fischer, the voice behind SliceItRight. My passion for food started in my grandmother’s kitchen, where I learned the art of slicing, dicing, and creating delicious meals. Over the years, I’ve explored everything from the perfect kitchen gadgets to mastering culinary techniques, and I’m here to share all of it with you. Whether you’re a beginner or an experienced home chef, my goal is to make cooking easier, more enjoyable, and a lot more fun. So, let’s slice it right and cook up something amazing together!