What is the best way to replace the wood under your kitchen sink? The best way involves removing the damaged wood, treating any mold or mildew, building a replacement base from plywood, and sealing it to prevent future water damage. This guide provides a step-by-step approach for DIY sink cabinet repair.
Water damage under the kitchen sink is a common household problem. Leaks from the faucet, pipes, or even spilled cleaning products can lead to wood rot and unsightly, potentially structurally unsound conditions in the cabinet. Fortunately, replacing the wood under the kitchen sink is a manageable DIY project. This guide will walk you through the process of kitchen sink base repair, from assessing the damage to installing a new, protected base. This is a practical way to address under sink wood damage.
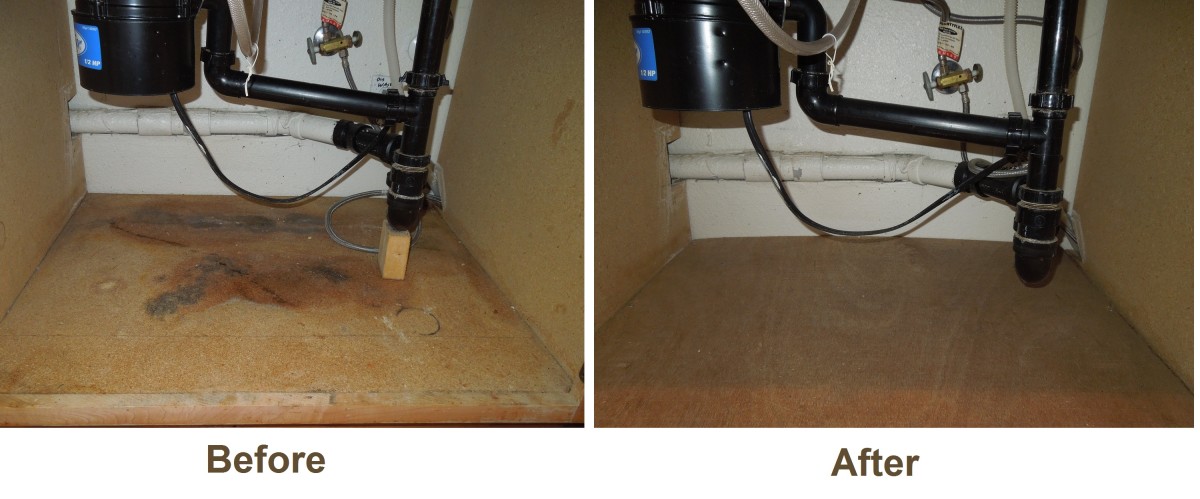
Image Source: images.saymedia-content.com
Assessing the Damage: Is Replacement Necessary?
Before you start tearing things apart, take a good look at the extent of the problem. The goal is to find out how much wood rot there is. Not all damage requires a full sink base replacement. Sometimes, a simple patch will do.
- Minor Surface Damage: If the damage is only on the surface and the wood is still solid underneath, you might be able to get away with sanding, treating, and sealing the area. This is where patching kitchen cabinet floor is useful.
- Moderate Damage: If the wood is soft or crumbly in spots, but the damage is limited to a small area, you can cut out the damaged section and replace it with new wood.
- Extensive Damage: If the damage is widespread, the wood is severely rotted, or the structural integrity of the cabinet is compromised, full sink base replacement is the best option. This is often the case with significant cabinet floor rot repair.
Identifying the Source of the Leak
Before you even think about repairing the wood, you must find and fix the source of the leak. Otherwise, you’re just setting yourself up for the same problem to happen all over again. Check these potential sources:
- Faucet: Look for drips around the base of the faucet and the handles.
- Supply Lines: Check the connections between the faucet and the water supply lines.
- Drain Pipes: Examine the P-trap, the drain tailpiece, and the connections to the garbage disposal (if you have one).
- Dishwasher: If you have a dishwasher nearby, check the connection where the drain line attaches to the sink drain.
Once you find the leak, repair it before moving on to the wood repair. Tighten loose connections, replace worn washers, or replace damaged pipes.
Tools and Materials You’ll Need
To get the job done right, gather all the necessary tools and materials beforehand. This will save you time and frustration.
Essential Tools
- Safety Glasses and Gloves: Protect yourself from dust, debris, and chemicals.
- Utility Knife or Oscillating Multi-Tool: For scoring and cutting through caulk and damaged wood.
- Pry Bar or Putty Knife: To gently remove the old base.
- Measuring Tape: To accurately measure the space for the new base.
- Pencil: For marking cut lines.
- Circular Saw or Jigsaw: For cutting the plywood.
- Drill/Driver: For installing screws.
- Screws: For attaching the new base (exterior grade recommended).
- Caulk Gun: For applying sealant.
- Sandpaper: For smoothing rough edges.
- Level: To ensure the new base is level.
- Shop Vacuum: For cleaning up dust and debris.
Essential Materials
- Plywood: Exterior-grade plywood (¾ inch thick is usually best) is ideal for replacing damaged cabinet bottom.
- Wood Preservative: To treat the surrounding wood and prevent future rot.
- Mold and Mildew Cleaner: To kill any existing mold.
- Construction Adhesive: For added strength.
- Silicone Caulk: To seal the edges and prevent water from seeping in.
- Paint or Sealer: To protect the new wood.
| Tool/Material | Purpose |
|---|---|
| Safety Glasses/Gloves | Personal protection |
| Utility Knife | Cutting caulk and removing damaged material |
| Pry Bar | Removing the old base |
| Measuring Tape | Accurate measurements |
| Circular Saw/Jigsaw | Cutting the new plywood |
| Drill/Driver | Installing screws |
| Plywood | The material for the new base |
| Wood Preservative | Preventing future rot |
| Silicone Caulk | Sealing edges against water intrusion |
Step-by-Step Guide: Replacing the Wood Under the Sink
Now that you know what you’re dealing with and have all the necessary tools and materials, let’s get to work.
Step 1: Empty and Prepare the Cabinet
Remove everything from under the sink. This includes cleaning supplies, dish soap, garbage disposal (if applicable), and anything else stored in the cabinet. Disconnect the plumbing. Turn off the water supply to the sink. Disconnect the faucet supply lines and the drain lines. Place a bucket under the pipes to catch any residual water. If you have a garbage disposal, disconnect it from the sink drain and electrical supply (after turning off the breaker).
Step 2: Remove the Old Base
Use a utility knife or oscillating multi-tool to score along the edges of the old base where it meets the cabinet walls. This will help to prevent damage to the surrounding cabinet. Gently pry up the old base using a pry bar or putty knife. Work slowly and carefully to avoid splintering the wood. If the base is glued down, you may need to use more force or heat the adhesive with a heat gun.
Step 3: Clean and Treat the Area
Once the old base is removed, thoroughly clean the area. Use a shop vacuum to remove all dust, debris, and loose particles. Inspect the surrounding cabinet walls for any signs of mold or mildew. If you find any, clean it with a mold and mildew cleaner. Apply a wood preservative to the surrounding wood to help prevent future rot. Let the preservative dry completely before moving on.
Step 4: Measure and Cut the New Base
Carefully measure the inside dimensions of the cabinet where the new base will sit. Transfer these measurements to your sheet of plywood. Use a circular saw or jigsaw to cut the plywood to the correct size and shape. Test-fit the new base to make sure it fits snugly. You may need to trim it slightly for a perfect fit.
Step 5: Install the New Base
Apply a bead of construction adhesive to the bottom edges of the cabinet walls. Carefully place the new base into the cabinet, pressing it firmly against the adhesive. Use screws to secure the base to the cabinet walls. Drive the screws in at an angle for added strength. Make sure the screws are long enough to penetrate the cabinet walls but not so long that they poke through the other side. Use a level to ensure the new base is level. Shim if necessary.
Step 6: Seal the Edges
Apply a bead of silicone caulk along all the edges of the new base where it meets the cabinet walls. This will help to prevent water from seeping in and causing future damage. Smooth the caulk with your finger or a caulk smoothing tool for a neat finish.
Step 7: Paint or Seal the New Base
To further protect the new base from water damage, paint or seal it with a water-resistant paint or sealant. Apply two or three coats, allowing each coat to dry completely before applying the next.
Step 8: Reinstall Plumbing and Replace Items
Once the paint or sealant is dry, reinstall the plumbing. Reconnect the faucet supply lines and drain lines. If you removed a garbage disposal, reinstall it now. Turn the water supply back on and check for leaks. Replace all the items you removed from under the sink.
Dealing with Difficult Situations
Sometimes, replacing the wood under the sink can present some challenges. Here are a few tips for handling difficult situations.
- Uneven Cabinet Floor: If the cabinet floor is uneven, use shims to level the new base before securing it with screws.
- Difficult-to-Reach Areas: Use an oscillating multi-tool with a detail sanding attachment to sand hard-to-reach areas.
- Stubborn Adhesive: Use a heat gun to soften stubborn adhesive before trying to pry up the old base.
- Damaged Cabinet Walls: If the cabinet walls are also damaged, you may need to reinforce them with additional plywood or replace them altogether.
- Mold Infestation: If you find a significant mold infestation, consider hiring a professional mold remediation service.
Preventing Future Water Damage
Once you’ve replaced the wood under your sink, take steps to prevent future water damage.
- Regularly Check for Leaks: Inspect the faucet, supply lines, and drain lines regularly for any signs of leaks.
- Use a Sink Mat: Place a waterproof sink mat under the sink to protect the cabinet from spills and drips.
- Wipe Up Spills Immediately: Clean up any spills or drips immediately to prevent them from soaking into the wood.
- Consider a Leak Detector: Install a water leak detector under the sink to alert you to any leaks before they cause significant damage.
- Proper Ventilation: Ensure adequate ventilation under the sink to help prevent moisture buildup.
Cost Considerations for Sink Base Replacement
The cost of replacing the wood under the kitchen sink can vary depending on the extent of the damage, the materials you choose, and whether you hire a professional or do it yourself.
- DIY: If you do it yourself, the cost will primarily be for materials. Plywood typically costs $30-$60 per sheet, and other materials like sealant, screws, and wood preservative might add another $20-$50. So, a DIY project could cost between $50 and $110.
- Professional: Hiring a professional can cost significantly more. Labor costs can range from $100 to $500 or more, depending on the complexity of the job and your location. Including materials, a professional sink base replacement could cost between $150 and $600+.
Alternative Solutions: Repairing vs. Replacing
Sometimes, instead of replacing the entire base, you can repair the existing one. Repairing rotted plywood cabinet is possible in certain cases. Here are a couple of alternative solutions:
Patching the Damaged Area
If the damage is localized, you can cut out the rotted section and replace it with a new piece of wood.
- Cut out the Damaged Area: Use a utility knife or oscillating multi-tool to cut out the rotted section of the base.
- Create a Patch: Cut a piece of plywood to fit the opening.
- Attach the Patch: Apply construction adhesive to the edges of the opening and the back of the patch. Place the patch into the opening and secure it with screws.
- Sand and Finish: Sand the patch smooth and apply paint or sealer to match the existing finish.
Reinforcing the Existing Base
If the base is weakened but not completely rotted, you can reinforce it with additional plywood.
- Clean the Area: Clean the area thoroughly and remove any loose particles.
- Cut Reinforcement Pieces: Cut pieces of plywood to fit the underside of the base.
- Attach Reinforcements: Apply construction adhesive to the underside of the base and attach the reinforcement pieces. Secure them with screws.
- Seal the Edges: Seal the edges with silicone caulk to prevent water from seeping in.
Safety Precautions
When working with tools and materials, always take safety precautions.
- Wear Safety Glasses and Gloves: Protect your eyes and hands from dust, debris, and chemicals.
- Use Proper Ventilation: Work in a well-ventilated area to avoid inhaling dust and fumes.
- Follow Manufacturer’s Instructions: Read and follow the manufacturer’s instructions for all tools and materials.
- Disconnect Power: Disconnect the power to the garbage disposal before working on it.
- Turn Off Water: Turn off the water supply to the sink before disconnecting any plumbing.
Fathoming the Legal and Ethical Considerations
Always adhere to local building codes and regulations when making repairs or alterations to your home.
- Building Permits: Depending on the extent of the work, you may need a building permit. Check with your local building department to find out if a permit is required.
- Disposal of Materials: Dispose of old wood and materials properly. Check with your local waste management company for guidelines on disposal.
- Environmental Considerations: Be mindful of the environment when using chemicals and disposing of materials. Use eco-friendly products whenever possible.
Frequently Asked Questions (FAQ)
- What type of wood should I use to replace the base? Exterior-grade plywood is the best choice because it is more resistant to moisture than other types of wood.
- Can I use pressure-treated wood? While pressure-treated wood is highly resistant to rot, it is not recommended for indoor use due to the chemicals used in the treatment process.
- How long does it take to replace the wood under the sink? The project can typically be completed in a day, but it may take longer depending on the extent of the damage and your skill level.
- How do I prevent mold from growing under the sink? Ensure proper ventilation, wipe up spills immediately, and use a mold and mildew cleaner regularly.
- What if the cabinet walls are also damaged? If the cabinet walls are damaged, you may need to reinforce them with additional plywood or replace them altogether.
- Can I just cover up the damaged wood? Covering up the damaged wood is not recommended because it will not address the underlying problem and the rot will continue to spread.
- How do I know if I need to call a professional? If the damage is extensive, you are uncomfortable working with tools, or you are unsure how to proceed, it is best to call a professional. This ensures proper handling for how to fix water damaged cabinet.
- What is the best wood rot under sink solution? The best wood rot under sink solution is to remove the damaged wood, treat any mold or mildew, replace the wood with exterior-grade plywood, and seal it properly.
- Is DIY sink cabinet repair hard? While it requires some basic carpentry skills, DIY sink cabinet repair is manageable for most homeowners with the right tools and guidance.
- What causes wood to rot under the sink? Wood rot is typically caused by water damage from leaks, spills, or condensation.
Hi, I’m Scott Fischer, the voice behind SliceItRight. My passion for food started in my grandmother’s kitchen, where I learned the art of slicing, dicing, and creating delicious meals. Over the years, I’ve explored everything from the perfect kitchen gadgets to mastering culinary techniques, and I’m here to share all of it with you. Whether you’re a beginner or an experienced home chef, my goal is to make cooking easier, more enjoyable, and a lot more fun. So, let’s slice it right and cook up something amazing together!