Can you paint oak kitchen cabinets? Yes, you absolutely can! Painting oak cabinets is a fantastic way to breathe new life into your kitchen without the expense of a full remodel. This guide will provide a comprehensive overview of the cabinet painting process, covering everything from preparing oak cabinets for paint to selecting the best paint for oak cabinets and techniques for oak grain filling. You’ll learn how to update oak cabinets and achieve a durable, professional-looking finish with these DIY cabinet painting tips.
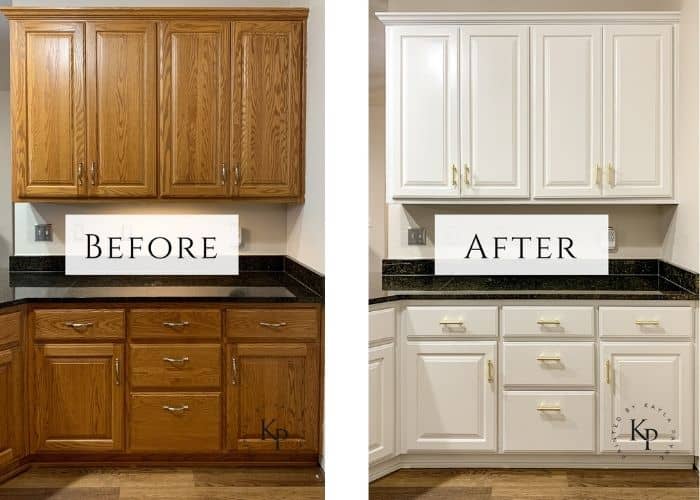
Image Source: www.paintedbykaylapayne.com
Why Paint Oak Kitchen Cabinets?
Oak cabinets, particularly those from the 80s and 90s, are often characterized by a strong wood grain and a dated golden or honey-toned finish. While solid oak is a durable material, the style may no longer fit your aesthetic. Painting oak cabinets offers several benefits:
- Modernizes Your Kitchen: Instantly transform the look of your kitchen with a fresh, updated color.
- Cost-Effective Renovation: Avoid the high costs of replacing cabinets by simply painting them.
- Increases Home Value: A well-done cabinet painting job can significantly increase the value of your home.
- Personalized Style: Choose a color that perfectly complements your kitchen’s décor and reflects your personal taste.
The Cabinet Painting Process: Step-by-Step
1. Gather Your Supplies
Having the right tools and materials is crucial for successful painting oak cabinets. Here’s a comprehensive list:
- Cleaning Supplies:
- Degreaser (e.g., TSP or a commercial kitchen cleaner)
- Clean cloths or rags
- Sponge
- Sanding Supplies:
- Sandpaper (120-grit, 220-grit)
- Sanding block or orbital sander
- Tack cloth
- Priming and Painting Supplies:
- Primer (oil-based or stain-blocking)
- Paint (cabinet-grade enamel or acrylic)
- Paintbrushes (high-quality, angled)
- Paint rollers (foam or microfiber)
- Paint tray
- Painter’s tape
- Oak Grain Filling (Optional):
- Wood filler or grain filler
- Putty knife
- Safety Gear:
- Safety glasses
- Dust mask or respirator
- Gloves
- Other Essentials:
- Screwdriver or drill for removing hardware
- Drop cloths or plastic sheeting
- Labeling tape
2. Preparing Oak Cabinets for Paint
Proper preparation is the foundation of a flawless finish when painting oak cabinets. Skipping steps can lead to poor adhesion, uneven coverage, and visible wood grain.
Removing Hardware
Remove all knobs, pulls, hinges, and other hardware from the cabinet doors and frames. Store the hardware in labeled bags to keep track of everything. If you plan to replace the hardware, now is the perfect time to select new pieces.
Cleaning the Cabinets
Kitchen cabinets accumulate grease, grime, and food splatters over time. Thorough cleaning is essential to ensure that the primer and paint adhere properly.
- Apply a degreasing cleaner, like TSP (trisodium phosphate) or a commercial kitchen cleaner, to the cabinet surfaces.
- Scrub the cabinets with a sponge or cloth to remove all dirt and grime.
- Rinse the cabinets thoroughly with clean water to remove any residue from the cleaner.
- Allow the cabinets to dry completely before proceeding.
Sanding the Surfaces
Sanding creates a slightly rough surface that allows the primer and paint to grip the cabinets effectively. It also helps to smooth out any imperfections.
- Use 120-grit sandpaper to lightly sand all surfaces of the cabinet doors and frames. Focus on removing any glossy finish.
- Switch to 220-grit sandpaper to smooth out any rough spots and create a more even surface.
- Wipe down the cabinets with a tack cloth to remove all sanding dust.
Deglossing Option
If you prefer to avoid heavy sanding, consider using a deglosser. Deglossers are chemical solutions that dull the existing finish, creating a better surface for paint adhesion. Follow the manufacturer’s instructions carefully when using a deglosser.
3. Addressing the Oak Grain (Oak Grain Filling)
One of the biggest challenges when painting oak cabinets is the prominent wood grain. If you prefer a smooth, modern look, you’ll need to address the grain before painting. This process is called oak grain filling.
Methods for Oak Grain Filling
There are two main methods for filling the oak grain: using wood filler or grain filler.
- Wood Filler: Wood filler is a thicker substance that is ideal for filling deeper imperfections and larger areas.
- Grain Filler: Grain filler is a thinner, more spreadable product specifically designed to fill wood pores.
Applying Grain Filler
- Apply a thin layer of wood filler or grain filler to the cabinet surfaces using a putty knife.
- Work the filler into the grain, ensuring that all the pores are filled.
- Remove any excess filler with the putty knife.
- Allow the filler to dry completely according to the manufacturer’s instructions. This may take several hours or overnight.
- Sand the filled surfaces smooth with 220-grit sandpaper.
- Wipe down the cabinets with a tack cloth to remove all sanding dust.
- Repeat the process if necessary to achieve a completely smooth surface.
4. Priming the Cabinets
Priming is a critical step in the painting process. It creates a uniform surface, seals the wood, and provides a good base for the paint to adhere to. Use an oil-based or stain-blocking primer for oak cabinets. These primers are effective at preventing tannins from the wood from bleeding through the paint.
Applying Primer
- Stir the primer thoroughly before use.
- Apply a thin, even coat of primer to the cabinet surfaces using a high-quality paintbrush or foam roller.
- Pay attention to corners, edges, and recessed areas.
- Allow the primer to dry completely according to the manufacturer’s instructions.
- Lightly sand the primed surfaces with 220-grit sandpaper to smooth out any imperfections.
- Wipe down the cabinets with a tack cloth to remove all sanding dust.
- Apply a second coat of primer if necessary, especially if the wood grain is still visible.
5. Painting the Cabinets
Now comes the exciting part: painting! Choosing the best paint for oak cabinets and applying it correctly will make a huge difference in the final result.
Selecting the Right Paint
The best paint for oak cabinets is a cabinet-grade enamel or acrylic paint. These paints are durable, washable, and provide a smooth, professional-looking finish.
- Cabinet-Grade Enamel: Enamel paints are oil-based or water-based and offer excellent durability and a hard, glossy finish.
- Acrylic Paint: Acrylic paints are water-based, easy to clean, and have low VOCs (volatile organic compounds).
Applying Paint
- Stir the paint thoroughly before use.
- Apply a thin, even coat of paint to the cabinet surfaces using a high-quality paintbrush or foam roller.
- Work in the direction of the wood grain (if visible) to minimize brushstrokes.
- Allow the paint to dry completely according to the manufacturer’s instructions.
- Lightly sand the painted surfaces with 320-grit sandpaper to smooth out any imperfections.
- Wipe down the cabinets with a tack cloth to remove all sanding dust.
- Apply a second coat of paint for full coverage and a durable finish.
- Allow the second coat of paint to dry completely.
6. Reassembling the Cabinets
Once the paint is fully dry, it’s time to reassemble the cabinets.
- Carefully reattach the hardware to the cabinet doors and frames.
- Rehang the cabinet doors on the frames.
- Adjust the hinges if necessary to ensure that the doors align properly.
Cabinet Painting Tips for Success
- Work in a Well-Ventilated Area: Ensure adequate ventilation when working with primers, paints, and deglossers.
- Use Painter’s Tape: Protect surrounding surfaces and create clean lines by using painter’s tape.
- Apply Thin Coats: Avoid applying thick coats of primer and paint, which can lead to drips and uneven coverage.
- Clean Your Brushes and Rollers: Clean your brushes and rollers immediately after use to prolong their life.
- Be Patient: Allow each coat of primer and paint to dry completely before proceeding to the next step.
- Consider Spray Painting: For an ultra-smooth finish, consider using a paint sprayer. This requires more preparation and practice, but the results can be stunning.
Choosing the Right Color for Your Cabinets
The color you choose for your cabinets will have a significant impact on the overall look of your kitchen. Here are some popular options:
- White: A classic choice that brightens up the kitchen and creates a clean, timeless look. Painting kitchen cabinets white is a very common choice.
- Gray: A versatile color that complements a variety of kitchen styles.
- Navy Blue: A bold choice that adds a touch of sophistication and elegance.
- Light Green: A fresh, natural color that creates a calming and inviting atmosphere.
- Two-Tone: Consider painting the upper and lower cabinets different colors for a more dynamic look.
Alternatives to Painting Oak Cabinets
While painting is a popular option for updating oak cabinets, there are other alternatives to consider:
- Refacing: Replace the cabinet doors and drawer fronts while keeping the existing cabinet boxes.
- Staining: Apply a new stain to the cabinets to change their color while still showcasing the wood grain.
- Glazing: Add a glaze over the existing finish to highlight the details and add depth.
Estimated Costs of Painting Oak Cabinets
The cost of painting oak cabinets can vary depending on several factors, including the size of your kitchen, the type of paint you use, and whether you hire a professional or do it yourself.
| Task | DIY Cost | Professional Cost |
|---|---|---|
| Materials (Paint, etc.) | \$100 – \$300 | Included |
| Labor | \$0 | \$500 – \$2000+ |
| Total | \$100 – \$300 | \$500 – \$2000+ |
Maintaining Your Painted Cabinets
To keep your painted oak cabinets looking their best, follow these maintenance tips:
- Clean Regularly: Wipe down the cabinets with a damp cloth and mild detergent to remove dirt and grime.
- Avoid Harsh Cleaners: Do not use abrasive cleaners or scouring pads, which can damage the painted finish.
- Touch Up As Needed: Touch up any chips or scratches with paint to prevent further damage.
- Protect from Moisture: Wipe up spills immediately to prevent water damage.
Frequently Asked Questions (FAQ)
- What is the best way to clean oak cabinets before painting?
- The best way is to use a degreaser like TSP (trisodium phosphate) or a commercial kitchen cleaner to remove grease and grime. Rinse thoroughly and let dry.
- Can I paint oak cabinets without sanding?
- It’s not recommended. Sanding creates a surface the primer can grip. At minimum, use a deglosser if you want to avoid sanding.
- Who can I hire to paint my kitchen cabinets?
- You can hire professional painters who specialize in cabinet refinishing, or general contractors with experience in painting kitchen cabinets.
- What is the drying time for primer and paint on oak cabinets?
- Drying times vary depending on the product and environmental conditions. Generally, allow at least 24 hours for primer and paint to dry completely before sanding or applying another coat.
- How do I prevent brushstrokes when painting oak cabinets?
- Use a high-quality brush, apply thin coats, and work in the direction of the grain. You can also “tip off” the paint by lightly dragging the brush across the surface after applying the paint.
- Is it better to spray or brush paint oak cabinets?
- Spraying generally provides a smoother, more even finish. However, brushing is a viable option if you don’t have access to a sprayer.
- How can I update oak cabinets on a budget?
- Painting is the most cost-effective way to update oak cabinets. You can further save money by doing the work yourself and choosing affordable paint and supplies. Simply changing the hardware can also make a big difference.
- Can I paint over stained oak cabinets without priming?
- No, priming is essential. It provides adhesion and prevents the stain from bleeding through the paint.
- What type of roller is best for painting cabinets?
- A foam or microfiber roller is best for achieving a smooth finish on cabinets.
- How many coats of paint do oak cabinets need?
- Typically, two coats of paint are sufficient for full coverage and a durable finish.
Painting oak cabinets is a rewarding DIY project that can transform your kitchen. By following these steps and tips, you can achieve a flawless finish that you’ll be proud of for years to come. Good luck!
Hi, I’m Scott Fischer, the voice behind SliceItRight. My passion for food started in my grandmother’s kitchen, where I learned the art of slicing, dicing, and creating delicious meals. Over the years, I’ve explored everything from the perfect kitchen gadgets to mastering culinary techniques, and I’m here to share all of it with you. Whether you’re a beginner or an experienced home chef, my goal is to make cooking easier, more enjoyable, and a lot more fun. So, let’s slice it right and cook up something amazing together!