Can you paint kitchen cabinets that are laminate? Yes, you absolutely can paint laminate kitchen cabinets! It’s a cost-effective way to update your kitchen without replacing the entire cabinetry. However, success lies in proper preparation and using the right techniques. This guide provides a detailed, step-by-step approach to painting laminate kitchen cabinets, ensuring a durable and beautiful finish.
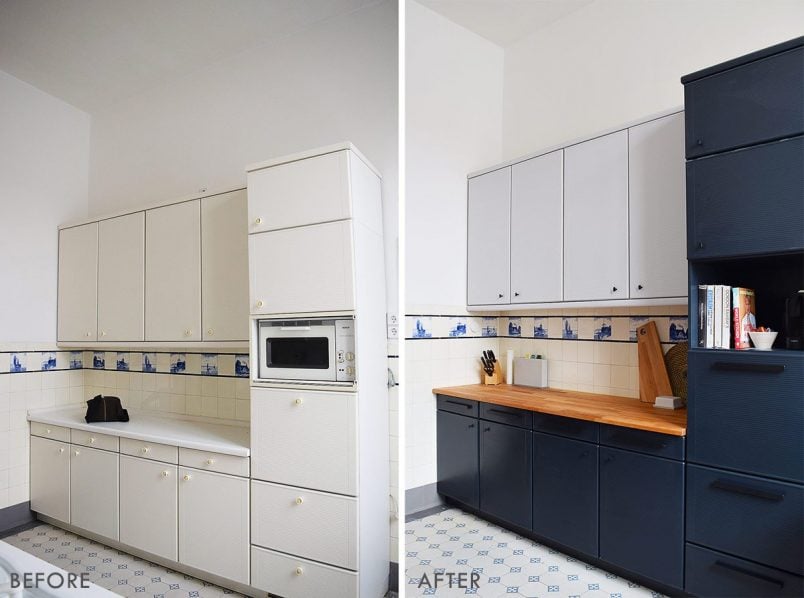
Image Source: www.littlehouseonthecorner.com
Why Paint Laminate Cabinets?
Painting laminate kitchen cabinets offers several advantages:
- Saves Money: It’s significantly cheaper than replacing cabinets.
- Updates the Look: A fresh coat of paint can dramatically transform your kitchen’s style.
- Increases Home Value: A well-done paint job improves the overall appearance and appeal of your home.
- DIY Project: You can tackle this project yourself, saving on labor costs.
Gathering Your Supplies
Before you begin, gather all the necessary materials. This will make the process smoother and more efficient.
Essential Materials
- Cleaning Supplies:
- Degreaser (e.g., TSP)
- Clean cloths or rags
- Buckets
- Preparation Tools:
- Screwdriver (for removing hardware)
- Painter’s tape
- Drop cloths or plastic sheeting
- Sandpaper (120-grit and 220-grit)
- Sanding block or orbital sander (optional)
- Wood filler (for filling holes or imperfections)
- Putty knife
- Painting Supplies:
- Primer (specifically for laminate)
- Paint (specifically for cabinets, see section below)
- Paintbrushes (high-quality, angled brush for trim)
- Paint rollers (foam or microfiber)
- Paint tray
- Stir sticks
- Respirator or mask
- Safety glasses
- Optional but Recommended:
- Spray gun (for a smoother finish)
- Tack cloth
Selecting the Best Paint
Choosing the right paint is crucial for a long-lasting finish. The best paint for laminate cabinets is one that provides excellent adhesion and durability.
- Acrylic Latex Paint: A popular choice due to its durability, ease of application, and low VOC (volatile organic compounds) content.
- Alkyd Paint: Offers a harder, more durable finish than latex but has higher VOCs and requires more careful application.
- Cabinet-Specific Paints: Many manufacturers offer paints specifically designed for kitchen cabinets, providing excellent adhesion and a smooth finish. These are often acrylic or alkyd-based.
When selecting your paint, opt for a satin or semi-gloss finish. These finishes are easier to clean and more resistant to stains, essential for kitchen cabinets.
Primer: The Key to Adhesion
Priming laminate cabinets for paint is non-negotiable. Laminate is a non-porous surface, meaning paint won’t adhere well without a primer. Choose a high-quality bonding primer specifically designed for slick surfaces like laminate or melamine. These primers contain additives that help the paint grip the surface.
Step-by-Step Guide to Painting Laminate Kitchen Cabinets
Follow these steps carefully to achieve professional-looking results.
Step 1: Preparation is Paramount
How to prep laminate cabinets for painting correctly is the most critical step. Poor preparation leads to peeling and an unsatisfactory finish.
- Remove Hardware: Take off all knobs, pulls, hinges, and other hardware. Store them in a safe place. Label each cabinet door and drawer so you can easily reattach the hardware later.
- Clean Thoroughly: Use a degreaser like TSP (trisodium phosphate) to clean all cabinet surfaces. This removes grease, grime, and dirt, ensuring proper paint adhesion. Rinse with clean water and let dry completely.
- Protect Your Workspace: Cover countertops, floors, and appliances with drop cloths or plastic sheeting to protect them from paint splatters.
- Tape Off Areas: Use painter’s tape to mask off areas you don’t want to paint, such as walls, backsplashes, and the inside edges of cabinets.
Step 2: Sanding for Adhesion
While laminate is not very porous, light sanding is crucial for laminate cabinet paint adhesion.
- Lightly Sand: Use 120-grit sandpaper to lightly scuff the surface of the laminate. This creates a slightly rough texture that the primer can grip onto. Focus on creating an even, matte surface.
- Smooth with Finer Grit: Follow with 220-grit sandpaper to smooth out any rough spots created by the 120-grit paper.
- Clean Again: Wipe away all sanding dust with a tack cloth or a damp cloth. Dust particles can interfere with the primer and paint adhesion.
Step 3: Filling Imperfections
- Apply Wood Filler: If your cabinets have any holes, dents, or imperfections, fill them with wood filler.
- Let Dry and Sand: Allow the wood filler to dry completely according to the manufacturer’s instructions. Then, sand it smooth with 220-grit sandpaper.
- Clean Again: Remove any residual dust.
Step 4: Priming for Success
Priming laminate cabinets for paint is essential for a durable finish.
- Apply Primer: Using a high-quality brush or roller, apply a thin, even coat of bonding primer to all cabinet surfaces. For a smoother finish, consider using a spray gun.
- Dry Completely: Allow the primer to dry completely according to the manufacturer’s instructions. This is crucial for proper adhesion.
- Lightly Sand (Optional): If the primer feels rough after drying, lightly sand it with 220-grit sandpaper to create a smooth surface.
- Clean Again: Remove any sanding dust.
- Second Coat (Optional): For best results, apply a second coat of primer, especially if the laminate is dark. Allow to dry completely and sand lightly if needed.
Step 5: Painting Like a Pro
- Apply the First Coat: Using a high-quality brush or roller, apply a thin, even coat of your chosen paint to the cabinets. Work in long, smooth strokes, avoiding drips and runs.
- Dry Completely: Allow the paint to dry completely according to the manufacturer’s instructions. Drying times can vary depending on the type of paint and humidity levels.
- Lightly Sand (Optional): After the first coat is dry, lightly sand any imperfections with 320-grit sandpaper. This helps create a smooth surface for the second coat.
- Clean Again: Remove any sanding dust.
- Apply the Second Coat: Apply a second thin, even coat of paint. This coat provides better coverage and durability.
- Dry Completely: Allow the paint to dry completely, ideally for 24-48 hours, before handling the cabinets.
Step 6: Reassembly and Finishing Touches
- Remove Painter’s Tape: Carefully remove the painter’s tape, pulling it away at a 45-degree angle to avoid chipping the paint.
- Reattach Hardware: Reinstall the knobs, pulls, hinges, and other hardware you removed earlier.
- Inspect and Touch Up: Inspect the cabinets for any missed spots or imperfections. Touch up any areas as needed.
- Clean Up: Clean up your workspace and dispose of any painting supplies properly.
Laminate Cabinet Painting Tips
- Work in a Well-Ventilated Area: Ensure adequate ventilation when painting to avoid inhaling harmful fumes.
- Thin Coats are Key: Applying thin, even coats of primer and paint is better than applying thick coats, which can lead to drips and runs.
- Invest in Quality Tools: High-quality brushes and rollers will provide a smoother finish and last longer.
- Patience is a Virtue: Allow each coat of primer and paint to dry completely before proceeding to the next step. Rushing the process can lead to peeling and an uneven finish.
- Consider a Topcoat: For added durability, especially in high-traffic areas, consider applying a clear topcoat after the paint has dried completely.
Addressing Common Issues
- Peeling Paint: This usually occurs due to inadequate preparation or using the wrong type of primer. Ensure you clean the cabinets thoroughly, sand them lightly, and use a bonding primer specifically designed for laminate.
- Uneven Finish: This can be caused by applying too much paint or using poor-quality tools. Use thin, even coats and invest in high-quality brushes and rollers.
- Drips and Runs: Avoid applying too much paint at once. Work in long, smooth strokes and check for drips frequently.
- Bubbling: This can occur if the paint is applied to a surface that is not completely dry. Allow each coat of primer and paint to dry completely before proceeding to the next step.
Ensuring Durability: Preventing Peeling
Painting laminate cabinets without peeling requires careful attention to detail. Here’s a breakdown of factors that impact longevity:
- Surface Preparation: Thorough cleaning and sanding are crucial for proper adhesion.
- Primer Selection: Using a high-quality bonding primer designed for slick surfaces is essential.
- Paint Choice: Choose a durable paint for laminate cabinets specifically formulated for kitchen cabinets.
- Application Technique: Apply thin, even coats of primer and paint.
- Drying Time: Allow each coat to dry completely before proceeding to the next step.
- Topcoat (Optional): A clear topcoat can provide added protection against scratches and stains.
Table: Troubleshooting Paint Adhesion Problems
| Problem | Possible Cause | Solution |
|---|---|---|
| Paint Peeling | Poor surface preparation, incorrect primer | Thoroughly clean and sand the surface. Use a high-quality bonding primer specifically designed for laminate. |
| Paint Not Adhering | Oily or dirty surface, incorrect primer | Clean the surface with a degreaser like TSP. Rinse and dry thoroughly. Use a bonding primer. |
| Blistering or Bubbling | Applying paint to a wet surface | Ensure each coat of primer and paint is completely dry before applying the next. |
| Scratches Easily | Using the wrong type of paint | Choose a durable paint specifically formulated for kitchen cabinets. Consider applying a clear topcoat for added protection. |
| Uneven Color or Coverage | Inadequate number of coats, uneven application | Apply at least two coats of paint, using thin, even strokes. Ensure the primer is fully covering the surface before painting. |
DIY Laminate Cabinet Painting Cost Considerations
DIY laminate cabinet painting is budget-friendly. Cost varies based on kitchen size and material choices.
Here’s a general cost breakdown:
| Item | Estimated Cost |
|---|---|
| Cleaning Supplies | \$10 – \$20 |
| Sandpaper | \$5 – \$10 |
| Wood Filler | \$5 – \$15 |
| Primer | \$20 – \$40 |
| Paint | \$30 – \$70 (per gallon) |
| Brushes/Rollers | \$15 – \$30 |
| Tape/Drop Cloths | \$10 – \$20 |
| Total | \$95 – \$205 |
These are estimates; prices can vary based on brand and location. Obtaining multiple estimates for materials can help you find the best possible deal.
Frequently Asked Questions (FAQ)
-
How long does it take to paint laminate kitchen cabinets?
The duration depends on the size of your kitchen and your pace. It typically takes 3-5 days, allowing for proper drying time between coats.
* Do I need to sand laminate cabinets before painting?Yes, light sanding is essential to create a textured surface for the primer to adhere to.
* Can I use regular paint on laminate cabinets?No, regular paint will not adhere well to laminate. You need to use a bonding primer and a paint specifically designed for cabinets.
* What if the laminate is peeling already?Carefully remove any loose or peeling laminate before cleaning and sanding. Fill any gaps with wood filler and sand smooth before priming.
* How do I clean painted laminate cabinets?Use a mild soap and water solution and a soft cloth. Avoid abrasive cleaners, which can damage the paint.
* What color should I paint my laminate cabinets?This is a matter of personal preference. Consider the overall style of your kitchen and the colors of your countertops and backsplash. White and gray are popular choices for a clean, modern look.
* Can I spray paint laminate cabinets?Yes, spray painting can provide a smoother finish than brushing or rolling. However, you’ll need to use a spray gun and take precautions to protect your surrounding areas from overspray.
By following these steps and tips, you can successfully paint your laminate kitchen cabinets and transform your kitchen into a beautiful and inviting space.
Hi, I’m Scott Fischer, the voice behind SliceItRight. My passion for food started in my grandmother’s kitchen, where I learned the art of slicing, dicing, and creating delicious meals. Over the years, I’ve explored everything from the perfect kitchen gadgets to mastering culinary techniques, and I’m here to share all of it with you. Whether you’re a beginner or an experienced home chef, my goal is to make cooking easier, more enjoyable, and a lot more fun. So, let’s slice it right and cook up something amazing together!