Can you paint kitchen cabinets that are already painted? Yes, you absolutely can! In fact, repainting kitchen cabinets is a popular and cost-effective way to refresh your kitchen without a full renovation. This guide will walk you through the process of painting over painted cabinets like a professional, covering everything from preparing painted cabinets for paint to selecting the best paint for kitchen cabinets and mastering kitchen cabinet painting tips. Prepare for a painted kitchen cabinet makeover that will breathe new life into your space with this DIY kitchen cabinet painting tutorial.
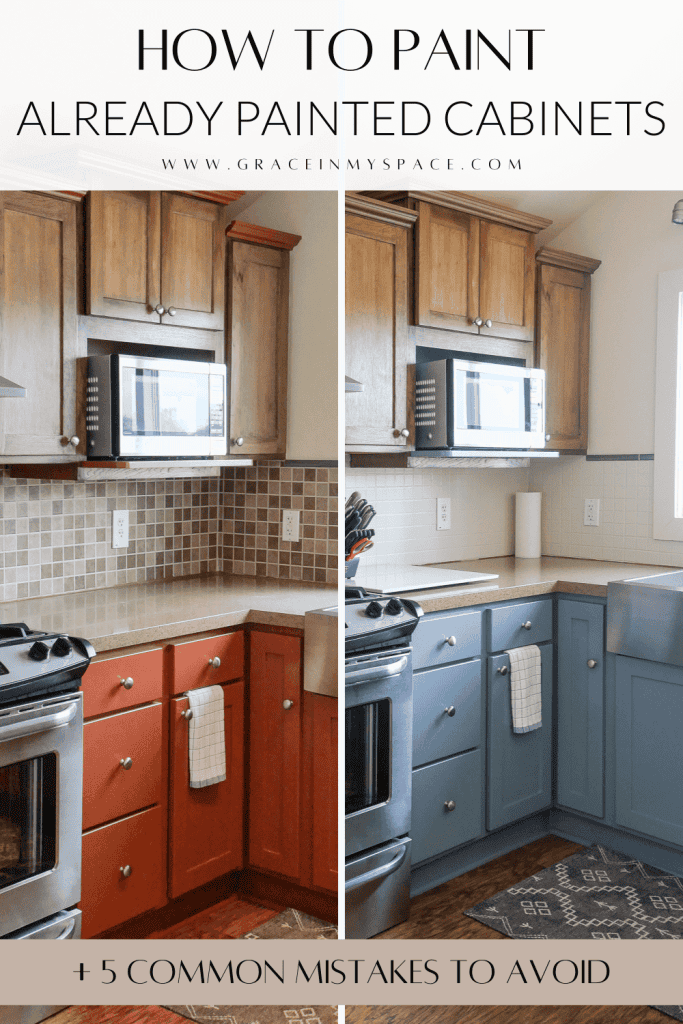
Image Source: graceinmyspace.com
Why Repaint Your Kitchen Cabinets?
Before diving into the how-to, let’s consider why you might want to repaint kitchen cabinets in the first place:
- Cost Savings: It’s significantly cheaper than replacing cabinets.
- Aesthetic Upgrade: Change the color to match your current style.
- Increased Home Value: A fresh, updated kitchen can boost your home’s value.
- DIY Satisfaction: Accomplish a rewarding project and personalize your space.
- Extending Cabinet Life: A new coat of paint can protect cabinets from wear and tear.
Gathering Your Supplies
Having the right tools and materials is crucial for a successful cabinet painting tutorial. Here’s a list to get you started:
- Cleaning Supplies:
- Degreaser (e.g., TSP substitute)
- Clean cloths or rags
- Scrub brush
- Sanding Supplies:
- Sandpaper (120-grit, 220-grit)
- Sanding block or orbital sander
- Tack cloth
- Priming and Painting Supplies:
- Primer (bonding primer recommended)
- Paint (specifically for cabinets)
- Paintbrushes (high-quality, angled)
- Paint rollers (foam rollers for smooth finish)
- Paint tray and liners
- Painter’s tape
- Caulk (optional, for filling gaps)
- Caulk gun (if using caulk)
- Safety Gear:
- Safety glasses
- Respirator or face mask
- Gloves
- Other:
- Screwdriver or drill (for removing hardware)
- Drop cloths or plastic sheeting
- Wood filler (for repairing damage)
- Putty knife
- Small containers (for hardware)
- Ladder or step stool (if needed)
Step-by-Step: How to Paint Kitchen Cabinets Professionally
Follow these steps for a professional-looking painted cabinet refinishing job:
1. Preparation is Key: Preparing Painted Cabinets for Paint
A thorough prep job is arguably the most important part of the process.
- Remove Hardware: Take off all knobs, pulls, hinges, and other hardware. Store them in labeled bags to avoid confusion during reassembly.
- Clean Thoroughly: Use a degreaser and scrub brush to remove all grease, grime, and dirt. Rinse with clean water and let dry completely.
- Protect Your Work Area: Cover countertops, floors, and appliances with drop cloths or plastic sheeting.
- Tape Off Areas: Use painter’s tape to protect walls, backsplashes, and any areas you don’t want painted.
2. Sanding for Success
Sanding creates a surface that the primer and paint can grip onto.
- Lightly Sand: Use 120-grit sandpaper to lightly sand all surfaces of the cabinets. The goal isn’t to remove the old paint entirely, but to rough up the surface.
- Focus on Glossy Areas: Pay extra attention to any glossy areas, as these will resist paint adhesion.
- Smooth Out Imperfections: If there are any dents or scratches, use wood filler to repair them. Let the filler dry completely and then sand it smooth.
- Dust Removal: After sanding, use a tack cloth to remove all sanding dust. This is crucial for a smooth finish.
3. Priming for Perfection
Primer helps the paint adhere better and provides a uniform base. A bonding primer is particularly useful when painting over painted cabinets.
- Apply Primer: Apply a thin, even coat of primer to all surfaces of the cabinets. Use a paintbrush for corners and details, and a foam roller for larger, flat areas.
- Allow to Dry: Let the primer dry completely according to the manufacturer’s instructions.
- Lightly Sand Again (Optional): If the primer feels rough after drying, lightly sand it with 220-grit sandpaper and remove the dust with a tack cloth.
- Second Coat (If Necessary): For dark or stained cabinets, a second coat of primer may be needed to fully block the underlying color.
4. The Main Event: Painting Your Cabinets
Now for the fun part! Choosing the best paint for kitchen cabinets and applying it correctly makes all the difference.
- Choose Your Paint: Select a high-quality paint specifically designed for cabinets. Acrylic or enamel paints are good choices because they are durable and easy to clean. Consider the sheen: semi-gloss or gloss is recommended for kitchens due to their durability and cleanability.
- Apply the First Coat: Apply a thin, even coat of paint to all surfaces of the cabinets. Use a paintbrush for corners and details, and a foam roller for larger, flat areas. Work in the direction of the wood grain, if applicable.
- Allow to Dry: Let the paint dry completely according to the manufacturer’s instructions.
- Lightly Sand Again (Important): After the first coat dries, lightly sand with 220-grit sandpaper to remove any imperfections or brushstrokes. Remove the dust with a tack cloth.
- Apply the Second Coat: Apply a second thin, even coat of paint. This coat will provide full coverage and a professional finish.
- Allow to Dry Completely: Let the paint dry completely before reassembling the cabinets. This may take 24-48 hours.
5. Reassembly and Finishing Touches
The final steps bring your painted kitchen cabinet makeover to life.
- Remove Painter’s Tape: Carefully remove the painter’s tape, pulling it away from the painted surface at a 45-degree angle.
- Reinstall Hardware: Reattach all knobs, pulls, hinges, and other hardware.
- Adjust Hinges (If Necessary): If the doors don’t line up properly, adjust the hinges as needed.
- Clean Up: Remove drop cloths and dispose of paint supplies properly.
- Admire Your Work: Step back and enjoy your newly transformed kitchen!
Selecting the Best Paint for Kitchen Cabinets
Choosing the right paint is crucial for durability and a professional finish. Here’s a breakdown:
| Paint Type | Pros | Cons |
|---|---|---|
| Acrylic Latex | Water-based, low VOCs, easy cleanup, good color retention, flexible (less prone to cracking) | Not as durable as oil-based, may require more coats, can raise wood grain |
| Oil-Based Enamel | Extremely durable, provides a smooth, hard finish, excellent leveling | High VOCs, requires mineral spirits for cleanup, longer drying time, yellows over time |
| Alkyd Enamel | Durable, good leveling, can be thinned with mineral spirits or water (depending on the formulation) | May contain VOCs, can be more difficult to apply than latex, requires careful surface preparation |
| Cabinet-Specific Paints | Formulated for cabinets, excellent adhesion and durability, often self-leveling | Can be more expensive than other options, may have limited color choices |
Consider these factors when choosing your paint:
- Durability: Kitchen cabinets endure a lot of wear and tear, so choose a durable paint that can withstand daily use.
- Cleanability: Opt for a paint that is easy to clean, as kitchen cabinets are prone to grease and spills.
- Sheen: Semi-gloss or gloss sheens are recommended for kitchens due to their durability and cleanability.
- VOC Content: Consider low-VOC or zero-VOC paints for better indoor air quality.
- Color: Choose a color that complements your kitchen’s overall aesthetic.
Pro Kitchen Cabinet Painting Tips
Here are some additional kitchen cabinet painting tips to help you achieve professional results:
- Spray Painting: If possible, consider spray painting the cabinets for an ultra-smooth, factory-like finish. This requires a paint sprayer and a well-ventilated area.
- Thin Coats: Apply thin, even coats of paint to avoid drips and runs.
- Wet Edging: When using a brush, maintain a “wet edge” to prevent lap marks. This means overlapping each brushstroke slightly before the previous stroke dries.
- Self-Leveling Paint: Consider using a self-leveling paint, which helps to minimize brushstrokes and roller marks.
- Practice: Practice your painting technique on a scrap piece of wood before painting the cabinets.
- Patience: Don’t rush the process. Allow each coat of primer and paint to dry completely before proceeding to the next step.
- Ventilation: Ensure adequate ventilation in your work area to minimize exposure to paint fumes.
- Clean Brushes and Rollers: Clean your brushes and rollers immediately after use to prolong their lifespan.
- Consider a Professional: If you’re not confident in your DIY skills, consider hiring a professional painter. This will ensure a high-quality, long-lasting finish.
Alternative Painted Finishes
Consider these alternatives to standard paint for a unique look:
- Chalk Paint: Chalk paint provides a matte finish that’s easily distressed for a vintage or rustic look.
- Milk Paint: Milk paint offers a similar look to chalk paint, but it’s made from natural ingredients.
- Glazing: Apply a glaze over the paint to add depth and dimension to the cabinets.
- Antiquing: Use antiquing wax or stain to create an aged or weathered look.
Fathoming Painted Cabinet Durability
The lifespan of your newly painted cabinets depends on several factors:
- Paint Quality: Higher quality paints generally last longer.
- Preparation: Thorough preparation is crucial for adhesion and durability.
- Usage: Cabinets that are heavily used or exposed to moisture will require more frequent repainting.
- Maintenance: Regular cleaning and touch-ups can extend the lifespan of your painted cabinets.
Generally, a well-painted kitchen cabinet can last for 5-10 years before needing a fresh coat of paint.
Frequently Asked Questions (FAQ)
Q: What is the best way to clean kitchen cabinets before painting?
A: Use a degreaser (like TSP substitute) and a scrub brush to remove grease, grime, and dirt. Rinse with clean water and let dry completely.
Q: Can I paint laminate kitchen cabinets?
A: Yes, you can, but it requires careful preparation. Sand the laminate thoroughly, use a bonding primer specifically designed for slick surfaces, and choose a paint formulated for laminate.
Q: How many coats of paint do I need on kitchen cabinets?
A: Typically, two coats of paint are sufficient for full coverage and a professional finish. However, if you’re painting a light color over a dark color, you may need three coats.
Q: What is the best type of roller to use for painting kitchen cabinets?
A: Use a high-density foam roller for a smooth, even finish with minimal stippling.
Q: Is it better to spray or brush paint kitchen cabinets?
A: Spraying provides the smoothest, most professional finish, but it requires a paint sprayer and a well-ventilated area. Brushing is a good option for smaller projects or when a sprayer isn’t available.
Q: How do I prevent brush strokes when painting kitchen cabinets?
A: Use a high-quality brush, apply thin, even coats of paint, maintain a wet edge, and consider using a self-leveling paint.
Q: How long should I wait before using my newly painted kitchen cabinets?
A: Allow the paint to cure completely before using the cabinets. This may take 24-48 hours, or longer depending on the paint type and humidity levels.
Q: What do I do if the paint chips or scratches after painting my kitchen cabinets?
A: Lightly sand the damaged area, apply a small amount of primer, and touch up with paint.
With careful planning, the right supplies, and a bit of elbow grease, you can achieve a stunning painted kitchen cabinet makeover that will transform your kitchen without breaking the bank. Enjoy the process and the beautiful results!
Hi, I’m Scott Fischer, the voice behind SliceItRight. My passion for food started in my grandmother’s kitchen, where I learned the art of slicing, dicing, and creating delicious meals. Over the years, I’ve explored everything from the perfect kitchen gadgets to mastering culinary techniques, and I’m here to share all of it with you. Whether you’re a beginner or an experienced home chef, my goal is to make cooking easier, more enjoyable, and a lot more fun. So, let’s slice it right and cook up something amazing together!