Are you wondering how to seal backsplash and prevent water damage in your kitchen? Yes, caulking is the answer! This comprehensive guide covers everything you need to know about caulking kitchen backsplash, including choosing the best caulk for backsplash, mastering the caulk gun technique backsplash, and preventing mold in backsplash caulk. We’ll walk you through applying caulk to backsplash like a pro, including caulking around kitchen sink, ensuring a beautiful and long-lasting result.
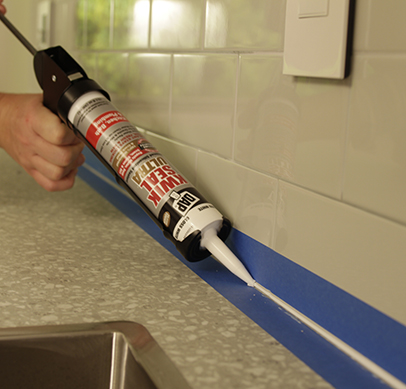
Image Source: www.dap.com
Why Caulking Your Kitchen Backsplash Is Crucial
Caulk is a flexible sealant that creates a watertight barrier between your backsplash and the surrounding surfaces, such as the countertop and cabinets. Without proper caulking, water can seep behind the backsplash, leading to:
- Mold and mildew growth
- Damaged drywall
- Loose or cracked tiles
- Costly repairs
Caulking protects your investment and maintains a clean and hygienic kitchen environment.
Choosing the Right Caulk for Your Kitchen
Selecting the types of caulk for kitchen projects requires careful consideration. Not all caulk is created equal. Here’s a breakdown of the best options for your kitchen backsplash:
Silicone Caulk
- Pros: Excellent water resistance, flexibility, and durability. It adheres well to various surfaces, including tile, stone, and glass. It resists mold and mildew growth.
- Cons: Can be difficult to apply smoothly, and it’s not paintable.
- Best for: Areas that are frequently exposed to water, such as around the sink and along the countertop edge.
Acrylic Latex Caulk with Silicone
- Pros: Easier to apply and tool than pure silicone caulk. It is paintable and cleans up with water. Good for general use.
- Cons: Not as water-resistant as silicone caulk.
- Best for: Areas less prone to direct water exposure, such as the upper edges of the backsplash.
Hybrid Polymer Caulk
- Pros: Combines the best qualities of silicone and polyurethane. It’s highly flexible, durable, and paintable. Excellent adhesion to most surfaces.
- Cons: More expensive than silicone or acrylic caulk.
- Best for: Demanding applications where maximum performance is required.
Table: Caulk Comparison
| Feature | Silicone Caulk | Acrylic Latex with Silicone | Hybrid Polymer Caulk |
|---|---|---|---|
| Water Resistance | Excellent | Good | Excellent |
| Flexibility | Excellent | Good | Excellent |
| Paintable | No | Yes | Yes |
| Ease of Application | Moderate | Easy | Moderate |
| Durability | Excellent | Good | Excellent |
| Price | Moderate | Low | High |
Essential Tools and Materials
Before you start applying caulk to backsplash, gather these essential tools and materials:
- Caulk gun: Choose a smooth-rod caulk gun for better control.
- Caulk: Select the appropriate type of caulk for your needs.
- Caulk removal tool: For removing old caulk.
- Utility knife: For trimming the caulk tube nozzle.
- Paper towels or rags: For cleaning up excess caulk.
- Painter’s tape: For creating clean lines.
- Caulk smoothing tool or your finger: For creating a smooth bead.
- Spray bottle with water and a drop of dish soap: To lubricate your finger or smoothing tool.
- Safety glasses: To protect your eyes.
Step-by-Step Guide to Caulking Your Kitchen Backsplash
Here’s a detailed guide on how to caulk kitchen backsplash to achieve a professional finish.
Step 1: Removing Old Caulk
- Softening the Old Caulk: If the old caulk is hard, try softening it with a hairdryer or heat gun (on low setting) for a few seconds.
- Using a Caulk Removal Tool: Carefully slide the caulk removal tool along the caulk line, using a back-and-forth motion to loosen the caulk.
- Using a Utility Knife: For stubborn areas, use a utility knife to score along the edges of the caulk. Be careful not to damage the countertop or backsplash.
- Pulling the Caulk Away: Once loosened, grab the caulk and pull it away from the joint. Use pliers if necessary.
- Cleaning the Surface: Remove any remaining residue with a putty knife or scraper. Clean the area thoroughly with rubbing alcohol to ensure proper adhesion of the new caulk.
Step 2: Preparing the Surface
- Clean the Area: Ensure the surface is clean, dry, and free of debris. Use a damp cloth and mild detergent to remove any dirt, grease, or grime.
- Dry Thoroughly: Allow the area to dry completely before applying caulk.
- Apply Painter’s Tape: Apply painter’s tape along both sides of the joint you’ll be caulking, leaving a small gap for the caulk bead. This will create clean, straight lines.
Step 3: Loading and Preparing the Caulk Gun
- Cut the Nozzle: Cut the tip of the caulk tube at a 45-degree angle, using a utility knife. The size of the opening should match the desired width of the caulk bead. Start with a small opening; you can always make it larger.
- Puncture the Seal: Insert a long nail or wire into the nozzle to puncture the inner seal of the caulk tube.
- Load the Caulk Gun: Place the caulk tube into the caulk gun and secure it. Pump the trigger until the caulk begins to flow from the nozzle.
Step 4: Applying the Caulk
- Position the Nozzle: Hold the caulk gun at a 45-degree angle to the joint.
- Apply Steady Pressure: Apply even pressure to the trigger and move the gun smoothly along the joint. Maintain a consistent speed to create a uniform bead of caulk.
- Overlap Slightly: Overlap each section of caulk slightly to ensure a continuous seal.
- Avoid Air Pockets: Keep the nozzle submerged in the caulk bead to prevent air pockets from forming.
Step 5: Smoothing the Caulk Bead
This is where the caulk gun technique backsplash becomes critical.
- Wet Your Finger or Tool: Lightly spray your finger or caulk smoothing tool with a mixture of water and a drop of dish soap. This will prevent the caulk from sticking.
- Smooth the Bead: Gently run your finger or smoothing tool along the caulk bead in a continuous motion. Apply light pressure to create a smooth, concave surface.
- Clean Excess Caulk: Wipe off any excess caulk from your finger or tool with a paper towel or rag.
- Repeat if Necessary: Repeat the smoothing process until you achieve the desired finish.
Step 6: Removing the Painter’s Tape
- Remove Tape Immediately: Carefully remove the painter’s tape while the caulk is still wet. Pull the tape away from the caulk bead at a 45-degree angle.
- Touch Up if Needed: If any caulk is pulled away with the tape, use your finger or smoothing tool to touch up the area.
Step 7: Curing and Cleanup
- Allow to Cure: Allow the caulk to cure completely according to the manufacturer’s instructions (usually 24-48 hours). Avoid getting the area wet during this time.
- Clean Up: Clean any remaining caulk residue with a damp cloth.
Tips and Tricks for a Professional Finish
- Practice Your Technique: Practice applying caulk on a piece of cardboard before working on your backsplash.
- Use a Cartridge Heater: If you’re working in a cold environment, use a cartridge heater to warm the caulk tube and make it easier to apply.
- Apply in Small Sections: Work in small sections to prevent the caulk from drying out before you can smooth it.
- Keep Your Tools Clean: Regularly clean your caulk gun and smoothing tool to prevent caulk buildup.
- Use a Caulk Saver: A caulk saver tool helps prevent the caulk in the tube from drying out between uses.
Preventing Mold in Backsplash Caulk
Preventing mold in backsplash caulk is essential for a healthy kitchen. Here’s how to do it:
- Choose a Mold-Resistant Caulk: Select a caulk specifically formulated to resist mold and mildew growth. Look for products labeled “mold-resistant” or “mildew-resistant.”
- Maintain a Clean and Dry Surface: Regularly clean your backsplash and surrounding areas to remove any dirt, grease, or soap scum that can promote mold growth.
- Ventilate the Area: Ensure proper ventilation in your kitchen to reduce moisture levels. Use a range hood when cooking and open windows when possible.
- Address Leaks Promptly: Fix any leaks or water damage immediately to prevent moisture buildup behind the backsplash.
- Regular Inspections: Regularly inspect the caulk for signs of mold or damage. Replace the caulk if necessary.
Caulking Around Kitchen Sink
Caulking around kitchen sink requires extra attention due to constant water exposure.
- Dry the Area Thoroughly: Ensure the area around the sink is completely dry before applying caulk.
- Apply a Generous Bead: Apply a generous bead of silicone caulk to create a watertight seal.
- Smooth Carefully: Smooth the caulk bead carefully to ensure a tight seal between the sink and the countertop.
- Allow Extra Curing Time: Allow the caulk to cure for at least 48 hours before using the sink.
Backsplash Sealant Application
Backsplash sealant application, while not always necessary, provides an extra layer of protection, especially for natural stone backsplashes. A kitchen backsplash caulk job can be further protected with this.
- Choose the Right Sealant: Select a sealant specifically designed for your backsplash material.
- Apply Evenly: Apply the sealant evenly with a brush or roller.
- Wipe Off Excess: Wipe off any excess sealant with a clean cloth.
- Allow to Dry: Allow the sealant to dry completely before using the backsplash.
Fathoming the Importance of Prepwork
The quality of your caulk job heavily relies on how well you prepare the surface. It’s not just about removing old caulk; it’s about ensuring the area is impeccably clean, dry, and free from any residue that could hinder adhesion. Take your time with this step; it’s the foundation of a long-lasting seal.
Common Mistakes to Avoid
- Using the Wrong Type of Caulk: Always choose a caulk that’s specifically designed for kitchen use and is resistant to mold and mildew.
- Applying Caulk to a Wet Surface: Moisture can prevent the caulk from adhering properly and can lead to mold growth.
- Applying Too Much or Too Little Caulk: Aim for a consistent bead that fills the joint without overflowing.
- Not Smoothing the Caulk: Smoothing the caulk creates a professional finish and ensures a watertight seal.
- Rushing the Curing Process: Allow the caulk to cure completely before exposing it to water or moisture.
Long-Term Maintenance
Once your caulk is applied, ongoing maintenance is important. Regularly inspect the caulk lines for cracks, gaps, or signs of mold. Clean the backsplash regularly with a mild detergent and water to prevent buildup that can degrade the caulk. Address any issues promptly to prevent more extensive damage.
FAQ
-
What is the best caulk for a kitchen backsplash? Silicone caulk is generally considered the best due to its excellent water resistance and durability.
-
Can I paint over caulk? Yes, but only if you use acrylic latex caulk with silicone. Silicone caulk is not paintable.
-
How long does caulk take to dry? Most caulk takes 24-48 hours to fully cure. Check the manufacturer’s instructions for specific drying times.
-
How often should I recaulk my kitchen backsplash? You should recaulk your kitchen backsplash every 3-5 years, or sooner if you notice any signs of damage or mold.
-
Is it difficult to caulk a backsplash myself? While it takes some practice, caulking a backsplash is a manageable DIY project with the right tools and preparation.
-
Who is best suited to caulk my backsplash? If you’re not comfortable with DIY projects or want a guaranteed professional finish, hire a qualified contractor.
By following these tips and tricks, you can confidently caulk your kitchen backsplash like a pro, ensuring a beautiful, durable, and water-tight seal that will protect your kitchen for years to come. Mastering backsplash sealant application will protect the tiles and caulking around kitchen sink is crucial for maintaining a healthy and attractive kitchen.
Hi, I’m Scott Fischer, the voice behind SliceItRight. My passion for food started in my grandmother’s kitchen, where I learned the art of slicing, dicing, and creating delicious meals. Over the years, I’ve explored everything from the perfect kitchen gadgets to mastering culinary techniques, and I’m here to share all of it with you. Whether you’re a beginner or an experienced home chef, my goal is to make cooking easier, more enjoyable, and a lot more fun. So, let’s slice it right and cook up something amazing together!