Building an outdoor kitchen frame involves creating a support structure for countertops, appliances, and storage in your outdoor cooking area. You can build a frame using wood or metal studs. This guide provides steps and tips for outdoor kitchen frame construction, DIY outdoor kitchen framing, building outdoor kitchen island, helps choose outdoor kitchen frame materials, explains creating outdoor kitchen framing plans, choosing between a metal stud outdoor kitchen frame or wood frame outdoor kitchen, and how to ensure a durable outdoor kitchen frame using best outdoor kitchen framing techniques for a strong outdoor kitchen support structure.
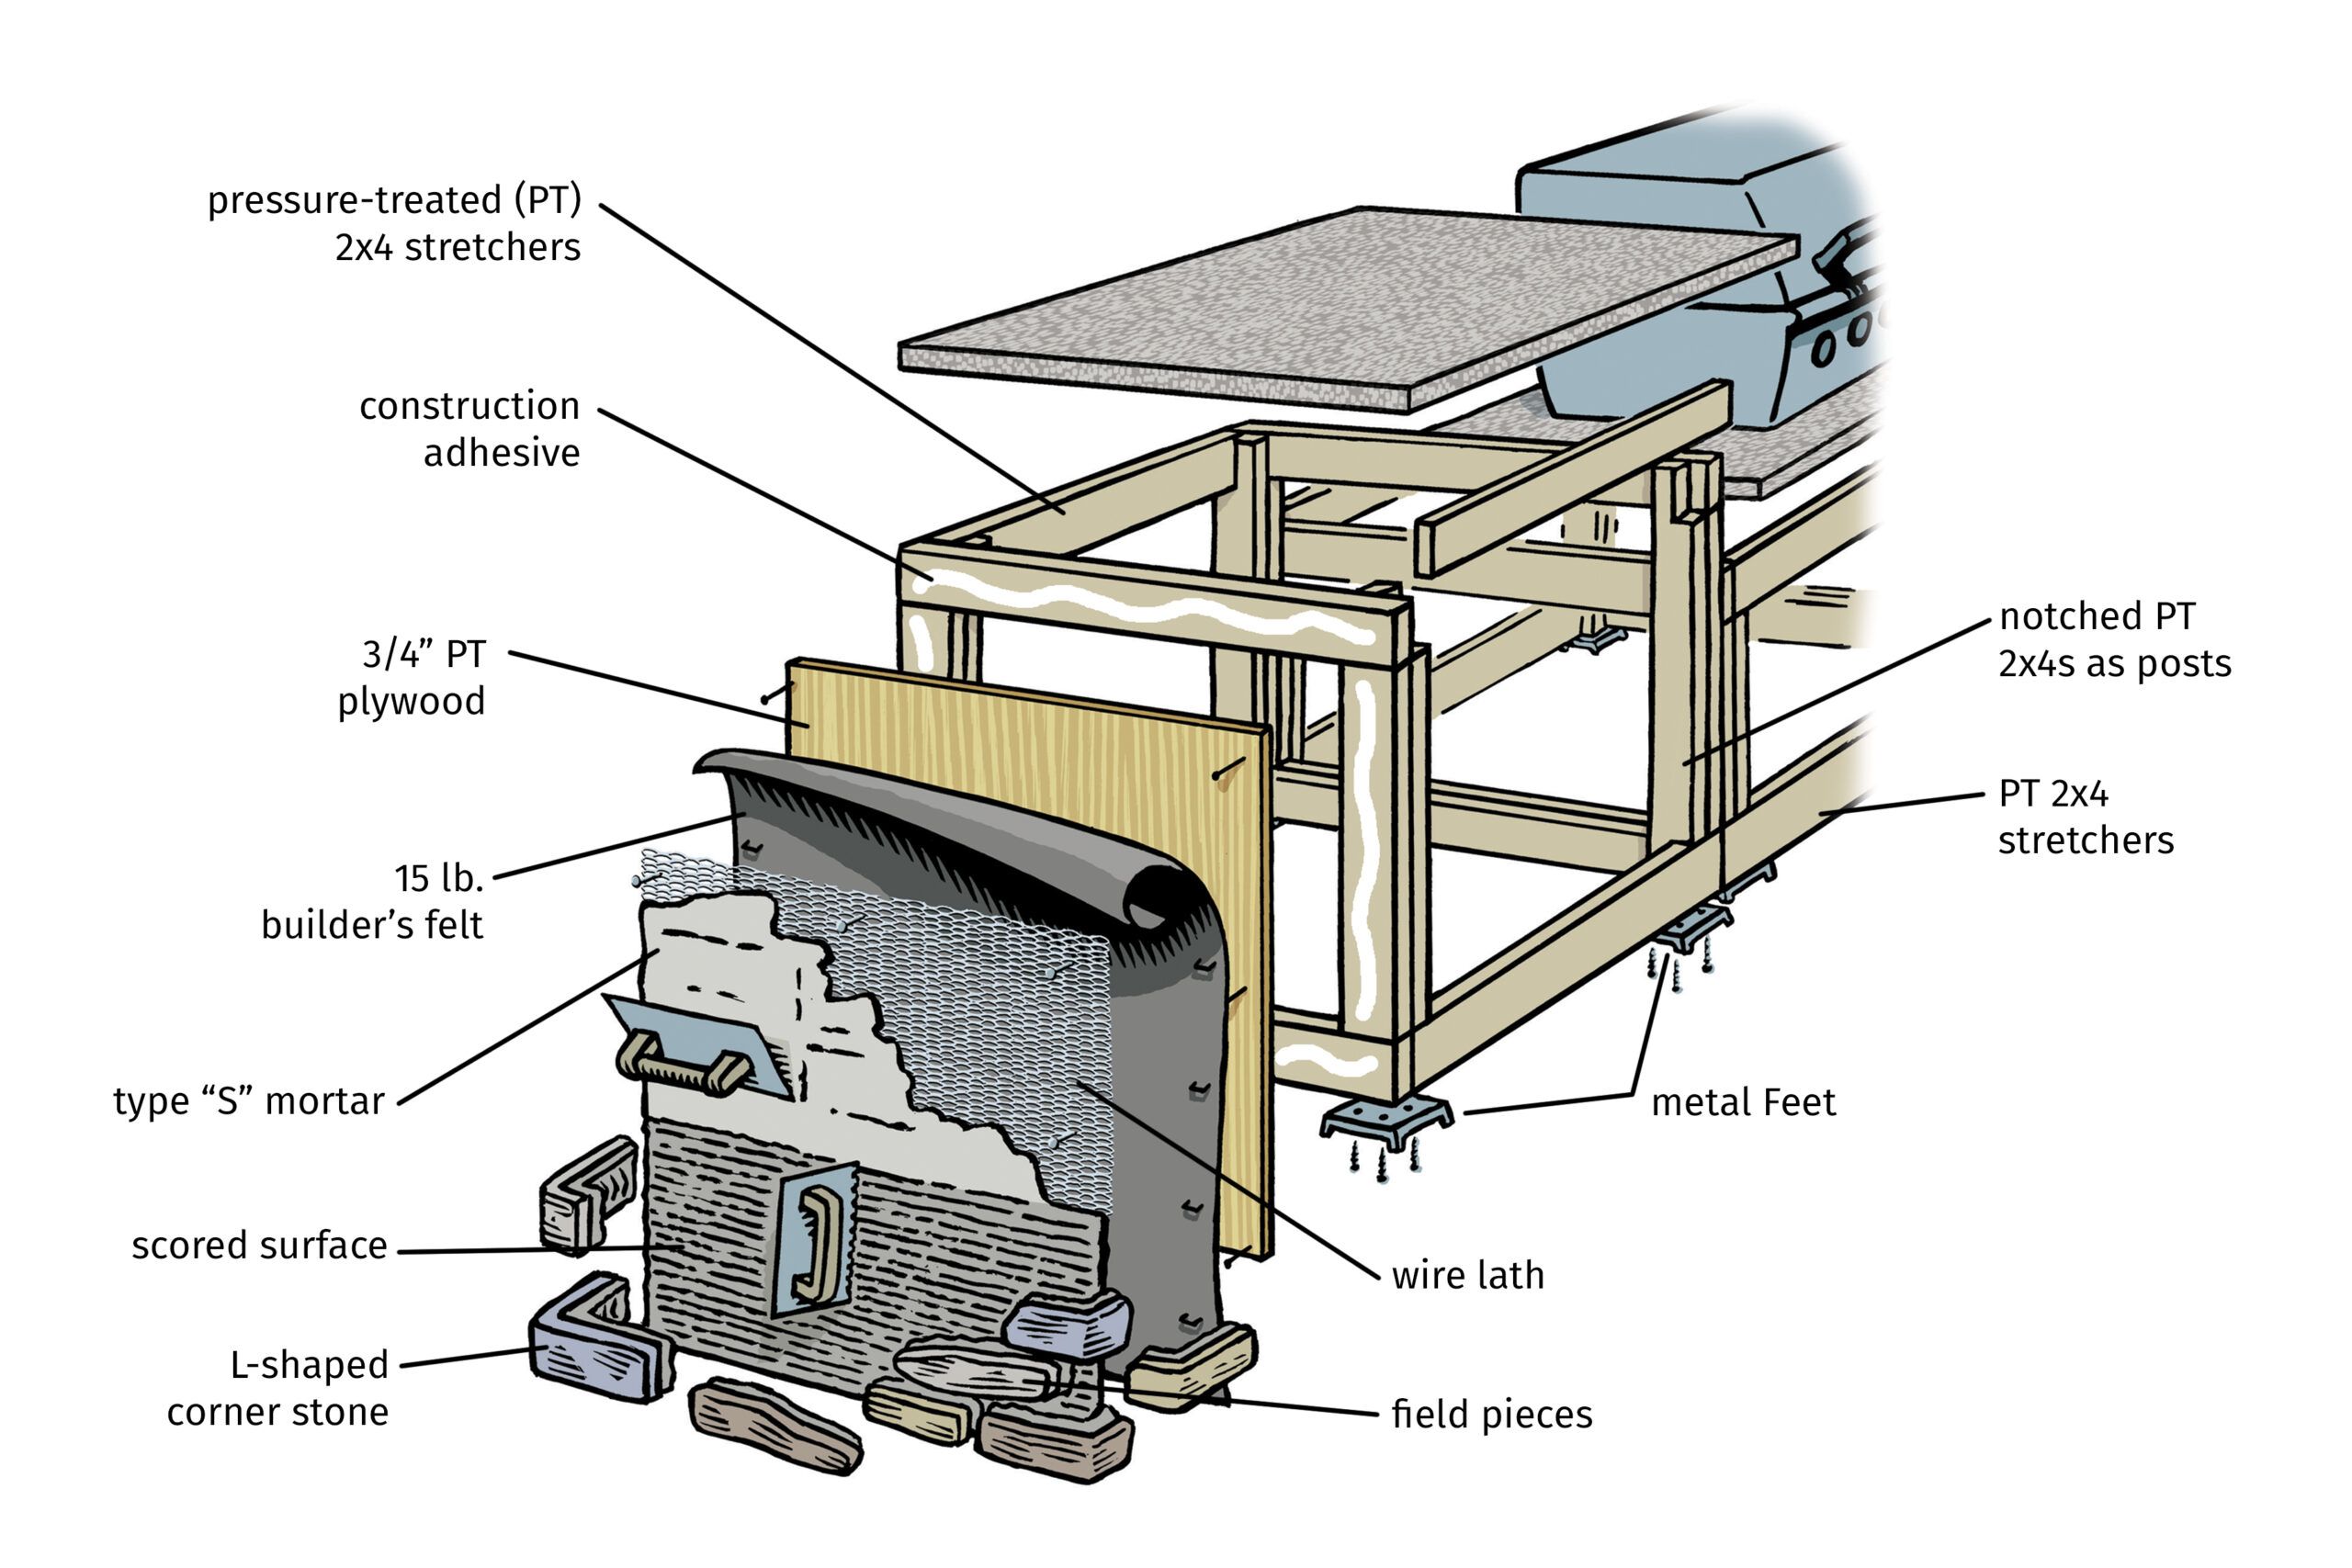
Image Source: s42814.pcdn.co
Planning Your Outdoor Kitchen Frame
Before you even pick up a tool, careful planning is key. This step saves you time, money, and headaches later on.
Defining the Kitchen Layout
- Space Assessment: Look at your available space. Measure the length and width of the area. Know where gas lines, water lines, and electrical outlets are located.
- Appliance Integration: List all appliances you want to include. This could be a grill, a side burner, a sink, a refrigerator, or storage drawers. Get the exact dimensions of each appliance.
- Countertop Considerations: Choose your countertop material. This affects the support needed from the frame. Granite and concrete are heavy and need stronger frames than lighter materials like tile.
- Style and Design: Think about the overall look you want. A modern, sleek design needs a different frame than a rustic, traditional one.
Creating Framing Plans
- Sketching and Dimensioning: Draw a detailed sketch of your kitchen frame. Include all dimensions – height, width, and depth. Mark the positions of appliances and access doors.
- Material Selection: Choose your frame material. Wood is easy to work with but might not last as long. Metal studs are more durable but need special tools.
- Load Calculation: Calculate the weight your frame will hold. This includes the countertop, appliances, and anything stored inside. This helps you choose the right material size and spacing.
- Plan Review: Before you start building, review your plans with someone experienced. They can catch mistakes or suggest improvements.
Choosing Your Frame Material
The material you choose is crucial for the longevity and look of your outdoor kitchen. Wood and metal are common choices, each with pros and cons.
Wood Frame Kitchens
Pros:
- Easy to Work With: Wood is easy to cut, drill, and screw together. You don’t need special tools.
- Cost-Effective: Wood is generally cheaper than metal studs.
- Aesthetic Appeal: Wood can be stained or painted to match your outdoor décor.
Cons:
- Susceptible to Weather: Wood can rot, warp, or be damaged by insects if not treated properly.
- Maintenance: Wood frames need regular sealing or painting to protect them from the elements.
- Not as Durable: Wood is not as strong as metal, especially over time.
Choosing the Right Wood
- Pressure-Treated Lumber: This is a must for outdoor use. It is treated to resist rot and insects.
- Cedar or Redwood: These woods are naturally resistant to decay and insects. They are more expensive but last longer.
- Kiln-Dried Lumber: This type of lumber is less likely to warp or crack.
Metal Stud Frame Kitchens
Pros:
- Durable: Metal studs are resistant to rot, insects, and fire.
- Strong: Metal frames can support heavy countertops and appliances.
- Low Maintenance: Metal doesn’t need painting or sealing.
Cons:
- Requires Special Tools: You need metal cutting tools and self-tapping screws.
- More Expensive: Metal studs are generally more expensive than wood.
- Thermal Conductivity: Metal can get very hot in direct sunlight.
Selecting Metal Studs
- Gauge: Choose the right gauge (thickness) of metal studs. Thicker gauges are stronger and better for heavy loads.
- Galvanized Steel: Make sure the studs are galvanized to prevent rust.
- Stud Spacing: Follow the manufacturer’s recommendations for stud spacing based on the load.
Material Comparison Table
| Feature | Wood Frame | Metal Stud Frame |
|---|---|---|
| Cost | Lower | Higher |
| Durability | Lower | Higher |
| Maintenance | Higher | Lower |
| Ease of Use | Easier | More Difficult |
| Weather Resistance | Lower (if not treated well) | Higher |
Building Your Outdoor Kitchen Frame: Step-by-Step
Step 1: Prepare the Foundation
- Leveling the Ground: Make sure the ground is level. Use a level and shovel to even out any bumps or dips.
- Creating a Base: A concrete slab is ideal. If that’s not possible, use compacted gravel or pavers as a base.
- Protection from Moisture: Use a vapor barrier between the ground and the frame to prevent moisture damage.
Step 2: Assemble the Frame
For Wood Frames:
- Cut the Lumber: Cut the wood according to your plan. Use a circular saw or miter saw for clean cuts.
- Assemble the Base: Build the base frame first. Use screws and wood glue for a strong connection.
- Add Vertical Supports: Attach vertical supports to the base frame. Space them according to your plan and load calculations.
- Install Horizontal Supports: Add horizontal supports to create a rigid structure. These supports will hold the countertop and appliances.
- Reinforce Corners: Use metal brackets or wood blocks to reinforce the corners.
For Metal Stud Frames:
- Cut the Metal Studs: Cut the metal studs to the right length. Use metal cutting shears or a chop saw with a metal cutting blade.
- Assemble the Base: Use self-tapping screws to assemble the base frame.
- Attach Vertical Supports: Attach vertical supports to the base frame. Use a level to ensure they are plumb.
- Install Horizontal Supports: Add horizontal supports to create a rigid structure.
- Secure Connections: Use metal brackets or straps to reinforce connections.
Step 3: Add Finishing Touches
- Sheathing: Cover the frame with cement board or plywood. This provides a smooth surface for the exterior finish.
- Waterproofing: Apply a waterproof membrane to protect the frame from moisture.
- Appliance Cutouts: Cut out openings for appliances. Make sure the openings are the right size.
- Access Doors: Install access doors for storage and utility connections.
Tips for Building a Durable Outdoor Kitchen Frame
- Use Quality Materials: Don’t skimp on materials. Invest in pressure-treated lumber or galvanized metal studs.
- Proper Spacing: Follow recommended stud spacing for the load you will be supporting.
- Strong Connections: Use screws and glue for wood frames, and self-tapping screws for metal frames. Reinforce corners with brackets or straps.
- Water Management: Design the frame to allow water to drain away. Avoid flat surfaces where water can pool.
- Regular Inspection: Check the frame regularly for signs of damage. Repair any damage promptly.
Fathoming Design Elements and Functionality
Beyond the basic structure, consider these design and functional aspects:
Incorporating Storage
- Door Placement: Think about where you want to access storage areas. Place doors strategically.
- Shelf Design: Plan for adjustable shelves or custom storage solutions.
- Drawer Slides: Use heavy-duty drawer slides for smooth and reliable operation.
Countertop Support
- Adequate Support: Make sure the frame provides enough support for the countertop material. Heavy materials like granite need more support.
- Level Surface: Ensure the frame is level to prevent the countertop from cracking or shifting.
- Overhang: Plan for a countertop overhang. This provides a comfortable space for seating.
Ventilation and Safety
- Grill Ventilation: Ensure proper ventilation for your grill. This prevents carbon monoxide buildup.
- Gas Line Safety: Hire a qualified professional to install gas lines. Follow all safety codes.
- Electrical Outlets: Install GFCI outlets for safety. Protect outlets from the weather.
Applying Exterior Finishes
The exterior finish not only enhances the look of your kitchen but also protects the frame.
Options for Exterior Finishes
- Stone Veneer: Stone veneer adds a classic, elegant look.
- Brick: Brick is durable and adds a rustic touch.
- Stucco: Stucco is a versatile option that can be textured and colored.
- Tile: Tile is easy to clean and comes in many styles.
- Wood Siding: Wood siding adds warmth and charm.
Installation Techniques
- Adhesion: Use the right adhesive for your chosen finish.
- Grouting: Apply grout carefully to prevent water damage.
- Sealing: Seal the finish to protect it from the weather.
Frequently Asked Questions (FAQ)
What is the best material for an outdoor kitchen frame?
The best material depends on your budget, skill level, and desired durability. Wood is cheaper and easier to work with, but metal is more durable and requires less maintenance.
Can I use regular lumber for an outdoor kitchen frame?
No, you should use pressure-treated lumber or naturally decay-resistant woods like cedar or redwood for wood frames. Regular lumber will rot quickly.
Who is qualified to install gas lines for an outdoor kitchen?
Only a licensed and qualified gas technician should install gas lines. This ensures safety and compliance with local codes.
What is the best way to protect a wood frame from the weather?
Apply a waterproof sealant or paint to the wood. Reapply the sealant or paint every year or two.
How do I ensure my outdoor kitchen frame is level?
Use a level to check the frame during construction. Make adjustments as needed to ensure a level surface.
Hi, I’m Scott Fischer, the voice behind SliceItRight. My passion for food started in my grandmother’s kitchen, where I learned the art of slicing, dicing, and creating delicious meals. Over the years, I’ve explored everything from the perfect kitchen gadgets to mastering culinary techniques, and I’m here to share all of it with you. Whether you’re a beginner or an experienced home chef, my goal is to make cooking easier, more enjoyable, and a lot more fun. So, let’s slice it right and cook up something amazing together!