How long does it take to repaint kitchen cabinets? The answer depends on whether you do it yourself (DIY) or hire a professional. A DIY project can take anywhere from 3 to 10 days, while a professional job might only take 2 to 5 days. This guide breaks down the cabinet painting timeline, looking at the kitchen cabinet painting duration for both DIYers and professionals. This article will explore the average time to paint cabinets, the cabinet painting project length, and how long to repaint kitchen cupboards. We will also discuss cabinet painting process time, factors affecting cabinet painting time, DIY cabinet painting time, professional cabinet painting time, and cabinet repaint completion time.
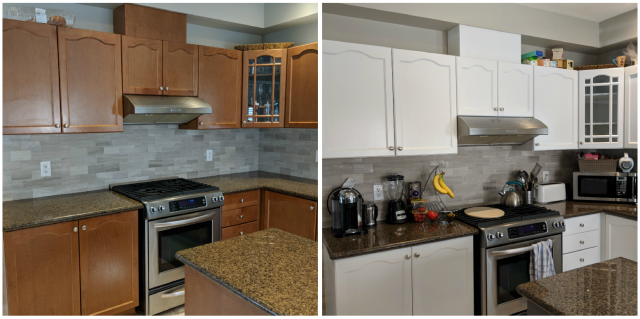
Image Source: www.paintmycabinets.ca
Comparing DIY vs. Professional Cabinet Repainting
Choosing between DIY and professional cabinet repainting comes down to cost, time, and skill. DIY saves money, but takes longer. Professionals are quicker but cost more.
DIY Cabinet Painting: A Detailed Timeline
Doing it yourself lets you save money, but it takes more time. Here’s a look at how long each step can take:
-
Day 1: Preparation (4-8 hours)
- Removing cabinet doors and hardware (1-2 hours)
- Cleaning cabinets (1-2 hours)
- Sanding (2-4 hours)
-
Day 2: Priming (2-4 hours)
-
Applying the first coat of primer (1-2 hours)
- Drying time (at least 2 hours)
-
Day 3: Painting (4-8 hours)
-
Applying the first coat of paint (2-4 hours)
- Drying time (at least 4 hours)
-
Day 4: Painting (4-8 hours)
-
Applying the second coat of paint (2-4 hours)
- Drying time (at least 4 hours)
-
Day 5: Reassembly (2-4 hours)
-
Reattaching hardware (1-2 hours)
- Rehanging cabinet doors (1-2 hours)
This timeline assumes you work on the project for a few hours each day. The cabinet painting project length could be longer if you can only work for short periods. Also, more coats of primer or paint will also affect the overall cabinet repaint completion time.
Professional Cabinet Painting: A Swift Process
Professionals usually work faster because they have experience and special tools. Here’s a typical schedule:
-
Day 1: Preparation and Priming (6-8 hours)
- Taping off the area and protecting surfaces (1-2 hours)
- Removing doors and hardware (1-2 hours)
- Cleaning and sanding cabinets (2-3 hours)
- Applying primer (1-2 hours)
-
Day 2: Painting (6-8 hours)
-
Applying the first coat of paint (3-4 hours)
- Drying time (at least 2 hours)
- Applying the second coat of paint (3-4 hours)
-
Day 3: Finishing and Reassembly (4-6 hours)
-
Applying a clear coat (optional, 1-2 hours)
- Drying time (at least 2 hours)
- Reattaching hardware and doors (1-2 hours)
Professionals can often complete the cabinet painting process time in a few days because they work efficiently.
Factors Affecting How Long Cabinet Painting Takes
Many things can change the average time to paint cabinets. These include the size of your kitchen, the type of paint, and the condition of your cabinets.
Kitchen Size and Cabinet Quantity
A larger kitchen means more cabinets to paint. This increases the time needed for each step. More cabinets also mean more hardware to remove and reinstall.
Cabinet Material and Condition
- Wood Cabinets: Wood is easy to paint, but it may need more prep work if it’s old or damaged.
- Laminate Cabinets: Laminate needs special primer and paint to stick properly. This can add time to the project.
- Previously Painted Cabinets: If the old paint is peeling, you’ll need to spend more time sanding and prepping the surface.
Paint Type and Drying Time
Different types of paint have different drying times. Oil-based paints take longer to dry than water-based paints. Using a sprayer can speed up the painting process, but it requires practice.
Skill Level and Experience
If you’re new to DIY, expect the project to take longer. Professionals have experience and can work faster. They also know how to fix common problems quickly.
Breaking Down the Cabinet Painting Process
To better estimate the cabinet painting timeline, let’s look at each step in more detail.
Preparation: The Foundation for Success
Proper preparation is key to a good paint job.
- Cleaning: Use a degreaser to remove grease and dirt.
- Sanding: Sanding helps the primer and paint stick to the cabinets. Use a medium-grit sandpaper to rough up the surface.
- Taping: Protect countertops, floors, and walls with painter’s tape.
- Hardware Removal: Take off all knobs, pulls, and hinges.
Priming: Creating a Smooth Surface
Primer helps the paint stick and covers stains.
- Choosing the Right Primer: Use a primer that is made for the type of cabinet you have (wood, laminate, etc.).
- Applying Primer: Apply a thin, even coat of primer. Let it dry completely before moving on.
- Sanding After Priming: Lightly sand the primer to create a smooth surface for the paint.
Painting: Adding Color and Style
Painting is where you bring your vision to life.
- Choosing the Right Paint: Use a paint that is made for cabinets. Look for paints that are durable and easy to clean.
- Applying Paint: Apply thin, even coats of paint. Let each coat dry completely before applying the next.
- Using a Brush or Sprayer: A brush is good for small areas and details. A sprayer can give you a smooth, even finish, but it takes practice to use.
Reassembly: Putting It All Back Together
Once the paint is dry, you can put the cabinets back together.
- Reattaching Hardware: Install the knobs, pulls, and hinges.
- Rehanging Doors: Carefully rehang the cabinet doors. Make sure they are aligned properly.
- Adjusting Hinges: Adjust the hinges so the doors open and close smoothly.
Optimizing Your Cabinet Painting Timeline
Here are some tips to help you speed up the cabinet painting process time:
- Plan Ahead: Make a detailed plan and gather all the supplies you need before starting.
- Work Efficiently: Set up a good workspace and work in an organized way.
- Use the Right Tools: Using quality brushes, rollers, or a sprayer can save time and give you better results.
- Don’t Rush: While you want to save time, don’t rush the process. Taking your time will give you a better finish.
- Enlist Help: If possible, ask a friend or family member to help. Having an extra set of hands can speed things up.
DIY vs. Professional: Cost Comparison
While DIY saves money on labor, you need to buy your own supplies. Here’s a quick look at the costs:
| Expense | DIY Cost | Professional Cost |
|---|---|---|
| Paint & Primer | $50 – $150 | Included in service fee |
| Supplies (brushes, tape, etc.) | $30 – $50 | Included in service fee |
| Labor | Your Time | $4-$10 per square foot |
| Total | $80 – $200 + Time | $$$$ – $$$$$ |
Professionals charge more, but they provide expertise and save you time. They also handle the prep work and cleanup.
Choosing the Right Option for You
Consider these points when deciding between DIY and professional cabinet painting:
- Budget: DIY is cheaper, but professional services offer value for money.
- Time: Professionals are faster, letting you enjoy your new kitchen sooner.
- Skill Level: If you’re comfortable with DIY projects, you can save money. If not, hiring a professional is a better choice.
- Desired Quality: Professionals often deliver a higher-quality finish due to their experience and equipment.
Fathoming Common Mistakes and How to Avoid Them
- Skipping Prep Work: Not cleaning and sanding properly can lead to paint that doesn’t stick.
- Solution: Always clean, sand, and prime before painting.
- Using the Wrong Paint: Using paint that is not made for cabinets can result in a finish that chips or peels.
- Solution: Choose a paint that is durable and designed for cabinets.
- Applying Thick Coats of Paint: Thick coats of paint can drip and take longer to dry.
- Solution: Apply thin, even coats of paint and let each coat dry completely.
- Rushing the Process: Rushing can lead to mistakes and a poor finish.
- Solution: Take your time and follow each step carefully.
Frequently Asked Questions (FAQ)
-
What is the best paint for kitchen cabinets?
Acrylic latex or alkyd paints are top choices because they’re durable and easy to clean.
* Can I paint my cabinets without sanding?Yes, you can, but it’s not recommended. Sanding helps the paint stick better. You can use a deglosser instead, but sanding is still better.
* Who is best suited to DIY cabinet painting?Homeowners who are comfortable with DIY projects and have the time and patience to do the job right.
* How many coats of paint do kitchen cabinets need?Usually, two coats of paint are enough for good coverage.
* What’s the best way to clean kitchen cabinets before painting?Use a degreaser to remove grease and grime. Then, rinse with water and let dry.
* How long should I wait between coats of paint on cabinets?Wait at least 2-4 hours between coats, or as recommended by the paint manufacturer.
* Can I paint over laminate cabinets?Yes, but you need to use a special primer that is made for laminate.
* What tools do I need to paint kitchen cabinets?You’ll need sandpaper, cleaner, primer, paint, brushes, rollers, painter’s tape, and drop cloths.
* How do I prevent brush strokes when painting cabinets?Use a high-quality brush, apply thin coats of paint, and consider using a paint leveler.
* What do I do if the paint is peeling off my cabinets?Scrape off the loose paint, sand the surface, prime, and repaint.
By considering these factors and following the tips in this guide, you can better estimate the cabinet painting timeline for your project and achieve a beautiful, long-lasting finish. Whether you choose to DIY or hire a professional, a fresh coat of paint can transform your kitchen.
Hi, I’m Scott Fischer, the voice behind SliceItRight. My passion for food started in my grandmother’s kitchen, where I learned the art of slicing, dicing, and creating delicious meals. Over the years, I’ve explored everything from the perfect kitchen gadgets to mastering culinary techniques, and I’m here to share all of it with you. Whether you’re a beginner or an experienced home chef, my goal is to make cooking easier, more enjoyable, and a lot more fun. So, let’s slice it right and cook up something amazing together!