Can you paint laminate kitchen cabinets? Yes, you can absolutely paint laminate kitchen cabinets, and with the right preparation and materials, you can achieve a beautiful and long-lasting finish. Many homeowners choose this cost-effective way to refresh their kitchen without the expense of replacing cabinets. This guide will provide you with a step-by-step approach to painting laminate cabinets for a durable and professional-looking result.
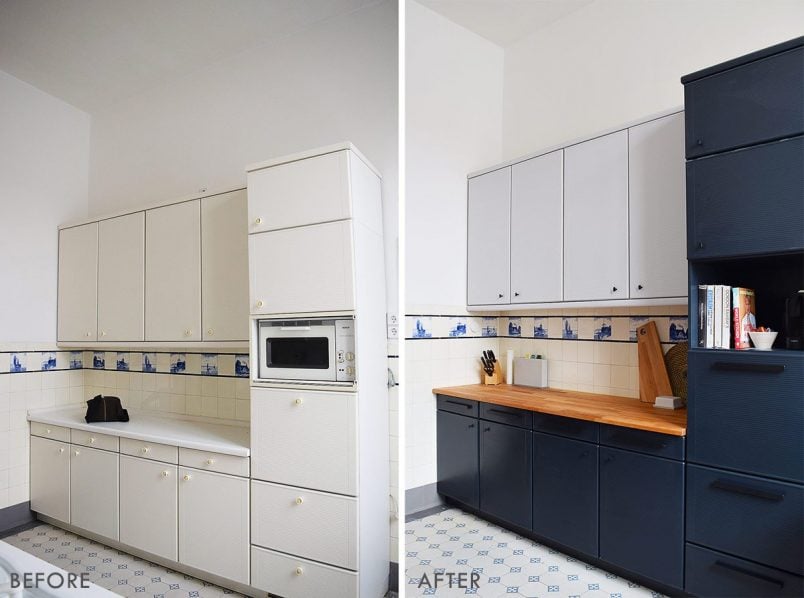
Image Source: www.littlehouseonthecorner.com
Is It Worth Painting Laminate Cabinets?
Painting your laminate kitchen cabinets can be a great investment of time and effort, but how do you know if it’s the right choice for you? Here’s a look at the pros and cons:
Pros:
- Cost-Effective: Painting is significantly cheaper than replacing cabinets.
- Customization: You can choose any color to match your desired aesthetic.
- Updated Look: Painting breathes new life into dated kitchens.
- DIY Project: It’s a manageable project for most homeowners.
- Eco-Friendly: Refurbishing existing cabinets is more sustainable than discarding them.
Cons:
- Time-Consuming: Proper preparation and painting require time and patience.
- Potential for Chipping: Laminate can be prone to chipping if not prepped and painted correctly.
- Requires Skill: Achieving a professional finish takes some skill and attention to detail.
- Not a Permanent Solution: Painted laminate may not last as long as new cabinets.
- Can’t Change Cabinet Style: You can only change the color, not the underlying style of the cabinets.
If you’re looking for an affordable way to update your kitchen and are willing to put in the necessary work, painting your laminate cabinets can be a worthwhile project. However, if you’re looking for a more permanent solution or want to change the style of your cabinets, replacement might be a better option.
Gathering Your Supplies for Painting Laminate Cabinets
Before you begin, gather all the necessary tools and materials. Having everything on hand will streamline the process and prevent delays. Here’s a comprehensive list:
- Cleaning Supplies:
- Degreaser (TSP or similar)
- Clean cloths or sponges
- Preparation Tools:
- Screwdriver or drill to remove hardware
- Painter’s tape
- Drop cloths or plastic sheeting
- Sandpaper (120-grit and 220-grit) or liquid deglosser
- Tack cloth
- Painting Supplies:
- High-quality primer for laminate
- Best paint for laminate cabinets: Acrylic latex or specialized cabinet paint
- Paintbrushes (angled for trim)
- Paint rollers (foam or microfiber)
- Paint tray
- Caulk (optional, for filling gaps)
- Safety Gear:
- Safety glasses
- Gloves
- Respirator or mask
Prepping Laminate Cabinets for Paint: The Foundation for Success
Proper preparation is the most crucial step in painting laminate cabinets. Skimping on prep will lead to poor adhesion and a finish that’s prone to chipping.
1. Removing Hardware and Doors
- Carefully remove all cabinet doors, drawers, knobs, pulls, and hinges.
- Label each door and drawer with tape to ensure proper reinstallation.
- Store hardware in a safe place.
2. Cleaning the Surfaces
- Use a degreaser (like TSP) and warm water to thoroughly clean all cabinet surfaces. This removes grease, dirt, and grime that can interfere with paint adhesion.
- Rinse with clean water and allow to dry completely.
3. Protecting Your Workspace
- Cover countertops, floors, and appliances with drop cloths or plastic sheeting.
- Use painter’s tape to mask off any areas you don’t want to paint, such as walls or backsplashes.
4. Deglossing and Sanding (If Necessary)
- Sanding: Lightly sand the laminate surfaces with 120-grit sandpaper to create a slightly rough surface for the primer to grip. Follow with 220-grit sandpaper to smooth the surface.
- Painting laminate cabinets without sanding: If you prefer to avoid sanding, use a liquid deglosser. Apply it according to the manufacturer’s instructions.
- After sanding or deglossing, wipe down all surfaces with a tack cloth to remove any dust or residue.
5. Filling Imperfections (Optional)
- If your cabinets have any dents, scratches, or gaps, fill them with wood filler or caulk.
- Allow the filler to dry completely and sand it smooth.
Prepping Thermofoil Cabinets for Painting
How to paint thermofoil cabinets is similar to painting laminate, but extra care is needed.
* Inspect for Damage: Thermofoil is prone to peeling. If the thermofoil is peeling, carefully remove the loose pieces.
* Use a Strong Primer: A high-quality bonding primer is essential for thermofoil.
* Avoid Excessive Sanding: Thermofoil is thin, so avoid heavy sanding that could damage it further.
Priming Laminate Cabinets Before Painting: The Glue That Holds It All Together
Priming laminate cabinets before painting is non-negotiable. Primer creates a bond between the laminate and the paint, ensuring a durable and long-lasting finish.
Choosing the Right Primer
- Use a high-quality bonding primer specifically designed for slick surfaces like laminate.
- Consider a stain-blocking primer if your cabinets have any stains or discoloration.
- Popular primer options include:
- BIN Shellac-Based Primer
- Kilz Adhesion Primer
- Zinsser 1-2-3 Primer
Applying the Primer
- Apply a thin, even coat of primer using a brush or roller.
- Follow the manufacturer’s instructions for drying time.
- Lightly sand the primed surface with 220-grit sandpaper to smooth out any imperfections.
- Wipe down with a tack cloth to remove any dust.
- Apply a second coat of primer if necessary, especially if the laminate is dark or glossy.
Selecting the Best Paint for Laminate Cabinets
Choosing the right laminate cabinet paint is crucial for a durable and attractive finish.
Types of Paint
- Acrylic Latex Paint: A popular choice for its durability, ease of use, and low VOC content. Choose a high-quality acrylic latex paint specifically formulated for cabinets and trim.
- Alkyd Paint: Provides a hard, durable finish but has a higher VOC content and longer drying time.
- Specialized Cabinet Paint: Some manufacturers offer paints specifically designed for cabinets, which may provide superior adhesion and durability.
Paint Sheen
- Satin: A good balance between durability and ease of cleaning.
- Semi-Gloss: More durable and easier to clean than satin, but also more reflective.
- Gloss: The most durable and easiest to clean, but also the most reflective and can highlight imperfections.
Color Selection
- Consider the overall style of your kitchen and choose a color that complements your countertops, backsplash, and flooring.
- Test paint samples in your kitchen before committing to a color.
- Neutral colors like white, gray, and beige are popular choices for kitchen cabinets.
Painting Laminate Cabinets: Achieving a Smooth, Professional Finish
Now comes the exciting part: applying the paint!
Application Techniques
- Apply thin, even coats of paint to avoid drips and runs.
- Use a brush for edges and corners and a roller for larger surfaces.
- Work in small sections to ensure even coverage.
- Allow each coat of paint to dry completely before applying the next coat.
Number of Coats
- Apply at least two coats of paint for full coverage and durability.
- For dark colors or high-gloss laminates, you may need three or more coats.
Curing Time
- Allow the paint to cure completely before reinstalling hardware and doors. This can take several days or even weeks, depending on the type of paint and the humidity.
- Avoid heavy use of the cabinets during the curing process.
Laminate Cabinet Painting Tips for a Professional Outcome
Here are some additional tips to help you achieve a professional-looking finish when painting kitchen cabinets laminate:
- Use High-Quality Tools: Invest in good quality brushes, rollers, and painter’s tape for the best results.
- Sand Between Coats: Lightly sand between coats of primer and paint to remove any imperfections and create a smooth surface.
- Practice on a Test Piece: Before painting your cabinets, practice your technique on a scrap piece of laminate to get a feel for the paint and application.
- Control the Environment: Paint in a well-ventilated area with a consistent temperature and humidity.
- Clean Your Tools: Clean your brushes and rollers immediately after use to prolong their life.
- Consider Spraying: For a super smooth finish, consider using a paint sprayer. This requires more skill and preparation but can yield professional-looking results.
- Don’t Rush: Take your time and pay attention to detail. Rushing the process will result in a subpar finish.
Durable Paint for Laminate Cabinets: Protecting Your Investment
Choosing a durable paint for laminate cabinets and properly sealing your painted cabinets are important for a long-lasting finish. Here’s how to protect your investment:
Applying a Topcoat (Optional)
- For added protection, consider applying a clear topcoat over the painted surface.
- Choose a water-based polyurethane or acrylic topcoat for durability and moisture resistance.
- Apply thin, even coats of topcoat and allow to dry completely.
Reinstalling Hardware and Doors
- Carefully reinstall the hardware and doors, using the labels you created during removal.
- Adjust hinges as needed to ensure the doors hang properly.
Cleaning and Maintenance
- Clean your painted cabinets with a mild soap and water solution.
- Avoid using harsh chemicals or abrasive cleaners.
- Touch up any chips or scratches as soon as they appear.
Painting Laminate Cabinets: Troubleshooting Common Issues
Even with careful preparation and painting, you may encounter some common issues. Here’s how to troubleshoot them:
Problem: Paint is chipping or peeling.
Solution: Ensure proper preparation, including thorough cleaning, sanding (or deglossing), and priming. Use a high-quality bonding primer and durable paint.
Problem: Paint is not adhering to the laminate.
Solution: Check that you’re using a primer specifically designed for slick surfaces like laminate. Ensure the surface is clean and free of grease and dirt.
Problem: Paint has drips or runs.
Solution: Apply thin, even coats of paint. Sand down any drips or runs between coats.
Problem: Paint finish is uneven.
Solution: Use a consistent application technique. Sand lightly between coats and apply additional coats as needed.
Problem: Bubbles in the Paint.
Solution: Avoid shaking the paint can vigorously. Use a quality brush and roller to evenly distribute the paint. High temperatures can cause bubbles. Try painting during cooler times of the day.
Problem: Visible Brush Marks.
Solution: Use a self-leveling paint, apply even pressure, and consider thinning the paint slightly to help it flow smoothly. A foam roller can also minimize brush marks.
FAQ: Painting Laminate Cabinets
Q: Do I really need to sand my laminate cabinets before painting?
A: While you can paint laminate cabinets without sanding by using a liquid deglosser, lightly sanding the surface will improve primer adhesion and result in a more durable finish.
Q: What kind of paint should I use on laminate cabinets?
A: The best paint for laminate cabinets is a high-quality acrylic latex paint specifically formulated for cabinets and trim. You can also use specialized cabinet paint.
Q: How many coats of primer do I need?
A: Typically, one to two coats of primer are sufficient. If the laminate is dark or glossy, two coats are recommended.
Q: How long should I wait between coats of paint?
A: Follow the manufacturer’s instructions for drying time. Generally, wait at least 4-6 hours between coats.
Q: Can I use a paint sprayer to paint my laminate cabinets?
A: Yes, you can use a paint sprayer for a smooth, professional finish. However, this requires more skill and preparation.
Q: How do I clean my painted laminate cabinets?
A: Clean with a mild soap and water solution. Avoid using harsh chemicals or abrasive cleaners.
Q: How long will the paint last on my laminate cabinets?
A: With proper preparation and painting, the paint can last for several years. However, painted laminate is not as durable as new cabinets and may require occasional touch-ups.
Q: What if my Thermofoil is peeling off?
A: Carefully remove any loose pieces of thermofoil. You may need to use a heat gun to soften the adhesive. Fill any gaps with wood filler and sand smooth before priming and painting.
By following these steps and tips, you can successfully paint your laminate kitchen cabinets and achieve a beautiful and long-lasting finish. Remember, patience and attention to detail are key to a professional-looking outcome. Good luck!
Hi, I’m Scott Fischer, the voice behind SliceItRight. My passion for food started in my grandmother’s kitchen, where I learned the art of slicing, dicing, and creating delicious meals. Over the years, I’ve explored everything from the perfect kitchen gadgets to mastering culinary techniques, and I’m here to share all of it with you. Whether you’re a beginner or an experienced home chef, my goal is to make cooking easier, more enjoyable, and a lot more fun. So, let’s slice it right and cook up something amazing together!