Imagine spending weeks sanding, priming, and painting your kitchen cabinets. They look fantastic! But what if that beautiful finish scratches, chips, or fades in just a few months? Protecting your hard work with a clear coat is key, but choosing the right one can feel overwhelming. There are so many options, and each promises different things. Which one is best for your kitchen and your lifestyle?
Choosing the wrong clear coat can lead to disaster. It could yellow over time, show brush marks, or simply not provide enough protection against daily wear and tear. Nobody wants to redo their cabinets anytime soon! That’s why understanding the different types of clear coats and their properties is so important. This isn’t just about aesthetics; it’s about preserving your investment and enjoying your newly painted cabinets for years to come.
In this guide, we’ll break down the world of clear coats for painted kitchen cabinets. We’ll explore the pros and cons of each type, discuss application techniques, and offer tips for achieving a durable, beautiful finish. By the end, you’ll have the knowledge you need to confidently select the perfect clear coat for your cabinets, ensuring they stay looking their best for years to come. Let’s dive in and discover how to protect your painted kitchen cabinets!
Our Top 5 Clear Coat For Painted Kitchen Cabinets Recommendations at a Glance
Top 5 Clear Coat For Painted Kitchen Cabinets Detailed Reviews
1. Rust-Oleum 242057 Painter’s Touch Latex Paint

Rating: 8.7/10
The Rust-Oleum 242057 Painter’s Touch Latex Paint gives your projects a clear, glossy finish. This quart of paint works great for both indoor and outdoor projects. You can use it on wood, metal, plaster, brick, or even unglazed ceramic. The water-based formula means it doesn’t smell too strong. It resists chipping and helps protect your surfaces for a long time.
What We Like:
- You can use it on many different surfaces, inside or outside.
- The water-based formula has low odor.
- It dries to the touch in just 30 minutes, so you can finish projects quickly.
- The gloss finish makes surfaces look new and clean.
- It covers up to 120 square feet per quart.
- The paint is UV-resistant, so it won’t yellow over time.
- It creates a tough, chip-resistant finish.
- It seals, protects, and revitalizes surfaces.
What Could Be Improved:
- You need to sand and clean the surface well before painting for the best results. This adds an extra step.
In conclusion, the Rust-Oleum Painter’s Touch Latex Paint is a fantastic option for anyone looking to protect and beautify their projects with a durable, clear, and glossy finish. Just remember to prep your surface properly for the best outcome!
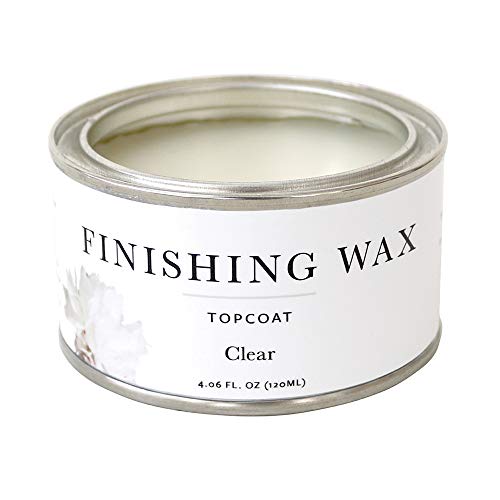
2. Jolie Finishing Wax – Protective topcoat Paint – Use on interior furniture
Rating: 9.2/10
The Jolie Finishing Wax is a clear, protective topcoat designed to seal and enhance your interior projects. Use it on furniture, cabinets, walls, or any home decor item you want to protect. This wax works great on painted, stained, or even raw wood. It’s available in a 120ml size, perfect for smaller projects.
What We Like:
- Durable Protection: It provides a strong seal to protect your furniture and decor from wear and tear.
- User-Friendly: The wax is odor-free and non-hazardous, making it safe and pleasant to use indoors.
- Easy Application: You can easily apply it with a wax brush or a soft cloth.
- Beautiful Finish: It dries to a soft, matte finish that looks elegant and can be buffed for a subtle shine.
- Versatile: You can layer it with colored waxes to add texture and dimension to your projects.
- Excellent Coverage: A little bit of this wax goes a long way, saving you money.
What Could Be Improved:
- Dry Time: The 8-hour dry time between coats can be a bit lengthy for some projects.
Overall, the Jolie Finishing Wax is a fantastic choice for protecting and beautifying your interior projects. Its ease of use and beautiful finish make it a winner.
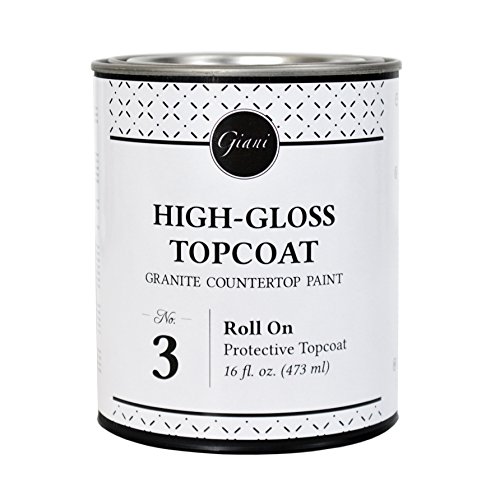
3. Giani Countertop Paint Clear Acrylic High-Gloss Topcoat- Step 3
Rating: 8.8/10
The Giani Countertop Paint Clear Acrylic High-Gloss Topcoat – Step 3 is the final touch for your Giani countertop transformation. This 16 oz. can is designed to seal and protect your newly painted countertop. It’s a crucial part of all Giani Countertop Paint Kits. This topcoat uses a special non-yellowing formula. Standard polyurethane finishes won’t work as well. One can covers about 35 square feet, or 16 running feet of a 24″ wide countertop. It’s a water-based acrylic paint, so it’s safe, has low odor, and low VOCs. It dries completely in just 4 hours.
What We Like:
- Specifically designed for Giani countertops, ensuring optimal performance and durability.
- Non-yellowing formula keeps your countertops looking fresh and new for longer.
- Water-based acrylic is safe to use with low odor and VOCs.
- Provides a beautiful high-gloss finish, enhancing the look of your countertop.
- Quick full dry time of 4 hours lets you use your countertops sooner.
What Could Be Improved:
- The 35 square feet coverage might not be enough for larger kitchens, requiring multiple cans.
- It is Step 3 of the Giani Countertop Paint Kits, so it is not a standalone product, and other steps are required.
If you’re using a Giani Countertop Paint Kit, this topcoat is essential. The Giani Clear Acrylic Topcoat will ensure your countertops look great for years to come.
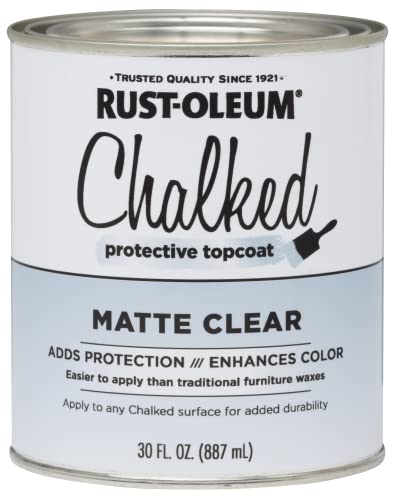
4. Rust-Oleum 287722 Chalked Ultra Matte Interior Paint
Rating: 8.9/10
The Rust-Oleum 287722 Chalked Ultra Matte Interior Paint and Matte Clear Topcoat lets you easily create a cool, vintage look on furniture and home décor. This paint works on many surfaces, like wood, metal, ceramic, and canvas. You can distress it to make it look aged. It has a low odor and is easy to clean up with soap and water. The paint dries quickly, in about 30 minutes, and one coat can cover up to 150 square feet. The clear topcoat protects your painted surface and gives it a smooth, ultra-matte finish.
What We Like:
- You can use it on lots of different indoor surfaces.
- It’s easy to create a vintage, distressed look.
- The low-odor formula makes it pleasant to use.
- Cleaning up is simple with just soap and water.
- It dries super fast, so you can finish projects quickly.
- One coat often covers completely, saving you time and paint.
- The paint sticks well and is easy to apply with little prep work.
- The topcoat gives a beautiful, velvety smooth, matte finish.
What Could Be Improved:
- The 30 oz size might not be enough for larger projects.
- Some users might prefer a wider range of color options.
If you want to give your furniture a charming, aged look, the Rust-Oleum Chalked Ultra Matte paint and topcoat are a great option. It’s easy to use and gives a professional-looking finish.
5. Rust-Oleum 302110 Universal All Surface Clear Topcoat Spray

Rating: 9.2/10
The Rust-Oleum 302110 Universal All Surface Clear Topcoat Spray gives your projects a shiny, protective finish. This 11 oz can of high gloss clear coat works on almost any surface. You can use it on wood, plastic, metal, and even concrete. It’s an oil-based formula that sticks well and helps prevent rust. Your finished projects will resist fading and chipping, keeping them looking good for a long time. The spray dries quickly, so you don’t have to wait long. It covers up to 15 square feet, making it great for small and medium-sized projects. It also fights rust and corrosion. This topcoat gives a clear, high-gloss shine that makes your projects pop.
What We Like:
- Works on many different surfaces like wood, metal, plastic, and more.
- The oil-based formula sticks well and prevents rust from forming.
- It dries fast, so you can finish your projects quickly.
- The clear, high-gloss finish adds a brilliant shine to your work.
- Helps prevent fading and chipping, making the finish last longer.
What Could Be Improved:
- Oil-based formulas can sometimes have a strong odor.
- Coverage area is limited to 15 sq ft per can, which might require multiple cans for larger projects.
- Proper ventilation is needed when spraying due to the fumes.
In conclusion, the Rust-Oleum Universal Clear Topcoat Spray is a versatile and effective way to protect and enhance your projects. It’s a great choice for anyone looking for a durable, high-gloss finish.
The Ultimate Buying Guide: Clear Coat for Painted Kitchen Cabinets
Choosing the right clear coat for your freshly painted kitchen cabinets is important. It protects your paint job and makes your cabinets look great for years to come. This guide will help you pick the best clear coat for your needs.
Key Features to Look For
When you’re shopping for a clear coat, think about these features:
- Durability: The clear coat should be tough enough to resist scratches, chips, and everyday wear and tear.
- Water Resistance: Kitchens get wet! The clear coat needs to protect your paint from water damage and spills.
- UV Protection: Sunlight can fade painted cabinets. Look for a clear coat that blocks UV rays.
- Sheen Level: Do you want a glossy, satin, or matte finish? Choose a sheen that matches your style.
- Ease of Application: Some clear coats are easier to apply than others. Consider your skill level.
- Food Safe: For kitchen cabinets, ensure the dried and cured finish is food-safe.
Important Materials and Types of Clear Coat
Clear coats come in different types. Here are some common options:
- Water-Based Polyurethane: This is a popular choice because it’s durable, low-odor, and easy to clean up with water. It dries clear and doesn’t yellow over time.
- Oil-Based Polyurethane: Oil-based poly is very durable and provides a warm, amber glow. However, it has a strong odor, takes longer to dry, and can yellow over time. Cleaning requires mineral spirits.
- Acrylic Clear Coat: Acrylics are good for adhesion and flexibility, but often less durable than polyurethane.
- Lacquer: Lacquer dries very quickly and provides a smooth, hard finish. However, it’s not as durable as polyurethane and requires good ventilation during application.
- Epoxy: Two-part epoxy provides a super durable finish, often used for countertops.
- Wax: Wax is a very soft clear coat that provides low protection.
Factors That Improve or Reduce Quality
Several things can affect how well your clear coat performs:
- Surface Preparation: Make sure your cabinets are clean, smooth, and properly primed before applying the clear coat.
- Application Technique: Apply thin, even coats to avoid drips and runs. Use a high-quality brush, roller, or sprayer.
- Number of Coats: Applying multiple coats (usually 2-3) provides better protection and durability.
- Drying Time: Allow the clear coat to dry completely between coats and before putting your cabinets back in place.
- Quality of the Product: Cheaper clear coats may not be as durable or long-lasting as higher-quality options.
- Environmental Conditions: Temperature and humidity can affect drying time and finish quality.
User Experience and Use Cases
Clear coats are used to protect painted cabinets in many kitchens. Here are some common scenarios:
- Protecting Freshly Painted Cabinets: After painting your cabinets, a clear coat seals the paint and prevents scratches and stains.
- Updating Existing Cabinets: You can apply a clear coat to older painted cabinets to refresh their look and add extra protection.
- High-Traffic Areas: Clear coat is especially important for cabinets near the sink, stove, or other areas that get a lot of use.
- DIY Projects: Clear coat is a great way to achieve a professional-looking finish on your DIY cabinet projects.
Frequently Asked Questions (FAQ)
Q: What is the best type of clear coat for kitchen cabinets?
A: Water-based polyurethane is a great all-around choice because it’s durable, easy to use, and dries clear. However, the best choice depends on your specific needs and preferences.
Q: How many coats of clear coat should I apply?
A: Two to three coats are usually recommended for optimal protection and durability.
Q: Do I need to sand between coats of clear coat?
A: Yes, lightly sanding with fine-grit sandpaper (220-320 grit) between coats helps create a smooth, even finish. Be sure to remove all dust before applying the next coat.
Q: Can I use a brush, roller, or sprayer to apply clear coat?
A: Yes, you can use any of these methods. A high-quality brush or sprayer will give you the smoothest finish. Use the method you are most comfortable with.
Q: How long does it take for clear coat to dry?
A: Drying time varies depending on the type of clear coat, temperature, and humidity. Always follow the manufacturer’s instructions. Typically, you’ll need to wait at least 4-6 hours between coats and 24-48 hours before using your cabinets.
Q: Will clear coat yellow over time?
A: Oil-based polyurethanes are more likely to yellow over time. Water-based polyurethanes are less likely to yellow.
Q: How do I clean clear-coated kitchen cabinets?
A: Use a mild soap and water solution. Avoid harsh chemicals or abrasive cleaners.
Q: Can I apply clear coat over chalk paint?
A: Yes, you can, but you might need to apply more coats because chalk paint is porous. Make sure the chalk paint is fully dry before applying the clear coat.
Q: What sheen level should I choose for my clear coat?
A: The sheen level is a matter of personal preference. Glossy sheens are easier to clean but show imperfections more easily. Matte sheens hide imperfections but can be harder to clean. Satin is a good compromise.
Q: Is clear coat food safe?
A: Once fully cured (dried), many clear coats are considered food-safe for incidental contact. It’s always best to check the manufacturer’s specifications to be sure.
In conclusion, every product has unique features and benefits. We hope this review helps you decide if it meets your needs. An informed choice ensures the best experience.
If you have any questions or feedback, please share them in the comments. Your input helps everyone. Thank you for reading.
Hi, I’m Scott Fischer, the voice behind SliceItRight. My passion for food started in my grandmother’s kitchen, where I learned the art of slicing, dicing, and creating delicious meals. Over the years, I’ve explored everything from the perfect kitchen gadgets to mastering culinary techniques, and I’m here to share all of it with you. Whether you’re a beginner or an experienced home chef, my goal is to make cooking easier, more enjoyable, and a lot more fun. So, let’s slice it right and cook up something amazing together!