Dreaming of a kitchen refresh that doesn’t break the bank? You’re not alone! Many homeowners want to update their kitchen cabinets but feel overwhelmed by the choices. Picking the perfect chalk paint can feel like a puzzle, with so many colors and finishes to consider. You might worry about whether it will look good, how to apply it, or if it will last.
But what if there was a way to transform your kitchen cabinets into a stylish focal point with minimal fuss and a lot of personality? This blog post is your secret weapon. We’ll dive deep into the wonderful world of chalk paint for kitchen cabinets. You’ll learn how to choose the best shades, get practical tips for a flawless application, and discover how to achieve that beautiful, durable finish you’ve been picturing.
Get ready to unlock the secrets to a stunning kitchen makeover. By the time you finish reading, you’ll feel confident and inspired to tackle your cabinet project and create the kitchen of your dreams. Let’s get started on this exciting transformation!
Our Top 5 Chalk Paint For Kitchen Cabinets Recommendations at a Glance
| Image | Product | Rating | Links |
|---|---|---|---|
 |
ALL-IN-ONE Paint | 9.3/10 | Check Price |
 |
Rust-Oleum Linen White Chalked All-in-One Ultra Matte Paint | 8.5/10 | Check Price |
 |
ALL-IN-ONE Paint | 8.6/10 | Check Price |
 |
Mister Rui Chalk Wax Paint Brush | 9.5/10 | Check Price |
 |
Rust-Oleum 372007 Transformations Basics Cabinet & Trim Paint | 8.9/10 | Check Price |
Top 5 Chalk Paint For Kitchen Cabinets Detailed Reviews
1. ALL-IN-ONE Paint
Rating: 8.8/10
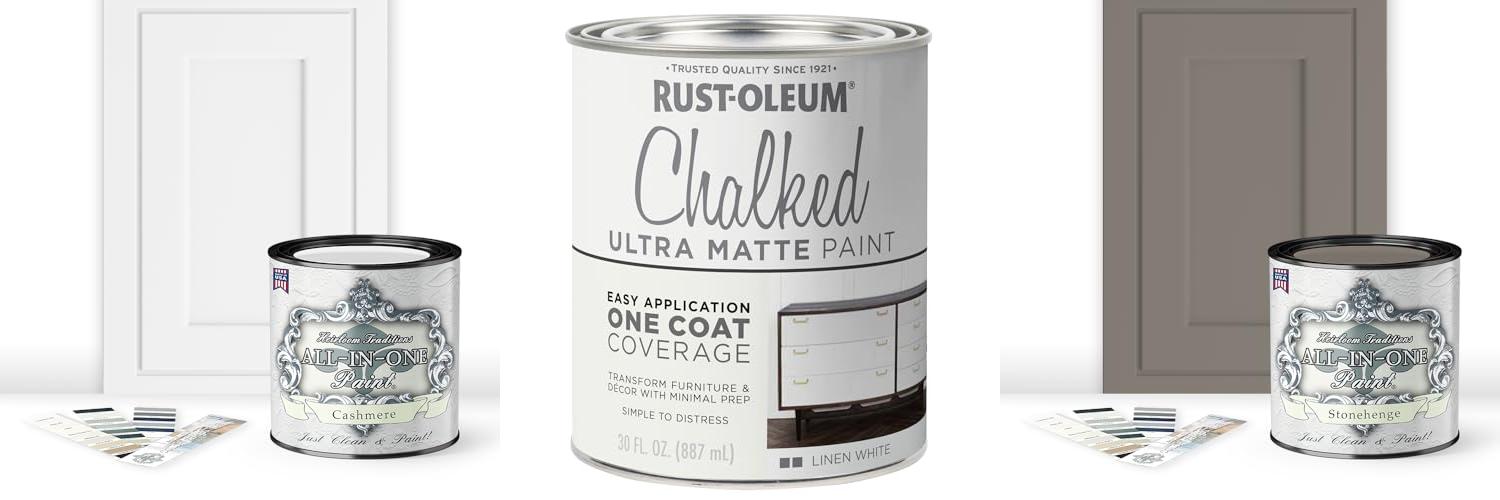
This ALL-IN-ONE Paint, Durable cabinet and furniture paint, is a game-changer for DIY projects. It boasts a built-in primer and top coat, meaning you can skip the tedious sanding step! This quart of paint comes with a handy 30-color card featuring their newest shades, including the lovely Cashmere (a true white). It promises a low-luster, velvet sheen finish that looks fantastic on almost anything.
What We Like:
- It’s truly ALL-IN-ONE: no separate primer or top coat needed.
- The no-sanding requirement saves so much time and effort.
- The included color card with sprayed-on colors helps you pick the perfect shade for your home’s lighting.
- It works on a huge variety of surfaces, from walls and cabinets to furniture, metal, glass, and even fabric, vinyl, and leather.
- The velvet sheen finish adds a touch of elegance.
- It’s suitable for both interior and exterior use, making it super versatile.
What Could Be Improved:
- Results can’t be guaranteed, so manage your expectations.
- Digital screens might not show the true colors accurately, so relying on the physical color card is important.
- For the most accurate color choices, you’ll want to search for their “Heirloom Traditions Paint Color Collection Fan Deck.”
This paint offers a fantastic shortcut to beautifully finished projects. If you’re looking for a simple, effective way to refresh your home or furniture, this is definitely worth considering.
2. Rust-Oleum Linen White Chalked All-in-One Ultra Matte Paint
Rating: 9.0/10
Revamp your furniture with Rust-Oleum Chalked All-in-One Ultra Matte Paint in Linen White. This paint makes updating your home decor super simple. You can transform old pieces into something new and stylish without a lot of hassle. It’s perfect for anyone who wants to add a personal touch to their living space.
What We Like:
- It’s really easy to use, even if you’ve never painted before.
- You don’t need to prime or sand your furniture first.
- One coat often covers the whole surface.
- It dries fast, usually in 30 minutes.
- Cleanup is a breeze with just soap and water.
- The matte finish looks and feels smooth and fancy.
- It sticks to lots of different materials like wood, metal, and ceramic.
- It’s made right here in the USA.
What Could Be Improved:
- While it says one coat, some darker colors might need a second coat for perfect coverage.
- The “ultra-matte” finish can sometimes be a bit delicate and might require a clear coat for high-traffic areas if you want extra protection.
Overall, this paint is a fantastic option for DIYers looking for an easy way to refresh furniture. It delivers a beautiful, smooth finish with minimal effort.
3. ALL-IN-ONE Paint
Rating: 8.6/10
Transform your home with the ALL-IN-ONE Paint, Durable cabinet and furniture paint. This amazing paint simplifies your projects because it has primer and top coat built right in. You won’t need to sand or prime, and there’s no need for a separate top coat. It even comes with a handy 30-color card featuring Stonehenge, a beautiful mid-tone greige, so you can see how the colors look in your own home’s light. This paint is ready to tackle almost any surface inside or out.
What We Like:
- It’s truly all-in-one: no sanding, priming, or top coat needed, saving you time and effort.
- The low luster, velvet sheen finish looks elegant and modern on furniture and cabinets.
- It’s super versatile, perfect for walls, doors, cabinets, furniture, metal, glass, ceramics, and even floor and wall tile.
- The paint is durable but also flexible enough to paint fabrics, vinyl, and leather smoothly.
- The included 30-color card with actual sprayed-on colors helps you choose the perfect shade for your space.
What Could Be Improved:
- Color accuracy can vary on digital screens, so using the physical color card or ordering a sample is important.
- The product description mentions that results cannot be guaranteed, which might make some users hesitant for critical projects.
This paint makes DIY projects much easier and more enjoyable. Give your home a fresh new look with this all-in-one solution.
4. Mister Rui Chalk Wax Paint Brush
Rating: 9.1/10
Transform your furniture with the Mister Rui Chalk Wax Paint Brush set. This 3-piece collection gives you the tools you need for a flawless finish on your DIY projects. Whether you’re working with chalk paint, wax, acrylic, or milk paint, these brushes are designed for smooth application and beautiful results.
What We Like:
- The set includes three different brush shapes: a pointed brush, a round brush, and a flat brush. This variety helps you tackle various details and surfaces.
- Made with natural hog bristles, these brushes have great paint absorption. They apply paint and wax evenly without leaving streaks.
- The brushes are designed for no shedding, which means no annoying bristles left on your freshly painted furniture.
- Comfortable beech wood handles make painting easy. They feel good in your hand, even during longer projects.
- The stainless steel ferrules resist rust. They help keep the brushes in good condition over time.
- Each brush has a hole and lanyard for easy storage and drying. This keeps your brushes clean and ready for your next project.
What Could Be Improved:
- A reminder about pre-use bristle preparation is included. It’s important to comb out loose bristles before your first use to prevent shedding.
This Mister Rui brush set is a solid choice for anyone looking to add a professional touch to their furniture painting. You’ll achieve great results with these reliable tools.
5. Rust-Oleum 372007 Transformations Basics Cabinet & Trim Paint
Rating: 9.1/10
Give your cabinets a fresh new look with Rust-Oleum Transformations Basics Cabinet & Trim Paint in Pure White! This paint is designed to easily update old cabinets in your kitchen, bathroom, or office. It’s a simple way to make a big change.
What We Like:
- This paint makes old cabinets look brand new.
- It dries quickly, so you can finish your project faster.
- The paint goes on smoothly and looks great.
- It provides a tough finish that resists scratches and stains.
- One quart covers a good amount of space, up to 50 square feet.
- You get a nice semi-gloss shine in just one step.
What Could Be Improved:
- For the best protection, two coats are recommended, which means more time and paint.
- The “Pure White” color might not match all existing decor without other changes.
If you’re looking for an easy and effective way to refresh your cabinets, this Rust-Oleum paint is a solid option. It delivers a clean, bright finish that can transform your space.
Chalk Paint for Kitchen Cabinets: Your Guide to a Beautiful Makeover
Giving your kitchen cabinets a fresh new look doesn’t have to be a huge project. Chalk paint is a popular choice for DIYers because it’s easy to use and creates a lovely, matte finish. This guide will help you pick the best chalk paint for your kitchen cabinet project.
Key Features to Look For
When choosing chalk paint for your kitchen cabinets, keep these important features in mind:
- Durability: Kitchen cabinets get a lot of use. Look for chalk paints that are known for their toughness and resistance to scratches and moisture.
- Adhesion: Good chalk paint sticks well to different surfaces. This means you often don’t need to sand your cabinets beforehand, saving you time and effort.
- Finish: Chalk paint typically has a soft, matte finish. Some brands offer slightly different textures, so check if you prefer a very smooth or a more textured look.
- Color Variety: Most chalk paints come in a wide range of colors. Think about the style you want for your kitchen and choose a color that fits.
- Low VOCs (Volatile Organic Compounds): This means the paint has fewer harmful chemicals. It’s better for your health and the environment.
Important Materials You’ll Need
Besides your chalk paint, you’ll need a few other things for a successful cabinet makeover:
- Primer (Optional but Recommended): While chalk paint adheres well, a primer can help the paint stick even better, especially on slick surfaces like laminate. It also helps cover dark colors if you’re painting them a lighter shade.
- Topcoat/Sealer: This is crucial for chalk paint on kitchen cabinets. A good topcoat protects the paint from water, grease, and wear. Wax is a traditional option, but polycrylic or a water-based polyurethane is often more durable for high-traffic areas like kitchens.
- Brushes and Rollers: High-quality brushes will give you a smoother finish. A small foam roller can also be helpful for flat surfaces.
- Sandpaper (Fine Grit): You might need this for light sanding between coats or if you want a slightly distressed look.
- Cleaning Supplies: You’ll need a good degreaser to clean your cabinets thoroughly before you start painting.
Factors That Improve or Reduce Quality
Several things can make your chalk paint project turn out great or not so great:
- Surface Preparation: Properly cleaning and degreasing your cabinets is vital. Any grease or dirt will prevent the paint from sticking well.
- Application Technique: Applying thin, even coats is better than one thick coat. This helps the paint dry evenly and prevents drips.
- Topcoat Application: Don’t skip the topcoat! It’s what makes chalk paint durable enough for kitchen cabinets. Applying the topcoat evenly is also important for protection.
- Paint Quality: Higher-quality chalk paints generally have better pigment, smoother application, and more durability. Cheaper paints might require more coats or offer less protection.
- Environment: Painting in a well-ventilated area with a consistent temperature helps the paint dry properly. Extreme humidity or cold can affect the finish.
User Experience and Use Cases
Many people love using chalk paint for kitchen cabinets because it’s forgiving and allows for creative expression.
- Easy to Use: You usually don’t need to sand or prime, which makes it a quicker project than traditional painting.
- Versatile Finish: You can create a smooth, modern look or a charming, distressed farmhouse style by lightly sanding certain areas.
- Quick Updates: It’s a great way to update the look of your kitchen without replacing the cabinets entirely.
- Beginner Friendly: Even if you haven’t painted much before, chalk paint is a great way to start.
Frequently Asked Questions about Chalk Paint for Kitchen Cabinets
Q: Do I really need to use a topcoat on chalk paint for kitchen cabinets?
A: Yes, absolutely. A topcoat protects the chalk paint from water, grease, and everyday wear and tear, making your cabinets last longer and look better.
Q: Can I use chalk paint over laminate cabinets?
A: Yes, you can. Laminate cabinets are often slick, so cleaning them very well and using a good primer first will help the chalk paint stick better.
Q: How many coats of chalk paint do I need?
A: Most projects need two to three thin coats. The exact number depends on the color of your cabinets and the color of the chalk paint.
Q: Is chalk paint safe for kitchens?
A: Chalk paint itself is usually low in VOCs. However, the durability comes from the topcoat, so choose a water-based, low-VOC topcoat for safety.
Q: How do I clean chalk-painted cabinets?
A: For regular cleaning, use a damp cloth. For tougher spots, use a mild soap and water solution. Avoid harsh chemicals or abrasive scrubbers.
Q: Can I achieve a distressed look with chalk paint?
A: Yes! After the paint is dry, you can lightly sand edges and corners to create a vintage or distressed look.
Q: What’s the difference between wax and a polycrylic topcoat for chalk paint?
A: Wax gives a soft, matte finish but isn’t as durable for kitchens. Polycrylic or a water-based polyurethane offers better protection against moisture and stains.
Q: How long does chalk paint take to dry?
A: Chalk paint dries quickly to the touch, usually within an hour. However, it needs 24-48 hours for recoating and several weeks to fully cure and harden.
Q: Can I use chalk paint on glazed cabinets?
A: Yes, chalk paint adheres well to glazed cabinets. Make sure to clean them thoroughly to remove any residue from the glaze.
Q: What is the best way to apply chalk paint to cabinet doors?
A: Remove the cabinet doors and paint them flat on a protected surface. Use a good quality brush for a smooth finish, or a small foam roller for larger, flat areas.
In conclusion, every product has unique features and benefits. We hope this review helps you decide if it meets your needs. An informed choice ensures the best experience.
If you have any questions or feedback, please share them in the comments. Your input helps everyone. Thank you for reading.
Hi, I’m Scott Fischer, the voice behind SliceItRight. My passion for food started in my grandmother’s kitchen, where I learned the art of slicing, dicing, and creating delicious meals. Over the years, I’ve explored everything from the perfect kitchen gadgets to mastering culinary techniques, and I’m here to share all of it with you. Whether you’re a beginner or an experienced home chef, my goal is to make cooking easier, more enjoyable, and a lot more fun. So, let’s slice it right and cook up something amazing together!