Are you wondering how to remove that bulky box (soffit) above your kitchen cabinets? Yes, you can remove a kitchen soffit! This detailed kitchen soffit removal guide will show you how to safely and effectively tackle this project. It will cover everything from planning and preparation to demolition and what to do after removing the kitchen bulkhead. This guide also addresses soffit hiding pipes removal and kitchen soffit ideas after removal.
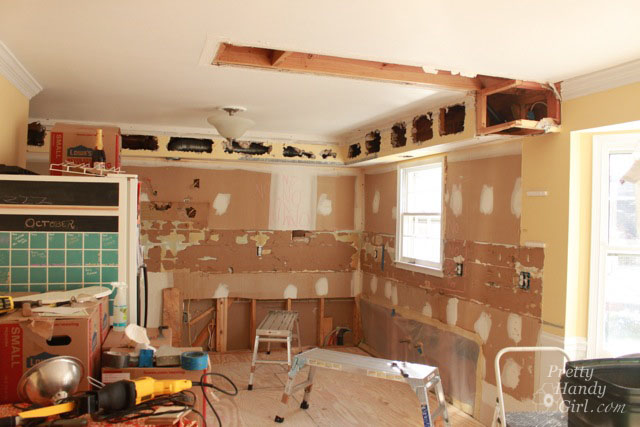
Image Source: prettyhandygirl.com
Why Remove a Kitchen Soffit?
Soffits, also sometimes called bulkheads, are those enclosed boxes above your kitchen cabinets. They were once common in kitchen design. However, modern homeowners often want to remove them for several reasons:
- Improved Aesthetics: Removing a soffit can create a cleaner, more modern look in your kitchen.
- Increased Cabinet Space: Without the soffit, you can install taller cabinets or extend existing ones to the ceiling for more storage.
- Better Lighting: Removing a soffit can allow for better placement of under-cabinet lighting and other light fixtures.
- Higher Home Value: A more modern and open kitchen design can increase the value of your home.
Grasping Soffit Construction
Before you begin soffit demolition kitchen, it’s crucial to understand how they are built. Most kitchen soffits are framed using wood studs and then covered with drywall. However, some may also contain plumbing, electrical wiring, or HVAC ductwork. This is especially true for soffit hiding pipes removal.
Types of Soffits
- Framed Soffits: These are the most common. They consist of a wooden frame covered in drywall.
- Drywall Soffits: Sometimes, a soffit might be constructed entirely of drywall attached to the wall studs.
- Soffits with Utilities: These are the trickiest. They contain pipes, wires, or ducts and require extra care.
Planning Your Kitchen Soffit Removal
Careful planning is critical to a successful soffit removal. Here’s what you need to consider:
1. Inspection: Check for Utilities
The most important step is to determine if the soffit contains any plumbing, electrical wiring, or HVAC ductwork. This will affect how you approach the removal.
- Visual Inspection: Look for pipes or wires entering or exiting the soffit.
- Floor Above: Check what’s directly above the soffit. A bathroom or laundry room above often means plumbing inside.
- Ask a Professional: If you’re unsure, hire a qualified plumber or electrician to inspect the soffit. This can help to avoid a costly (and potentially dangerous) mistake.
2. Design: Kitchen Soffit Ideas After Removal
Think about what you want to do after the soffit is gone. This will affect how you remove the soffit and prepare the space.
- Taller Cabinets: If you plan to install taller cabinets, measure the space and order them in advance.
- Open Space: If you prefer an open space, consider patching and painting the ceiling.
- Lighting: Plan any new lighting you want to install.
3. Permits: Do You Need One?
Check with your local building department to see if you need a permit for kitchen soffit removal. Permits are often required if you are altering the structure of your home or dealing with electrical or plumbing work.
4. Budget: Soffit Removal Cost Kitchen
The soffit removal cost kitchen varies depending on several factors:
- DIY vs. Professional: DIY is cheaper, but it requires your time and effort. Hiring a contractor will cost more but saves you time and labor.
- Utilities: Removing soffits with utilities will increase the cost due to the need for professional plumbers or electricians.
- Materials: The cost of patching, painting, and any new cabinets or lighting.
Here’s a rough estimate of the soffit removal cost kitchen:
| Item | Cost (DIY) | Cost (Professional) |
|---|---|---|
| Materials | \$50 – \$200 | \$50 – \$200 |
| Plumber/Electrician | \$0 | \$100 – \$500+ |
| Contractor Labor | \$0 | \$200 – \$1000+ |
| Total | \$50 – \$200 | \$350 – \$1700+ |
5. Safety: Protect Yourself
Safety is paramount. Wear appropriate personal protective equipment (PPE) during the removal process.
- Safety Glasses: To protect your eyes from dust and debris.
- Dust Mask: To avoid inhaling drywall dust.
- Gloves: To protect your hands.
- Hearing Protection: Especially if you are using power tools.
Tools and Materials for Kitchen Soffit Removal
Gather these tools and materials before starting:
- Safety Glasses
- Dust Mask
- Gloves
- Stud Finder: To locate studs behind the drywall.
- Utility Knife: To score the drywall.
- Drywall Saw: To cut the drywall.
- Pry Bar: To remove the drywall and framing.
- Hammer: For use with the pry bar.
- Screwdriver or Drill: To remove screws.
- Level: To ensure everything is level.
- Measuring Tape: To take measurements.
- Trash Bags or Container: For debris disposal.
- Ladder: To reach the soffit.
- Optional: Reciprocating saw (for faster cutting, but use with caution).
- For patching: Joint compound, drywall tape, sanding sponge.
Step-by-Step Kitchen Soffit Removal Guide
Follow these steps for safe and effective soffit removal:
Step 1: Prepare the Area
- Clear the Countertops: Remove everything from your countertops to protect them.
- Cover the Floor: Use drop cloths or plastic sheeting to protect your floors from dust and debris.
- Turn Off Power: If there’s any electrical wiring in the soffit, turn off the power at the breaker box.
- Disconnect Plumbing (if needed): If plumbing is present, turn off the water supply and disconnect any pipes. This is best left to a professional plumber.
Step 2: Locate the Studs
- Use a stud finder to locate the studs behind the drywall. Mark their locations with a pencil. This will help you understand how the soffit is constructed and where to cut.
Step 3: Score the Drywall
- Use a utility knife to score the drywall along the edges of the soffit. This will prevent the drywall from tearing when you remove it. Score deeply, going over the line several times.
Step 4: Remove the Drywall
- Use a drywall saw to cut along the scored lines. If you are careful, you can remove the drywall in large pieces.
- If the drywall is screwed in, use a screwdriver or drill to remove the screws.
- Once the drywall is cut or unscrewed, use a pry bar to gently pry it away from the framing. Be careful not to damage the surrounding walls or ceiling.
Step 5: Inspect for Utilities (Again!)
- With the drywall removed, you’ll have a clearer view of the inside of the soffit.
- Double-check for any plumbing, electrical wiring, or HVAC ductwork.
- If you find any utilities, do not proceed until you have consulted with a qualified professional.
Step 6: Remove the Framing
- Once you’re sure there are no utilities, you can start removing the framing.
- Use a pry bar and hammer to remove the wood studs.
- Start by removing the top and bottom plates (the horizontal pieces of wood that connect the studs).
- Then, remove the vertical studs.
- Be careful not to damage the surrounding walls or ceiling.
Step 7: Clean Up
- Once the framing is removed, clean up the area thoroughly.
- Sweep up any debris and dispose of it properly.
- Vacuum the area to remove any remaining dust.
Step 8: Patch the Walls and Ceiling
- After removing the soffit, you’ll likely need to patch the walls and ceiling.
- Apply joint compound to any holes or cracks.
- Use drywall tape to reinforce the seams.
- Let the joint compound dry completely, then sand it smooth.
- Prime and paint the patched areas to match the surrounding surfaces.
Framed Soffit Removal: Dealing With Variations
Framed soffits are the most common, but their construction can vary. Here’s how to handle different situations:
- Large Soffits: Large soffits may have additional support framing. Take your time and carefully remove each piece.
- Soffits Attached to the Ceiling: Some soffits are tightly attached to the ceiling. Use a sharp utility knife to cut the caulk or paint along the seam before prying the soffit away.
- Soffits with Irregular Shapes: Soffits with curves or angles require more careful cutting. Use a drywall saw to follow the shape of the soffit.
Drywall Soffit Removal: Simpler, But Still Requires Care
Drywall soffits, constructed solely from drywall attached to studs, are simpler to remove than framed ones, but still require a cautious approach:
- Locate Studs: Find and mark the studs.
- Score the Seams: Score along the edges to prevent tearing.
- Cut Along Studs: Use a drywall saw to cut along the stud locations.
- Remove Sections: Pry the drywall sections away from the studs.
- Clean and Patch: Clean up debris and patch any damaged areas.
Soffit Hiding Pipes Removal: Extra Precautions
Soffits that conceal plumbing require extra caution:
- Identify Pipes: Locate and identify all pipes within the soffit.
- Turn Off Water: Shut off the water supply to the affected pipes.
- Call a Plumber: Do not attempt to move or disconnect pipes yourself. Hire a licensed plumber to reroute or cap the pipes as needed.
- Careful Demolition: Once the plumbing is addressed, carefully remove the soffit structure.
- Inspect and Repair: Inspect for any leaks or damage and repair as needed.
Utilities Relocation
When soffits conceal utilities, relocation is key. Here’s a breakdown of each:
- Plumbing: Relocating pipes often involves rerouting them within the wall or ceiling. A licensed plumber is essential for this task to ensure proper drainage and prevent leaks.
- Electrical Wiring: Electrical wiring must be handled by a qualified electrician. They can safely reroute the wiring, ensuring it meets code requirements and prevents electrical hazards.
- HVAC Ductwork: Moving HVAC ductwork may require modifying your home’s heating and cooling system. An HVAC technician can assess the situation and recommend the best solution.
Kitchen Soffit Ideas After Removal
Once the soffit is gone, you have several options to improve your kitchen’s aesthetics and functionality:
1. Extend Cabinets to the Ceiling
- This is the most popular option. It creates a seamless look and maximizes storage space.
- Measure the space and order cabinets that fit perfectly.
2. Open Space Above Cabinets
- Leaving the space open can create a more airy and modern feel.
- Consider adding decorative items or plants to the space.
3. Install New Lighting
- Removing the soffit provides an opportunity to install new lighting fixtures.
- Consider under-cabinet lighting, pendant lights, or recessed lighting.
4. Add a Decorative Molding
- Install a decorative molding along the top of the cabinets to create a finished look.
- Choose a molding that complements your kitchen’s style.
5. Tile the Wall
- Extend your backsplash tile up to the ceiling to create a dramatic effect.
- This can add color and texture to your kitchen.
Frequently Asked Questions (FAQ)
- Can I remove a kitchen soffit myself? Yes, you can, if you are comfortable with basic carpentry and drywall work and there are no utilities inside. If there are utilities, hire a professional.
- How long does it take to remove a kitchen soffit? It depends on the size and complexity of the soffit. A simple soffit can be removed in a few hours, while a larger one with utilities may take a few days.
- What if I find asbestos in the soffit? Stop work immediately and contact a qualified asbestos abatement professional.
- Is it difficult to patch the ceiling after removing a soffit? Patching a ceiling can be tricky, especially if you’re trying to match the texture of the existing ceiling. Take your time and use the right tools and materials.
- What are the best kitchen soffit ideas after removal for a small kitchen? For small kitchens, extending cabinets to the ceiling or leaving the space open can make the kitchen feel larger and more open.
- How do I find a qualified contractor to remove a kitchen soffit? Ask for recommendations from friends or family, check online reviews, and get multiple quotes. Make sure the contractor is licensed and insured.
Removing a kitchen soffit can transform your kitchen, creating a more modern and functional space. By following this kitchen soffit removal guide, you can safely and effectively complete this project. Always prioritize safety and don’t hesitate to seek professional help when needed. Remember to plan carefully, inspect for utilities, and have a clear vision of what you want your kitchen to look like after the soffit is gone. Good luck!
Hi, I’m Scott Fischer, the voice behind SliceItRight. My passion for food started in my grandmother’s kitchen, where I learned the art of slicing, dicing, and creating delicious meals. Over the years, I’ve explored everything from the perfect kitchen gadgets to mastering culinary techniques, and I’m here to share all of it with you. Whether you’re a beginner or an experienced home chef, my goal is to make cooking easier, more enjoyable, and a lot more fun. So, let’s slice it right and cook up something amazing together!