How To Kasher A Kitchen? Kashering a kitchen for Passover involves thoroughly cleaning it and then applying specific methods to remove any trace of chametz (leavened products). This guide offers comprehensive instructions for kosher kitchen cleaning, kosher kitchen preparation, and the entire process of kosher kitchen conversion for Passover.
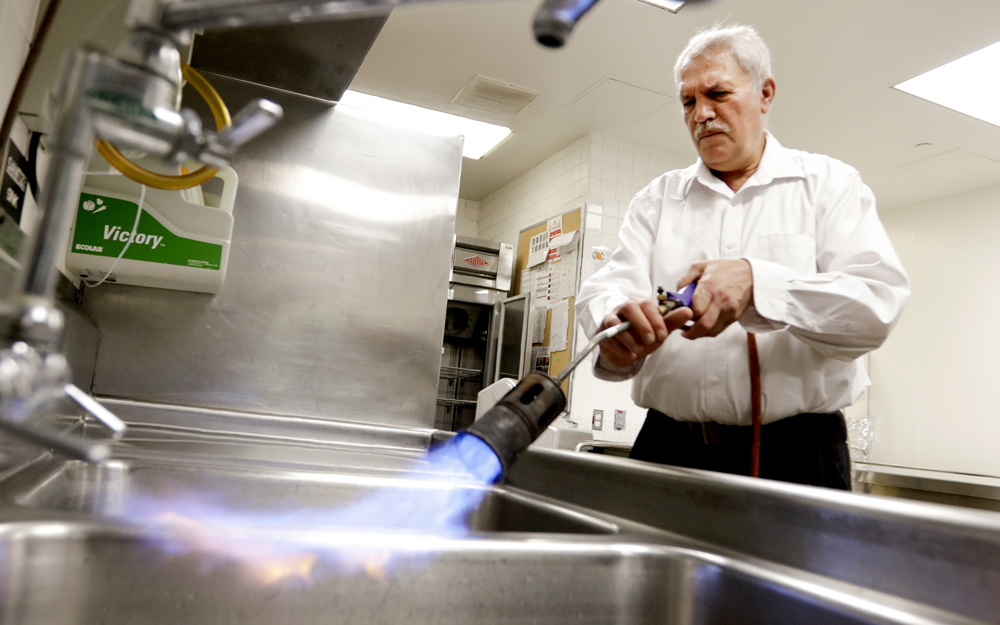
Image Source: www.cedars-sinai.org
Why Kasher Your Kitchen for Passover?
Passover is a major Jewish holiday that commemorates the Israelites’ exodus from Egypt. A key observance is abstaining from chametz – any food product made with wheat, barley, rye, oats, or spelt that has been allowed to leaven. The Torah prohibits owning, eating, or even deriving benefit from chametz during Passover.
To ensure compliance with these laws, observant Jews undertake a thorough spring cleaning and kashering process. Kashering a kitchen means rendering it free of any chametz residue, making it suitable for Passover use. It’s not just about cleaning; it’s about a spiritual transformation of your home.
Step 1: The Great Spring Cleaning
Before any kashering kitchen appliances or kashering kitchen surfaces can occur, an intensive cleaning is vital.
Getting Started: Preparation is Key
- Timing: Start well in advance of Passover. Don’t wait until the last minute!
- Supplies: Gather cleaning supplies:
- All-purpose cleaners
- Scrub brushes and sponges (new ones are ideal)
- Degreaser
- Oven cleaner
- Trash bags
- Gloves
- Inspection: Check every nook and cranny for chametz.
Cleaning Every Area: No Crumbs Left Behind
- Cabinets and Drawers: Empty completely. Wipe down every surface with a cleaner. Line with new paper or shelf liners for Passover.
- Refrigerator and Freezer: Remove all food. Clean every shelf, drawer, and seal. Pay attention to spills and crumbs.
- Pantry: Remove all chametz. Clean shelves and floor. Organize your Passover food items separately.
- Floors: Sweep, vacuum, and mop all floors thoroughly. Special attention to corners and under appliances.
- Sink: Clean thoroughly. Remove any drain stoppers for deep cleaning or replace them.
- Countertops: Scrub well to remove any food residue. Pay close attention to seams and edges.
- Stovetop: Clean thoroughly, removing burners and cleaning underneath. Degrease as needed.
- Oven: Use oven cleaner. Run a self-cleaning cycle if your oven has one. Clean racks separately.
- Dishwasher: Clean the filter and interior.
- Small Appliances: Wipe down the exterior of all small appliances like toasters, blenders, and food processors.
- Tables and Chairs: Wipe down the surfaces and legs of tables and chairs in the eating area.
Step 2: Kosher Kitchen Conversion – Methods and Rules
Once the kitchen is sparkling clean, it’s time to proceed with kashering. Different materials require different kosher kitchen methods. The goal is to remove any absorbed chametz from the surfaces or appliances.
Methods of Kashering
There are several primary methods for kashering kitchen items:
- Irui (Pouring Boiling Water): Boiling water is poured over the item to kasher it.
- Hagalah (Immersion in Boiling Water): The item is immersed in boiling water.
- Libun Kal (Light Fire): Heating the item until a paper held against it will singe.
- Libun Gamur (Intense Fire): Heating the item until it glows red-hot.
- Eruy Kli Rishon (Pouring from the Primary Vessel): Pouring boiling hot water directly from the pot in which it was heated.
Kashering Kitchen Surfaces: Materials and Methods
| Surface | Material | Method(s) | Notes |
|---|---|---|---|
| Countertops | Stone/Granite | Irui | Ensure the surface is perfectly clean. Pour boiling water over the entire surface. |
| Countertops | Stainless Steel | Irui | Ensure the surface is perfectly clean. Pour boiling water over the entire surface. |
| Countertops | Laminate | Not Kasherable | Cover with a waterproof covering. |
| Sinks | Stainless Steel | Hagalah/Irui | Clean thoroughly, remove any drain stoppers. Let sit unused for 24 hours. Then perform Hagalah by filling with boiling water or Irui. |
| Sinks | Porcelain | Not Kasherable | Clean thoroughly. Do not use for hot Passover food. |
| Stovetop (Burners) | Iron/Steel | Libun Kal | Clean thoroughly. Heat until a paper held against it will singe. |
| Stovetop (Surface) | Glass/Ceramic | Not Kasherable | Clean thoroughly. Do not use directly for Passover cooking. Cover with foil or a trivet. |
| Oven | Metal | Libun Kal/Self-Clean | Clean thoroughly, removing any baked-on food. Run a self-cleaning cycle or use Libun Kal. |
| Oven Racks | Metal | Libun Kal/Hagalah | Clean thoroughly. Can be placed in the oven during the self-clean cycle, or Hagalah with a very large pot if possible. |
| Refrigerator | Plastic/Glass | Cleaning Only | Clean thoroughly. No kashering required. Use separate shelves/containers for Passover food. |
| Dishwasher | Stainless Steel | Hagalah | Clean the filter. Run on the hottest cycle with a kosher for Passover detergent. It is best to leave the dishwasher unused for 24 hours prior. |
| Tables | Various | Clean and Cover/Not Kasherable | If the tabletop is not easily kashered, cover it with a waterproof tablecloth. |
Specific Appliance Kashering Kitchen Guidelines
-
Oven:
- Clean thoroughly, removing all traces of food.
- Wait 24 hours.
- Run the self-cleaning cycle, or kasher with Libun Kal by heating to the highest temperature for an hour.
- Oven racks should be kashered via Libun Kal or Hagalah if possible.
-
Stovetop:
- Clean thoroughly, removing all traces of food.
- Electric stovetops can be kashered by turning them on to the highest setting until they get very hot.
- Gas stovetops should have their grates cleaned and heated until they glow red.
- The stovetop surface may need to be covered if it is made of a material that cannot be kashered (like ceramic).
-
Microwave:
- Clean thoroughly.
- Place a cup of water inside and boil it until steam fills the microwave.
-
Dishwasher:
- Clean the filter thoroughly.
- Run the dishwasher empty on the hottest cycle with kosher for Passover detergent.
- Ideally, the dishwasher should not be used for 24 hours before kashering.
-
Sinks:
- Clean thoroughly.
- Wait 24 hours.
- Stainless steel sinks can be kashered by pouring boiling water over them (Irui) or by filling the sink with boiling water (Hagalah).
- Porcelain sinks are generally not kashered; it is best to use a sink insert.
-
Toaster Oven:
- Clean thoroughly, removing all crumbs.
- Heat to the highest setting for a certain period. It’s best not to use it for Passover since cleaning every crevice is very difficult.
Step 3: Maintaining a Kosher for Passover Kitchen
Once the kitchen is kashered, it’s important to maintain its kosher status throughout Passover.
- Separate Cookware: Use separate pots, pans, dishes, and utensils that are kosher for Passover.
- Designated Areas: Designate specific areas for Passover food preparation and storage.
- Careful Handling: Be careful to avoid cross-contamination between Passover and non-Passover food.
- Regular Cleaning: Clean up any spills or crumbs immediately.
- Double-Checking: Regularly inspect the kitchen to ensure no chametz has been brought in accidentally.
What About Items That Can’t Be Kashered?
Some items or surfaces in your kitchen may not be kasherable, such as laminate countertops or certain types of sinks. In these cases:
- Covering: Cover the surface with a thick, waterproof material like foil or contact paper.
- Separate Use: Designate these items or areas for non-Passover use only.
Kosher Kitchen Guidelines and Kosher Kitchen Rules
Here’s a summary of essential kosher kitchen guidelines and kosher kitchen rules for Passover:
- No Chametz: Absolutely no chametz is allowed in the kashered kitchen.
- Separate Utensils: Use separate utensils, pots, pans, and dishes for Passover.
- Thorough Cleaning: The kitchen must be thoroughly cleaned before kashering.
- Proper Kashering Methods: Use the appropriate kashering method for each surface and appliance.
- Maintaining Separation: Prevent cross-contamination between Passover and non-Passover food.
- 24-Hour Rule: Many kashering methods require a 24-hour waiting period before kashering can take place.
The Role of Kosher Kitchen Certification
While most home cooks kasher their kitchens independently, some may seek kosher kitchen certification from a rabbinical authority. This ensures that the kashering process meets specific standards and provides additional assurance.
-
Benefits of Certification:
- Expert guidance on the kashering process.
- An objective assessment of the kitchen’s kosher status.
- Peace of mind knowing that the kitchen meets high standards of kashrut.
-
Finding a Certifying Agency: Contact your local Orthodox rabbi or a reputable kosher certification agency.
Additional Tips for Kosherizing a Kitchen
- Create a Checklist: Make a detailed checklist of all areas and items in your kitchen that need to be cleaned and kashered.
- Enlist Help: Don’t be afraid to ask family members or friends for help with the cleaning and kashering process.
- Start Early: Begin preparing your kitchen well in advance of Passover to avoid feeling rushed.
- Consult a Rabbi: If you have any questions or doubts about the kashering process, consult a knowledgeable rabbi for guidance.
- Document Everything: Keep a record of what you kashered and how to avoid mistakes in the future.
Common Mistakes to Avoid When Kashering
- Insufficient Cleaning: Not cleaning thoroughly enough before kashering.
- Using the Wrong Method: Applying the wrong kashering method for a particular material or appliance.
- Neglecting Hard-to-Reach Areas: Overlooking corners, cracks, and other hard-to-reach areas.
- Cross-Contamination: Allowing cross-contamination between Passover and non-Passover food after kashering.
- Skipping the Waiting Period: Not waiting the required 24 hours before kashering.
Fathoming the Spiritual Significance
Kashering the kitchen for Passover is more than just a practical exercise; it’s a deeply spiritual endeavor. It’s about cleansing our homes and our lives of the spiritual chametz of arrogance, materialism, and complacency. By diligently following the kosher kitchen rules and methods, we prepare ourselves to fully experience the freedom and renewal that Passover represents.
Frequently Asked Questions (FAQ)
- Can I kasher my kitchen sink for Passover? Stainless steel sinks can typically be kashered by pouring boiling water over them (Irui) or by filling the sink with boiling water (Hagalah). Porcelain sinks are generally not kashered; it is best to use a sink insert.
- What is chametz? Chametz refers to any food product made from wheat, barley, rye, oats, or spelt that has been allowed to leaven.
- Who is responsible for kashering the kitchen? The homeowner or whoever is in charge of preparing the Passover meals is responsible for kashering the kitchen.
- What if I’m unsure about how to kasher something? Consult a knowledgeable rabbi for guidance.
- Is kosher kitchen certification necessary? No, kosher kitchen certification is not required, but it can provide additional assurance and guidance.
- Can I use the same dishwasher for Passover and non-Passover dishes? If the dishwasher is stainless steel, it can be kashered. However, it’s best to have separate dishwashers or dishware.
- What if I accidentally used a chametz utensil in my kashered kitchen? Consult a rabbi immediately for guidance on how to rectify the situation.
- Do I need to kasher my refrigerator? No, kashering is not necessary for a refrigerator. Simply clean it thoroughly and use separate shelves/containers for Passover food.
- How long does the kashering process take? The time it takes to kasher a kitchen depends on its size and the amount of cleaning required. It can take anywhere from a few hours to a full day.
- Is there a specific kosher kitchen cleaning product I should use? Any general cleaning products are acceptable. For the dishwasher, it is recommended that you use a kosher for passover detergent.
Hi, I’m Scott Fischer, the voice behind SliceItRight. My passion for food started in my grandmother’s kitchen, where I learned the art of slicing, dicing, and creating delicious meals. Over the years, I’ve explored everything from the perfect kitchen gadgets to mastering culinary techniques, and I’m here to share all of it with you. Whether you’re a beginner or an experienced home chef, my goal is to make cooking easier, more enjoyable, and a lot more fun. So, let’s slice it right and cook up something amazing together!