How long does it take to paint kitchen cabinets? Painting kitchen cabinets can take anywhere from 3 to 10 days, depending on factors like the size of your kitchen, the type of paint, and whether you’re doing it yourself or hiring professionals. The cabinet painting timeline can vary greatly, so let’s break down the process.
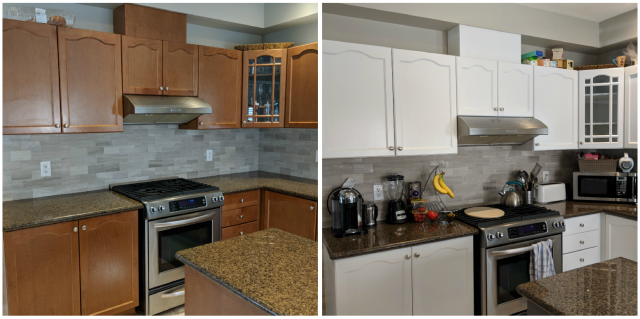
Image Source: www.paintmycabinets.ca
Grasping the Cabinet Painting Timeline
The kitchen cabinet painting duration isn’t just about the time spent applying paint. Several stages are involved. A detailed cabinet painting timeline helps manage expectations and avoid rushing, which can compromise the final result. The cabinet painting project length includes everything from initial planning to the final coat of paint.
Phases of a Cabinet Painting Project
Here’s a breakdown of the typical phases involved:
- Planning & Preparation: This includes choosing your paint, gathering supplies, and preparing the workspace.
- Cabinet Removal & Hardware Removal: Taking the cabinets off their hinges and removing knobs and pulls.
- Cleaning: Thoroughly cleaning the cabinet surfaces to remove grease, grime, and old finishes.
- Sanding: Lightly sanding the cabinets to create a smooth surface for the primer.
- Priming: Applying a coat of primer to help the paint adhere and provide a uniform base.
- Painting: Applying the first and second coats of paint.
- Drying & Curing: Allowing sufficient drying and curing time between coats and after the final coat.
- Reassembly: Reattaching hardware and rehanging the cabinets.
Factors Influencing Cabinet Painting Time
Several factors play a crucial role in determining the painting cabinets time estimate. Here’s what affects the overall cabinet painting timeline:
- Size of the Kitchen: A larger kitchen with more cabinets will naturally take longer to paint than a smaller kitchen.
- Cabinet Material: Different materials (wood, laminate, metal) require different preparation and paint types. Wood is usually the easiest, while laminate can be tricky.
- Paint Type: Oil-based paints take longer to dry than water-based (latex or acrylic) paints.
- Number of Coats: Typically, two coats of primer and two coats of paint are needed for optimal coverage and durability.
- DIY vs. Professional: A DIY cabinet painting time can be longer due to inexperience, while professional cabinet painting time is usually shorter due to efficiency and expertise.
- Workspace: Having a dedicated workspace with proper ventilation can speed up the drying process.
- Complexity of Design: Cabinets with intricate detailing or raised panels will require more time and effort.
- Curing Time: Properly cured cabinets are a must.
DIY Cabinet Painting Time vs. Professional Cabinet Painting Time
The average time to paint cabinets differs significantly between DIY and professional jobs.
DIY Cabinet Painting Time
For a homeowner, how long to paint kitchen cabinets DIY can be quite lengthy. Expect the project to take anywhere from 5 to 10 days, especially if it’s your first time. This includes:
- Day 1-2: Planning, gathering materials, and removing cabinets.
- Day 3-4: Cleaning, sanding, and priming.
- Day 5-7: Painting (two coats), allowing drying time between coats.
- Day 8-10: Reassembly and touch-ups.
Professional Cabinet Painting Time
Professionals can usually complete the job much faster. Professional cabinet painting time typically ranges from 3 to 7 days. They have the tools, experience, and manpower to streamline the process.
- Day 1: Preparation, cabinet removal, and cleaning.
- Day 2: Sanding and priming.
- Day 3-4: Painting (two coats) and drying.
- Day 5-7: Reassembly and final inspection.
Breaking Down the Cabinet Painting Process: A Detailed Timeline
To provide a more detailed picture, let’s dissect each step of the cabinet painting process and estimate the time required:
1. Planning and Preparation (2-4 Hours)
This stage is crucial for a successful outcome. It involves:
- Choosing Paint and Supplies (1-2 Hours): Researching different paints, primers, brushes, rollers, and other necessary equipment.
- Workspace Preparation (1 Hour): Setting up a clean and well-ventilated workspace, covering surfaces with drop cloths, and gathering tools.
2. Cabinet and Hardware Removal (2-4 Hours)
- Removing Cabinet Doors and Drawers (1-2 Hours): Carefully detach the cabinet doors and drawers, labeling each one to ensure proper reassembly.
- Hardware Removal (1-2 Hours): Remove all knobs, pulls, hinges, and other hardware. Store them in labeled bags to avoid confusion later.
3. Cleaning (2-4 Hours)
- Degreasing and Cleaning Surfaces (2-4 Hours): Thoroughly clean the cabinet surfaces with a degreaser or mild detergent to remove grease, grime, and old finishes. This is a critical step for proper paint adhesion.
4. Sanding (4-8 Hours)
- Light Sanding (4-8 Hours): Lightly sand all surfaces to create a slightly rough texture that will help the primer adhere. Use fine-grit sandpaper (220-grit) and avoid excessive sanding, which can damage the cabinets.
5. Priming (4-6 Hours + Drying Time)
- Applying Primer (2-3 Hours): Apply a thin, even coat of primer to all surfaces. Use a high-quality primer designed for cabinets.
- Primer Drying Time (2-3 Hours): Allow the primer to dry completely according to the manufacturer’s instructions.
6. Painting (6-12 Hours + Drying Time Between Coats)
- First Coat of Paint (3-6 Hours): Apply the first coat of paint, using smooth, even strokes.
- Drying Time (2-4 Hours): Allow the first coat to dry completely before applying the second coat.
- Second Coat of Paint (3-6 Hours): Apply the second coat of paint for full coverage and a durable finish.
7. Drying and Curing (24-72 Hours)
- Drying Time (24-48 Hours): Allow the painted cabinets to dry completely before handling them.
- Curing Time (24-72 Hours): Allow the paint to fully cure before reassembling the cabinets. Curing time allows the paint to harden and become more durable.
8. Reassembly (2-4 Hours)
- Reattaching Hardware (1-2 Hours): Reattach all knobs, pulls, hinges, and other hardware.
- Rehanging Cabinet Doors and Drawers (1-2 Hours): Carefully rehang the cabinet doors and drawers, ensuring they are properly aligned and functioning smoothly.
Here’s a table summarizing the estimated time for each step:
| Task | Estimated Time (DIY) | Estimated Time (Professional) |
|---|---|---|
| Planning & Preparation | 2-4 Hours | 1-2 Hours |
| Cabinet/Hardware Removal | 2-4 Hours | 1-2 Hours |
| Cleaning | 2-4 Hours | 1-2 Hours |
| Sanding | 4-8 Hours | 2-4 Hours |
| Priming (Application) | 2-3 Hours | 1-2 Hours |
| Primer Drying | 2-3 Hours | 1-2 Hours |
| Painting (1st Coat) | 3-6 Hours | 2-4 Hours |
| Paint Drying | 2-4 Hours | 1-2 Hours |
| Painting (2nd Coat) | 3-6 Hours | 2-4 Hours |
| Drying/Curing | 24-72 Hours | 24-72 Hours |
| Reassembly | 2-4 Hours | 1-2 Hours |
| Total (Excluding Drying/Curing) | 26-53 Hours | 12-27 Hours |
Tips for Speeding Up the Process
While rushing isn’t recommended, there are ways to optimize your cabinet painting timeline:
- Efficient Workspace: Organize your workspace for maximum efficiency.
- Quality Tools: Invest in high-quality brushes, rollers, and paint sprayers.
- Fast-Drying Paint: Choose paints with shorter drying times.
- Adequate Ventilation: Ensure good ventilation to speed up drying.
- Helper: Enlist a friend or family member to help with tasks like cleaning and sanding.
- Preparation is Key: Spend ample time prepping the cabinets properly, as this will lead to better paint adhesion and a smoother finish.
Common Mistakes That Can Delay the Project
Avoiding these mistakes can save you time and frustration:
- Skipping Preparation: Neglecting to clean, sand, or prime properly will lead to poor paint adhesion and a less durable finish.
- Applying Thick Coats: Applying paint too thickly can result in drips, runs, and longer drying times.
- Rushing Drying Time: Not allowing sufficient drying time between coats can cause the paint to peel or bubble.
- Using the Wrong Paint: Using the wrong type of paint for your cabinets can lead to poor adhesion and a lackluster finish.
- Ignoring the Curing Time: Installing before the cabinets are fully cured is never a good idea.
Deciphering Prep Time: A Crucial Investment
Cabinet painting prep time is often underestimated. It’s the foundation for a successful paint job. Proper preparation guarantees the paint adheres well, lasts long, and looks great. This includes cleaning, sanding, and priming. Skimping on prep will almost always result in problems later.
The Importance of Thorough Cleaning
Cleaning removes dirt, grease, and old coatings. A clean surface ensures the primer and paint bond effectively.
The Necessity of Sanding
Sanding creates a slightly rough surface. This gives the primer something to grip onto. Sanding also smooths out imperfections.
Priming: The Bonding Agent
Primer seals the cabinet surface and provides a uniform base for the paint. It improves adhesion and prevents the paint from soaking into the wood.
Fathoming Drying Time: Patience is Key
Cabinet painting drying time is critical. It’s the time the paint needs to harden. If you rush this step, you risk damaging the finish. Always follow the paint manufacturer’s recommendations for drying times.
Environmental Factors Affecting Drying
Temperature and humidity can affect drying time. Warmer, drier conditions will speed up drying. Colder, more humid conditions will slow it down.
Testing for Dryness
Before applying another coat, ensure the first coat is fully dry. You can test this by gently touching the surface. If it feels tacky, it needs more time.
FAQ: Frequently Asked Questions
Q: What is the best type of paint for kitchen cabinets?
A: Acrylic latex or alkyd (oil-based) paints are popular choices for kitchen cabinets. Acrylic latex is easier to clean and has lower VOCs. Alkyd paint provides a harder, more durable finish but requires more effort to clean and dries slower.
Q: Can I paint my laminate cabinets?
A: Yes, you can paint laminate cabinets, but it requires careful preparation. You’ll need to thoroughly clean, sand, and prime the surface with a bonding primer specifically designed for laminate.
Q: Who is best to hire for cabinet painting?
A: Hiring a professional painter with experience in cabinet refinishing is the best option. Look for someone with good reviews and a portfolio of their work. A general contractor with painting experience can also be a good choice.
Q: What is the average cost to have kitchen cabinets professionally painted?
A: The average cost ranges from $3,000 to $7,000, depending on the size of your kitchen, the complexity of the job, and the location.
Q: Can I use a paint sprayer for my kitchen cabinets?
A: Yes, a paint sprayer can provide a smooth, professional finish. However, it requires practice and proper technique to avoid drips and runs.
Q: What is the most durable finish for kitchen cabinets?
A: A catalyzed conversion varnish is one of the most durable finishes. It is often used by cabinet manufacturers due to its resistance to scratches, stains, and chemicals.
Q: How long should I wait before using my kitchen cabinets after painting?
A: It’s best to wait at least 72 hours, or longer if possible, before using your kitchen cabinets after painting to allow the paint to fully cure.
By following these guidelines, you can better estimate the cabinet painting timeline for your project and achieve beautiful, long-lasting results.
Hi, I’m Scott Fischer, the voice behind SliceItRight. My passion for food started in my grandmother’s kitchen, where I learned the art of slicing, dicing, and creating delicious meals. Over the years, I’ve explored everything from the perfect kitchen gadgets to mastering culinary techniques, and I’m here to share all of it with you. Whether you’re a beginner or an experienced home chef, my goal is to make cooking easier, more enjoyable, and a lot more fun. So, let’s slice it right and cook up something amazing together!