Want to give your kitchen table a fresh new look? The answer is yes, you absolutely can repaint your kitchen table and achieve professional-looking results without breaking the bank! This comprehensive kitchen table painting guide walks you through the entire process, from prepping the surface to selecting the best paint, offering plenty of painting kitchen table tips to ensure a durable and beautiful finish. Whether you’re interested in a complete kitchen table makeover or simply want to touch up an existing finish, this guide provides all the information you need for a successful refinishing kitchen table DIY project.
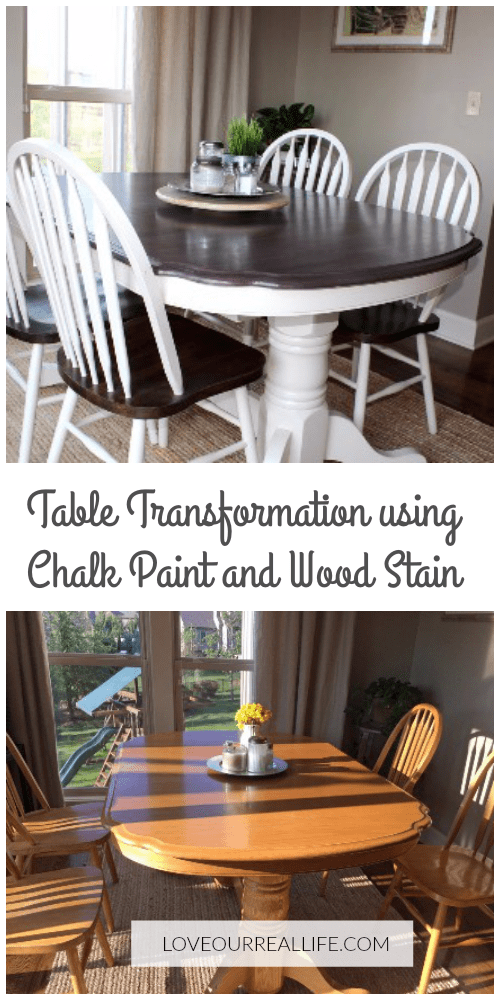
Image Source: www.loveourreallife.com
The Importance of Preparation
The secret to a stunning and long-lasting paint job isn’t just about the paint you choose, it’s about what you do before you even open the can. Properly prepping your kitchen table is crucial for adhesion, durability, and overall appearance.
Assessing the Current Condition
Before you dive in, take a good look at your table.
- Is the existing finish smooth and intact, or is it peeling and cracked? This will determine the level of prep work needed.
- Are there any stains, water rings, or other imperfections you want to address?
- What material is your table made of? Wood, laminate, or metal will require different approaches.
Cleaning: The First Critical Step
Regardless of the table’s condition, cleaning is non-negotiable. Dirt, grease, and grime can prevent the paint from adhering properly, leading to chipping and peeling later on.
- Use a mild dish soap and warm water.
- Wipe down the entire table surface thoroughly.
- Rinse with clean water.
- Allow the table to dry completely before proceeding.
For stubborn grease or grime, consider using a degreaser specifically designed for furniture.
Sanding: Smoothing the Way to Success
Sanding creates a slightly rough surface, giving the paint something to grip onto. The amount of sanding required depends on the existing finish.
Lightly Sanding for Existing Paint in Good Condition
If the existing finish is in good condition, you can get away with light sanding.
- Use fine-grit sandpaper (220-grit or higher).
- Lightly scuff the surface to create a “tooth” for the new paint.
- Don’t apply too much pressure; you’re not trying to remove the existing finish, just roughen it slightly.
Extensive Sanding for Damaged or Glossy Surfaces
If the existing finish is peeling, cracked, or very glossy, you’ll need to do more extensive sanding. This is also crucial if you are thinking about painting kitchen table without sanding.
- Start with medium-grit sandpaper (120-grit).
- Sand until the surface is smooth and even.
- Follow up with fine-grit sandpaper (220-grit) to smooth out any scratches.
For removing old paint from the kitchen table, you might even need to start with a coarser grit (80-grit) if the paint is very thick and stubborn. Consider using a paint stripper first to make the sanding process easier.
Sanding Tips
- Always sand in the direction of the wood grain. This helps prevent scratches.
- Use a sanding block or orbital sander for larger surfaces. This will make the job easier and more efficient.
- Wear a dust mask to protect your lungs from sanding dust.
- Vacuum up the sanding dust thoroughly before proceeding to the next step.
Priming: Creating the Perfect Base
Primer creates a smooth, even surface for the paint to adhere to, blocks stains, and helps the paint color look its best.
Choosing the Right Primer
- Latex primer: A good all-around choice for most surfaces.
- Oil-based primer: Excellent for blocking stains and providing a durable base, but requires mineral spirits for cleanup.
- Shellac-based primer: The best choice for blocking stubborn stains and odors.
Applying Primer
- Apply a thin, even coat of primer using a brush, roller, or sprayer.
- Allow the primer to dry completely according to the manufacturer’s instructions.
- Lightly sand the primed surface with fine-grit sandpaper (220-grit or higher) to smooth out any imperfections.
- Wipe away any sanding dust before proceeding to the painting stage.
Selecting the Best Paint for Kitchen Table
Choosing the right paint is essential for achieving a durable and beautiful finish. Consider these factors when making your selection.
Types of Paint
- Latex paint: Water-based, easy to clean up, and low in VOCs (volatile organic compounds). A good choice for general use.
- Acrylic paint: More durable than latex paint and resistant to chipping and fading.
- Oil-based paint: Provides a very durable and glossy finish, but requires mineral spirits for cleanup and has a higher VOC content.
- Chalk paint: Creates a matte, vintage look and requires a sealant (wax or polyurethane) for protection. A popular choice for kitchen table painting with chalk paint.
- Milk paint: Another option for a vintage look, made from natural ingredients.
Durability and Finish
- For high-traffic areas like a kitchen table, choose a durable paint that can withstand daily use and cleaning. Acrylic or oil-based paints are generally the best choices.
- Consider the desired finish. Matte finishes hide imperfections well, while glossy finishes are easier to clean. Satin or semi-gloss finishes offer a good balance of both.
Color Selection
- Consider your existing kitchen décor. Choose a color that complements your cabinets, countertops, and flooring.
- Test paint samples before committing to a color. Paint a small area of the table and let it dry to see how it looks in different lighting conditions.
Best Paint for Kitchen Table Options – A Comparison
| Paint Type | Durability | Finish Options | VOCs | Cleanup | Pros | Cons |
|---|---|---|---|---|---|---|
| Latex | Good | Matte, Satin, Semi-Gloss | Low | Water | Easy to use, low odor, fast drying | Not as durable as acrylic or oil-based paints |
| Acrylic | Excellent | Satin, Semi-Gloss, Gloss | Low | Water | Very durable, resistant to chipping and fading | Can be more expensive than latex paint |
| Oil-Based | Excellent | Satin, Semi-Gloss, Gloss | High | Mineral Spirits | Extremely durable, provides a smooth, glossy finish | High VOCs, requires mineral spirits for cleanup, longer drying time |
| Chalk Paint | Moderate | Matte | Low | Water | Creates a vintage look, easy to apply, minimal prep work required | Requires a sealant (wax or polyurethane) for protection |
| Milk Paint | Moderate | Matte | Very Low | Water | Natural ingredients, creates a vintage look, can be easily distressed | Requires a sealant, may require more coats for full coverage |
The Art of Painting: Techniques and Tips
Now that you’ve prepped the table and chosen your paint, it’s time to start painting.
Essential Tools and Materials
- Paintbrushes: Choose high-quality brushes designed for the type of paint you’re using.
- Rollers: Use a foam roller for smooth surfaces and a nap roller for textured surfaces.
- Paint trays: To hold the paint and make it easier to apply.
- Painter’s tape: To protect areas you don’t want to paint.
- Drop cloths: To protect your floors from paint splatters.
- Stir sticks: To mix the paint thoroughly.
- Clean rags: To wipe up spills and drips.
Applying the Paint
- Start by taping off any areas you don’t want to paint, such as the legs or edges of the table.
- Stir the paint thoroughly to ensure it’s evenly mixed.
- Apply a thin, even coat of paint using a brush, roller, or sprayer.
- Work in long, smooth strokes, overlapping each stroke slightly.
- Avoid applying too much paint at once, as this can lead to drips and runs.
- Allow the first coat of paint to dry completely according to the manufacturer’s instructions.
- Lightly sand the painted surface with fine-grit sandpaper (220-grit or higher) to smooth out any imperfections.
- Wipe away any sanding dust before applying the second coat of paint.
- Apply a second coat of paint using the same technique as the first coat.
- Allow the second coat of paint to dry completely.
Achieving a Smooth Finish
- Use a high-quality brush or roller.
- Apply thin, even coats of paint.
- Sand between coats to smooth out any imperfections.
- Consider using a paint sprayer for a professional-looking finish.
Dealing with Drips and Runs
- If you notice any drips or runs while painting, wipe them up immediately with a clean rag.
- If the paint has already dried, sand down the drips or runs before applying the next coat of paint.
Protecting Your Masterpiece: Sealing and Finishing
Once the paint is dry, it’s important to protect it with a sealant. This will help prevent scratches, chips, and stains.
Choosing the Right Sealant
- Polyurethane: A durable and water-resistant sealant that’s available in a variety of finishes (matte, satin, semi-gloss, gloss).
- Wax: Provides a soft, matte finish and is easy to apply, but not as durable as polyurethane. A popular choice for chalk-painted furniture.
- Varnish: A durable and heat-resistant sealant that’s a good choice for tabletops.
Applying the Sealant
- Apply a thin, even coat of sealant using a brush, roller, or sprayer.
- Work in long, smooth strokes, overlapping each stroke slightly.
- Allow the sealant to dry completely according to the manufacturer’s instructions.
- Lightly sand the sealed surface with fine-grit sandpaper (320-grit or higher) to smooth out any imperfections.
- Wipe away any sanding dust before applying a second coat of sealant.
- Apply a second coat of sealant using the same technique as the first coat.
- Allow the second coat of sealant to dry completely.
Curing Time
- Allow the paint and sealant to cure completely before using the table. Curing time can vary depending on the type of paint and sealant used, but it’s generally recommended to wait at least 24-48 hours.
Alternatives to Sanding: Painting Kitchen Table Without Sanding
While sanding is generally recommended for the best results, there are ways to paint a kitchen table without sanding.
Using Liquid Deglossers
Liquid deglossers are chemical solutions that remove the shine from glossy surfaces, creating a “tooth” for the paint to adhere to.
- Apply the liquid deglosser to the table surface according to the manufacturer’s instructions.
- Allow it to sit for the recommended amount of time.
- Wipe away any residue with a clean rag.
- Prime the surface before painting.
Chalk Paint as an Alternative
Chalk paint is known for its ability to adhere to surfaces without sanding.
- Clean the table thoroughly.
- Apply two coats of chalk paint, allowing each coat to dry completely.
- Seal the chalk paint with wax or polyurethane.
When is Skipping Sanding Okay?
- If the existing finish is in good condition and not very glossy.
- If you’re using chalk paint or a paint specifically designed to adhere to glossy surfaces.
- If you’re willing to accept a slightly less durable finish.
Special Finishes and Techniques
Looking to add a little extra flair to your kitchen table makeover? Consider these special finishes and techniques.
Distressing
Distressing gives your table a vintage, worn look.
- Paint the table with two coats of paint.
- Once the paint is dry, use sandpaper to remove some of the paint in certain areas, such as the edges and corners.
- Seal the table with wax or polyurethane.
Antiquing
Antiquing adds depth and character to your table.
- Paint the table with two coats of paint.
- Apply an antiquing glaze to the surface.
- Wipe away the glaze with a clean rag, leaving some of the glaze in the crevices and details.
- Seal the table with wax or polyurethane.
Stenciling
Stenciling allows you to add patterns and designs to your table.
- Paint the table with two coats of paint.
- Position the stencil on the table.
- Apply paint to the stencil using a stencil brush or foam roller.
- Remove the stencil carefully.
- Seal the table with wax or polyurethane.
Problem Solving: Addressing Common Issues
Even with careful preparation and painting, you may encounter some common issues.
Paint Not Adhering
- Cause: Insufficient sanding, dirty surface, incompatible paint and primer.
- Solution: Sand the surface more thoroughly, clean the surface with a degreaser, use a compatible primer.
Brush Strokes Showing
- Cause: Using a poor-quality brush, applying too much paint, not sanding between coats.
- Solution: Use a high-quality brush, apply thin coats of paint, sand between coats.
Uneven Finish
- Cause: Applying uneven coats of paint, not stirring the paint thoroughly, using a dirty brush or roller.
- Solution: Apply even coats of paint, stir the paint thoroughly, use a clean brush or roller.
FAQ – Frequently Asked Questions
- What is the best way to remove old paint from a kitchen table? The best way is usually a combination of chemical paint stripper and sanding. Apply the stripper according to the manufacturer’s directions, then scrape off the loosened paint. Finish by sanding the surface smooth.
- Can I paint my kitchen table without sanding? Yes, you can, especially if you use chalk paint or a liquid deglosser. However, sanding is generally recommended for the best adhesion and durability.
- Who makes the most durable paint for a kitchen table? Acrylic and oil-based paints are generally considered the most durable for kitchen tables. Choose a high-quality brand for best results.
- How do I clean a painted kitchen table? Use a mild soap and water solution. Avoid harsh chemicals or abrasive cleaners, as these can damage the paint finish.
- What kind of finish should I use on a painted kitchen table? Polyurethane is a popular choice for painted kitchen tables due to its durability and water resistance. Choose a finish (matte, satin, semi-gloss, gloss) based on your desired look.
Repainting your kitchen table is a rewarding DIY project that can transform the look of your kitchen. By following these tips and techniques, you can achieve professional-looking results at home. Remember to take your time, prepare the surface properly, and choose the right paint and sealant for a durable and beautiful finish.
Hi, I’m Scott Fischer, the voice behind SliceItRight. My passion for food started in my grandmother’s kitchen, where I learned the art of slicing, dicing, and creating delicious meals. Over the years, I’ve explored everything from the perfect kitchen gadgets to mastering culinary techniques, and I’m here to share all of it with you. Whether you’re a beginner or an experienced home chef, my goal is to make cooking easier, more enjoyable, and a lot more fun. So, let’s slice it right and cook up something amazing together!