Can you refinish kitchen cabinets with stain? Yes, you absolutely can! Refinishing your kitchen cabinets with stain is a fantastic way to breathe new life into your kitchen without the expense of a full remodel. This comprehensive guide will walk you through each step of the process, from preparing your cabinets to applying the final coat of stain, ensuring a beautiful and long-lasting finish. This article will cover everything you need to know about staining kitchen cabinets.
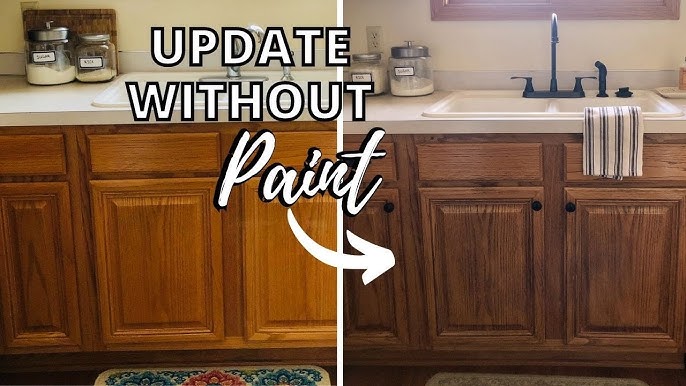
Image Source: i.ytimg.com
Why Choose Staining Kitchen Cabinets?
Refinishing wood cabinets with stain offers several advantages over painting:
- Highlights Natural Wood Grain: Stain enhances the natural beauty of the wood, showcasing its unique grain patterns.
- Durability: Stain penetrates the wood, providing a more durable finish than paint, which sits on the surface.
- Cost-Effective: Staining is typically less expensive than replacing cabinets, making it a budget-friendly option.
- Easier Touch-Ups: Scratches and minor damage are often less noticeable and easier to touch up with stain.
Is Staining Right for Your Cabinets?
Before you start, consider these factors:
- Wood Type: Staining works best on real wood cabinets. Veneer or laminate cabinets are not suitable for staining.
- Existing Finish: If your cabinets are currently painted, you’ll need to remove the paint completely before staining.
- Desired Look: Decide if you prefer the look of stained wood over painted cabinets.
Materials and Tools You’ll Need for Cabinet Refinishing With Stain
Gathering the right materials is crucial for a successful DIY kitchen cabinet staining project. Here’s a comprehensive list:
- Stain: Choose a high-quality stain in your desired color (more on this later).
- Sandpaper: Various grits (80, 120, 220) for different stages of sanding.
- Tack Cloth: For removing dust after sanding.
- Wood Cleaner/Degreaser: To clean the cabinets before sanding.
- Paint Stripper (if needed): For removing existing paint or varnish.
- Putty Knife: For applying wood filler.
- Wood Filler: To fill any imperfections in the wood.
- Pre-Stain Wood Conditioner: Helps ensure even stain absorption.
- Rags/Applicator Pads: For applying stain and conditioner.
- Polyurethane/Clear Coat: To protect the stained surface.
- Paint Brushes: High-quality brushes for applying the topcoat.
- Screwdriver/Drill: For removing cabinet doors and hardware.
- Drop Cloths: To protect your work area.
- Safety Glasses: To protect your eyes.
- Gloves: To protect your hands.
- Respirator/Mask: Especially important when sanding or using chemical strippers.
- Mineral Spirits/Paint Thinner: For cleaning brushes and spills.
Step-by-Step Guide: Staining Kitchen Cabinets
Follow these steps for a professional-looking finish when staining kitchen cabinets.
Step 1: Preparing Cabinets for Stain
Proper preparation is key to achieving a beautiful and durable stain finish.
- Remove Doors and Hardware: Use a screwdriver or drill to remove all cabinet doors, drawers, hinges, knobs, and pulls. Label each door and drawer to make reinstallation easier.
- Clean the Cabinets: Use a wood cleaner or degreaser to remove dirt, grease, and grime from the cabinet surfaces.
- Strip the Old Finish (If Necessary): If your cabinets have a painted or varnished finish, you’ll need to remove it. Apply paint stripper according to the manufacturer’s instructions. Use a putty knife to scrape off the old finish.
-
Sand the Surfaces: Sanding creates a smooth surface for the stain to adhere to. Start with a coarser grit sandpaper (80-120) to remove any remaining finish or imperfections. Then, use a finer grit sandpaper (220) for a smooth finish.
- Sanding Tips:
- Sand with the grain of the wood.
- Use a sanding block for even pressure.
- Don’t skip grits – each grit prepares the surface for the next.
- If you have intricate detailing, consider using a detail sander.
5. Repair Any Damage: Use wood filler to fill any holes, scratches, or dents in the wood. Let the filler dry completely and then sand it smooth.
6. Remove Dust: Use a tack cloth to remove all dust from the cabinets. This step is crucial for a smooth, even finish.
- Sanding Tips:
Step 2: Applying Pre-Stain Wood Conditioner
Pre-stain wood conditioner helps the stain absorb evenly, especially on softwoods like pine or birch.
- Apply the Conditioner: Use a brush or rag to apply the pre-stain wood conditioner to the cabinet surfaces.
- Let it Soak In: Allow the conditioner to soak into the wood for the time recommended by the manufacturer (usually 5-15 minutes).
- Wipe Off Excess: Wipe off any excess conditioner with a clean rag.
Step 3: Cabinet Stain Application
Now it’s time for the fun part: applying the stain!
- Choose Your Stain: Selecting the best stain for kitchen cabinets depends on your personal preference and the wood type. Gel stains are often recommended for vertical surfaces to prevent drips.
- Test the Stain: Before staining all the cabinets, test the stain on a hidden area or a piece of scrap wood to ensure you like the color.
- Apply the Stain: Use a brush, rag, or applicator pad to apply the stain to the cabinet surfaces. Apply the stain in the direction of the wood grain.
- Let it Penetrate: Allow the stain to penetrate the wood for the time recommended by the manufacturer (usually 5-15 minutes). The longer you leave the stain on, the darker the color will be.
- Wipe Off Excess Stain: Use a clean rag to wipe off any excess stain. This is an important step to prevent the stain from becoming sticky or uneven.
- Apply Additional Coats (Optional): If you want a darker color, you can apply additional coats of stain. Allow each coat to dry completely before applying the next. Lightly sand with very fine sandpaper (320 grit or higher) between coats for the smoothest finish.
Step 4: Applying a Protective Clear Coat
A clear coat, such as polyurethane, protects the stained surface from scratches, moisture, and wear.
- Let the Stain Dry Completely: Allow the stain to dry completely before applying the clear coat (usually 24-48 hours).
- Apply the Clear Coat: Use a high-quality brush to apply a thin, even coat of polyurethane to the cabinet surfaces.
- Let it Dry: Allow the clear coat to dry completely (usually 24 hours).
- Sand Lightly (Optional): If you want a very smooth finish, lightly sand the clear coat with very fine sandpaper (320 grit or higher).
- Apply Additional Coats: Apply additional coats of clear coat as needed for added protection (usually 2-3 coats). Allow each coat to dry completely before applying the next.
Step 5: Reassemble the Cabinets
Once the clear coat is completely dry, you can reassemble the cabinets.
- Reattach Hardware: Reattach the hinges, knobs, and pulls to the cabinet doors and drawers.
- Rehang Doors and Drawers: Rehang the doors and drawers onto the cabinet frames. Make sure everything is properly aligned.
Choosing the Best Stain for Kitchen Cabinets
Selecting the right stain is crucial for achieving your desired look. Here are some factors to consider:
- Oil-Based vs. Water-Based Stain: Oil-based stains penetrate deeper and offer richer color, but they take longer to dry and require mineral spirits for cleanup. Water-based stains dry faster, are easier to clean up with soap and water, and have lower VOCs (volatile organic compounds).
- Gel Stain: Gel stains are thicker and don’t drip easily, making them ideal for vertical surfaces and non-porous woods.
-
Color: Consider the existing colors in your kitchen and choose a stain that complements them. Popular kitchen cabinet stain colors include:
- Light Oak: A classic, natural-looking stain.
- Cherry: Adds warmth and richness to the wood.
- Walnut: A dark, sophisticated stain.
- Gray: A modern and versatile option.
- White Wash: A light, airy stain that lets the wood grain show through.
Kitchen Cabinet Stain Colors
Choosing the right color can make all the difference. Here’s a deeper dive into popular kitchen cabinet stain colors and their characteristics:
| Stain Color | Description | Best For |
|---|---|---|
| Light Oak | Warm, natural, and classic. | Traditional kitchens, highlighting wood grain. |
| Cherry | Rich, reddish-brown, and adds warmth. | Creating a cozy and inviting atmosphere. |
| Walnut | Dark, sophisticated, and elegant. | Modern or transitional kitchens, adding depth and drama. |
| Gray | Modern, versatile, and neutral. | Contemporary kitchens, creating a sleek and understated look. |
| White Wash | Light, airy, and lets the wood grain show through. | Coastal or farmhouse kitchens, achieving a relaxed and bright aesthetic. |
| Espresso | Very dark brown, almost black, for a bold statement. | Modern, minimalist kitchens; high contrast spaces. |
| Mahogany | Rich, reddish-brown with a slight shimmer, more formal than cherry. | Traditional or formal kitchens; pairing with lighter countertops. |
| Honey Oak | A warmer, slightly golden version of light oak. | Rustic or country-style kitchens; complementing natural stone elements. |
| Weathered Gray | A rustic gray with hints of brown, mimicking aged wood. | Farmhouse or industrial kitchens; adding character and vintage appeal. |
| Provincial | A medium-toned brown with warm undertones, very versatile. | Transitional kitchens; works well with various countertop and backsplash styles. |
Helpful Tips for Staining Kitchen Cabinets
- Work in a Well-Ventilated Area: Stain fumes can be strong, so work in a well-ventilated area.
- Use Quality Brushes: Invest in high-quality brushes for a smooth, even finish.
- Follow Manufacturer’s Instructions: Always follow the manufacturer’s instructions for the stain, conditioner, and clear coat.
- Be Patient: Don’t rush the process. Allow each coat to dry completely before proceeding to the next step.
- Protect Your Work Area: Use drop cloths to protect your floors and countertops.
Common Mistakes to Avoid During DIY Kitchen Cabinet Staining
- Skipping Preparation: Proper preparation is crucial for a successful stain job. Don’t skip steps like cleaning, sanding, and conditioning.
- Applying Too Much Stain: Applying too much stain can result in a sticky or uneven finish.
- Not Wiping Off Excess Stain: Always wipe off excess stain to prevent a blotchy look.
- Rushing the Drying Time: Allow each coat to dry completely before proceeding to the next step.
- Using the Wrong Type of Stain: Choose the right type of stain for your wood and desired look.
Maintaining Your Refinished Cabinets
To keep your stained kitchen cabinets looking their best, follow these tips:
- Clean Regularly: Clean the cabinets regularly with a mild soap and water solution.
- Avoid Harsh Cleaners: Avoid using harsh cleaners or abrasive sponges, which can damage the finish.
- Touch Up Scratches: Touch up any scratches or minor damage with a stain marker or touch-up kit.
- Apply a Fresh Coat of Polyurethane: Apply a fresh coat of polyurethane every few years to protect the stained surface.
Frequently Asked Questions (FAQ)
-
What is the best way to clean kitchen cabinets before staining?
Use a wood cleaner or degreaser specifically designed for kitchen cabinets. These cleaners remove grease, grime, and dirt without damaging the wood.
* Can I stain over existing stain?It’s generally not recommended to stain over existing stain. The new stain may not adhere properly, and the color may not be consistent. It’s best to remove the old stain completely before applying a new one.
* How do I prevent blotchy staining?Use a pre-stain wood conditioner to help the stain absorb evenly. Also, be sure to wipe off excess stain after application.
* What type of sandpaper should I use for staining cabinets?Use a coarser grit sandpaper (80-120) for removing old finishes and a finer grit sandpaper (220) for creating a smooth surface. Use very fine sandpaper (320 grit or higher) for sanding between coats of stain or clear coat.
* How long does it take to refinish kitchen cabinets with stain?The time it takes to refinish kitchen cabinets with stain depends on the size of your kitchen and the complexity of the project. It typically takes 3-7 days to complete the project.
* Is it cheaper to paint or stain kitchen cabinets?Staining is often cheaper than painting, primarily because it requires less material (no primer needed) and is generally a faster process. However, the cost can vary depending on the type of stain and paint you choose.
* Who is the best professional to hire for kitchen cabinet staining?A professional cabinet refinisher or painter with experience in staining wood is the best choice. Look for someone with a portfolio showcasing their staining work and positive reviews.
* Can I stain laminate cabinets?No, laminate cabinets cannot be stained because they lack the porous wood grain necessary for the stain to adhere properly. Staining requires real wood.
* What’s the difference between stain and paint for cabinets?Stain penetrates the wood to enhance its natural grain, while paint sits on top of the surface and obscures the grain. Stain offers a more natural look and can be more durable, while paint provides a solid color finish.
* How do I choose between oil-based and water-based stain?Oil-based stains offer richer color and deeper penetration but require mineral spirits for cleanup and take longer to dry. Water-based stains dry faster, are easier to clean up with soap and water, and have lower VOCs. Your choice depends on your desired finish, drying time, and environmental considerations.
Refinishing your kitchen cabinets with stain is a rewarding DIY project that can transform the look of your kitchen. By following these steps and tips, you can achieve a professional-looking finish that you’ll be proud of for years to come. Happy staining!
Hi, I’m Scott Fischer, the voice behind SliceItRight. My passion for food started in my grandmother’s kitchen, where I learned the art of slicing, dicing, and creating delicious meals. Over the years, I’ve explored everything from the perfect kitchen gadgets to mastering culinary techniques, and I’m here to share all of it with you. Whether you’re a beginner or an experienced home chef, my goal is to make cooking easier, more enjoyable, and a lot more fun. So, let’s slice it right and cook up something amazing together!