Are you wondering how to glaze kitchen cabinets to give them a beautiful, aged look? Glazing cabinets involves applying a thin layer of semi-transparent color over an existing finish to highlight details and create depth. This guide will walk you through various cabinet glazing techniques, glaze application methods, and everything else you need to know for successful DIY cabinet glazing.
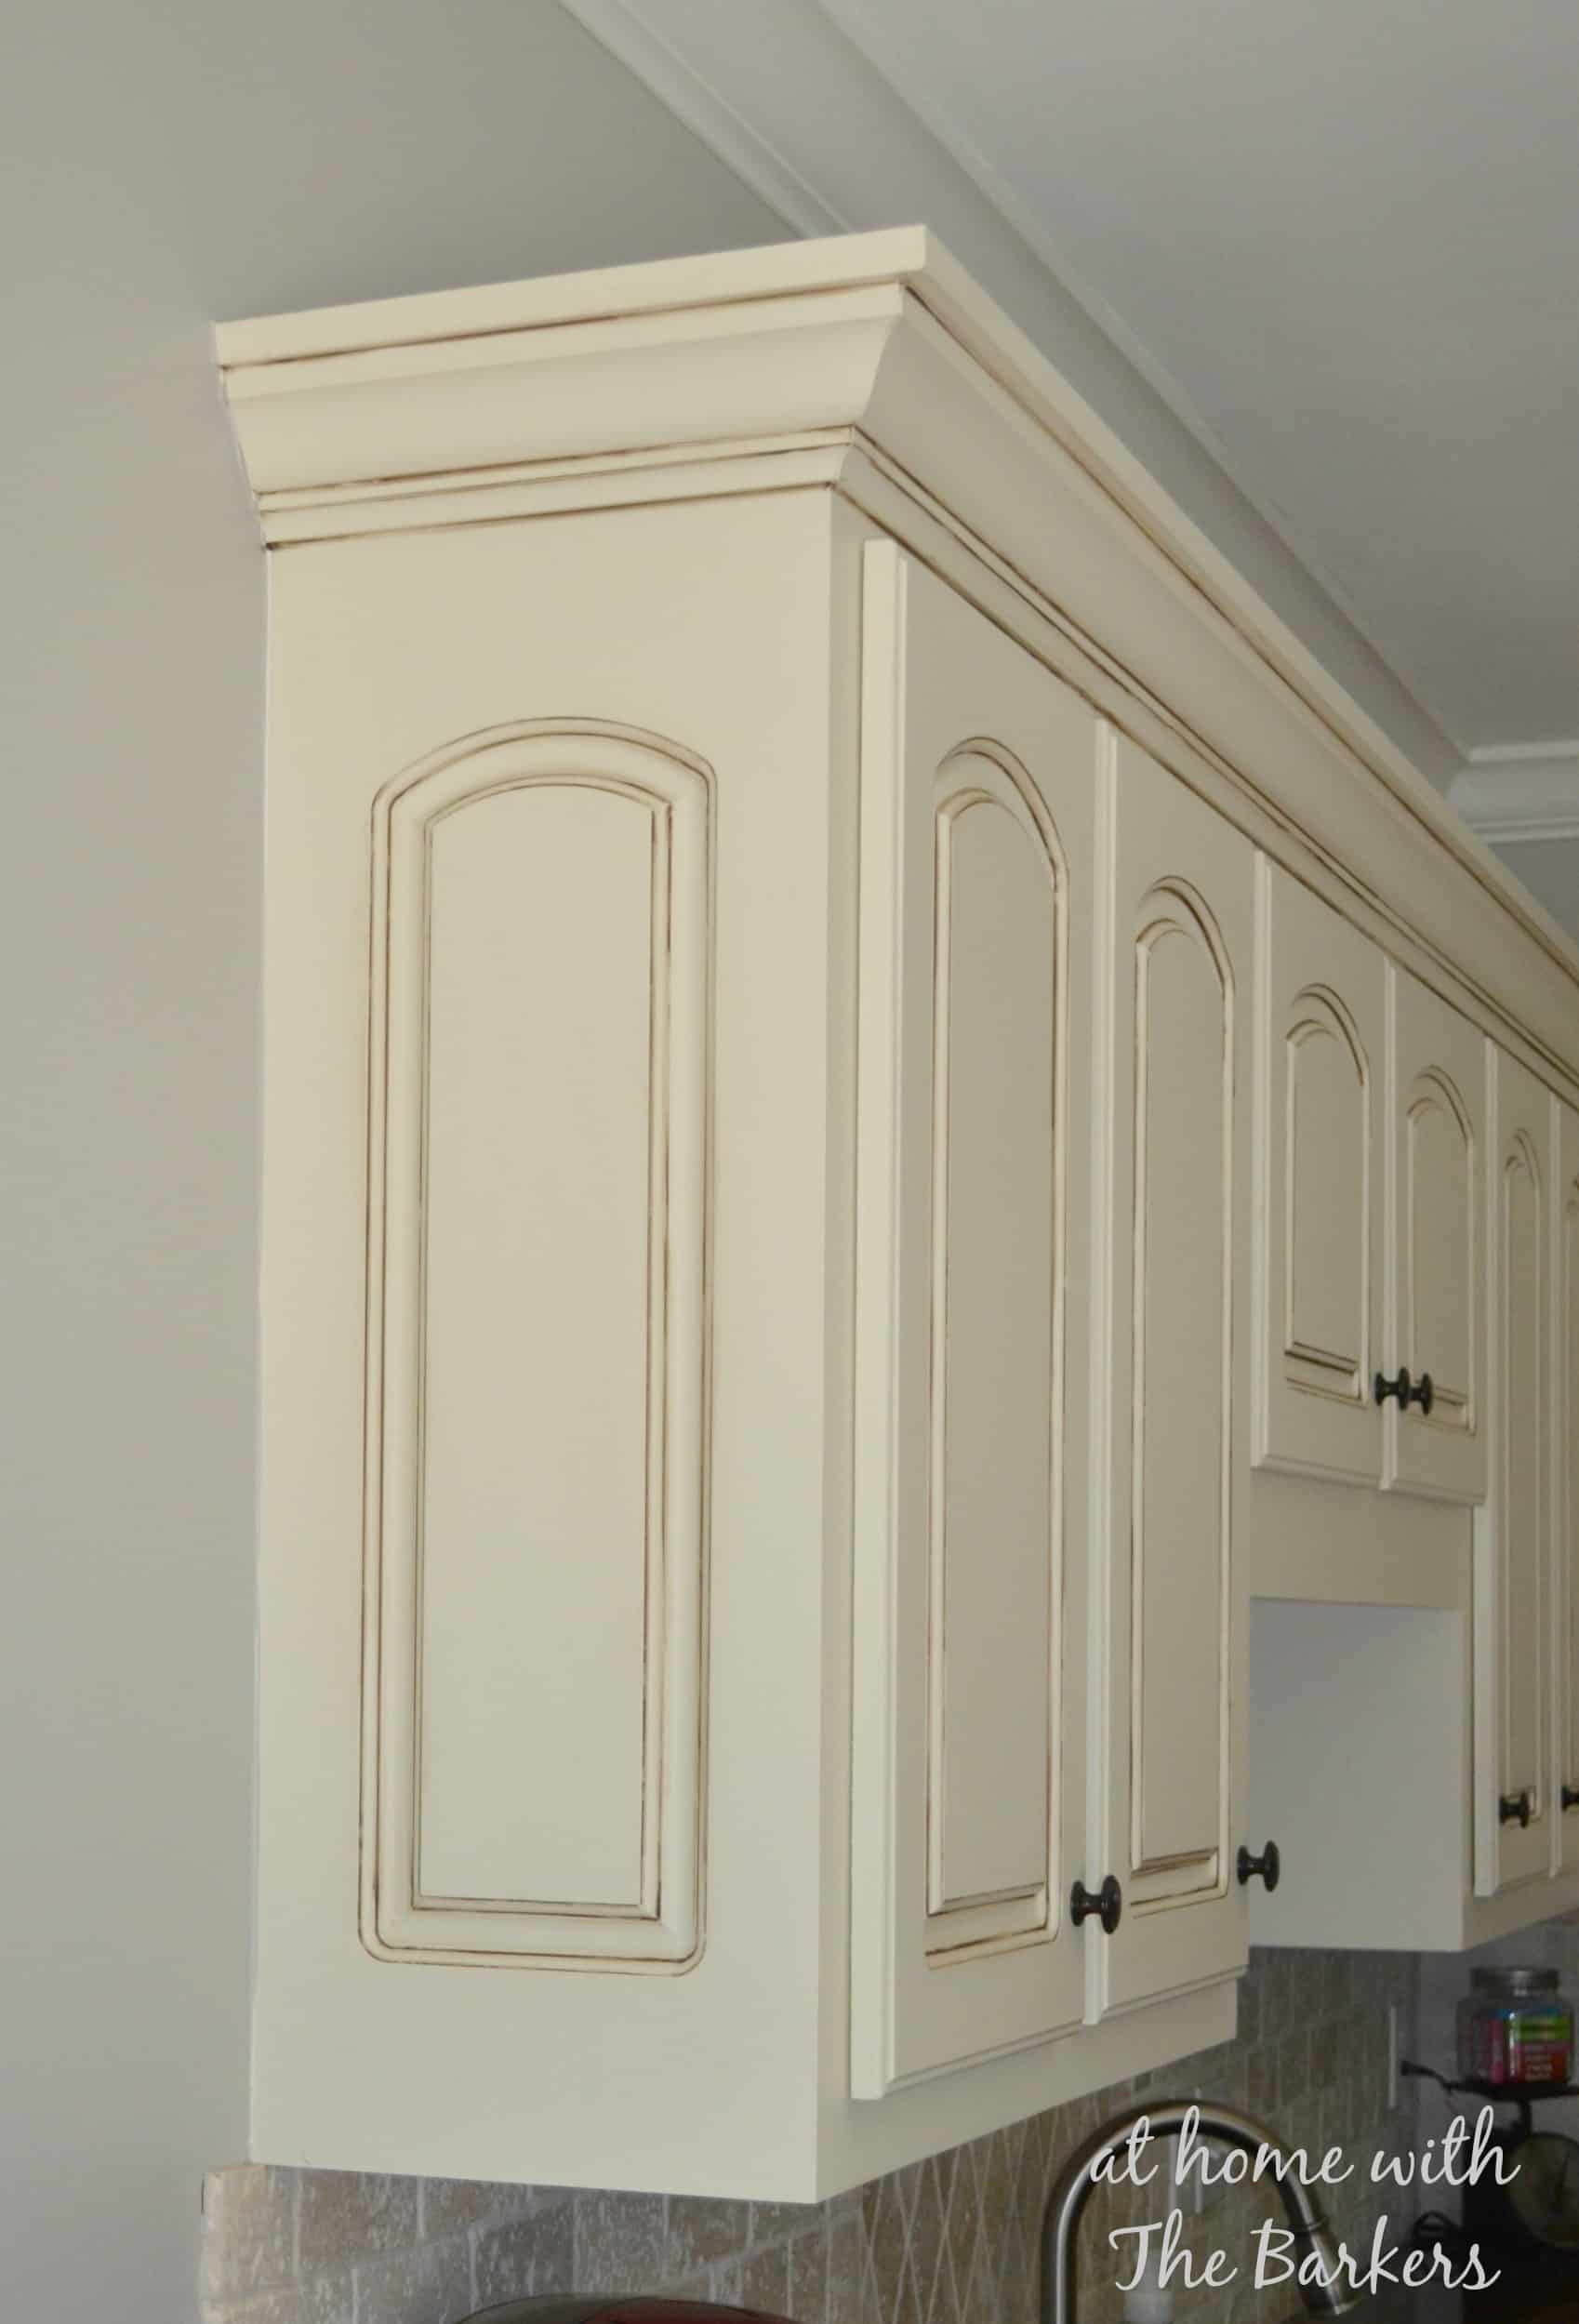
Image Source: athomewiththebarkers.com
The Allure of Antiqued Kitchen Cabinets
Antiqued kitchen cabinets offer a timeless aesthetic, adding character and warmth to any kitchen. This popular finish gives cabinets a vintage, lived-in appearance, contrasting with the sleek, modern look of newer designs. Applying glaze is an effective method for achieving this coveted look.
Why Glaze Your Kitchen Cabinets?
- Enhance Details: Glaze settles into grooves, corners, and raised panels, accentuating the cabinet’s design.
- Create Depth and Dimension: The contrast between the base color and the glaze creates a richer, more visually interesting surface.
- Achieve an Antiqued Look: Glaze mimics the natural aging process, adding a touch of old-world charm.
- Cost-Effective Makeover: Glazing is a relatively inexpensive way to refresh your kitchen without replacing the entire cabinetry.
- Increased Home Value: Well-executed cabinet finishing with glaze can increase the value of your home.
Essential Tools and Materials
Before diving into the project, gather these essential tools and materials:
- Cleaning Supplies: Degreaser, mild soap, water, and clean rags.
- Sandpaper: Fine-grit sandpaper (220-grit or higher) for scuff sanding.
- Primer (Optional): If your existing finish is glossy or damaged.
- Base Coat Paint (If Needed): To match your existing cabinets or create a new base color.
- Glaze: Choose a glaze specifically designed for cabinets. Oil-based or water-based options are available.
- Glaze Colors: Select the desired color; popular choices include Van Dyke Brown, burnt umber, or antique white.
- Application Tools:
- Paintbrushes: High-quality brushes for applying glaze.
- Foam Brushes: For smoother application.
- Lint-Free Rags: For wiping away excess glaze.
- Sponges: For creating specific textures.
- Protective Gear: Gloves, safety glasses, and a respirator.
- Drop Cloths: To protect your work area.
- Topcoat/Sealer: Polyurethane or varnish to protect the glaze.
Selecting the Right Glaze
Choosing the correct glaze is crucial for the final outcome. Consider these factors:
- Oil-Based vs. Water-Based: Oil-based glazes offer longer working times but require mineral spirits for cleanup. Water-based glazes are easier to clean and have lower VOCs.
- Color: Select a color that complements your base coat. Darker glazes create a more dramatic effect, while lighter glazes offer a subtle enhancement.
- Consistency: Glazes should be thick enough to stay in place but thin enough to spread easily.
Preparation: The Foundation of a Flawless Finish
Proper preparation is key to achieving professional-looking results.
Step 1: Cleaning and Degreasing
- Remove cabinet doors and drawers.
- Clean all surfaces thoroughly with a degreaser to remove grease, dirt, and grime.
- Rinse with clean water and allow to dry completely.
Step 2: Sanding
- Lightly sand all surfaces with fine-grit sandpaper to create a slightly rough texture for better adhesion.
- Focus on areas where the existing finish is glossy.
- Remove sanding dust with a tack cloth or damp rag.
Step 3: Priming (Optional)
- If your existing finish is damaged or you are changing the color significantly, apply a coat of primer.
- Use a high-quality primer designed for cabinets.
- Allow the primer to dry completely before proceeding.
Step 4: Base Coat (If Needed)
- If you are changing the base color of your cabinets, apply one or two coats of paint.
- Use a paint specifically designed for cabinets and allow it to dry completely between coats.
Cabinet Glazing Techniques: Step-by-Step
Now, let’s move on to the glazing process.
Method 1: The Brush-and-Wipe Technique
This is a classic and versatile cabinet glazing technique suitable for most cabinet styles.
- Apply the Glaze: Using a paintbrush, apply a thin, even layer of glaze to a small section of the cabinet.
- Wipe Away Excess: Immediately wipe away the excess glaze with a clean, lint-free rag. Use varying pressure to control the amount of glaze remaining. Focus on leaving glaze in the details, such as corners and grooves.
- Refine the Finish: Use a clean brush or rag to blend and soften the glaze. This step is crucial for achieving a natural, aged look.
- Repeat: Continue this process in small sections until the entire cabinet is glazed.
- Dry Time: Allow the glaze to dry completely according to the manufacturer’s instructions. This usually takes 24-48 hours.
Method 2: The Rag-Rolling Technique
This method creates a textured, mottled effect.
- Apply the Glaze: Apply a thin layer of glaze to a small section of the cabinet.
- Roll with a Rag: Crumple a clean rag and roll it over the wet glaze, lifting away some of the glaze and leaving a textured pattern.
- Adjust as Needed: Use a clean brush or rag to adjust the pattern and soften any harsh lines.
- Repeat: Continue this process in small sections until the entire cabinet is glazed.
- Dry Time: Allow the glaze to dry completely.
Method 3: The Sponge Technique
This technique creates a subtle, dappled effect.
- Apply the Glaze: Apply a thin layer of glaze to a small section of the cabinet.
- Dab with a Sponge: Dab the wet glaze with a clean, damp sponge, lifting away some of the glaze and creating a stippled pattern.
- Adjust as Needed: Use a clean brush or rag to adjust the pattern and soften any harsh lines.
- Repeat: Continue this process in small sections until the entire cabinet is glazed.
- Dry Time: Allow the glaze to dry completely.
Method 4: Dry Brushing Technique
Dry brushing involves using a nearly dry brush to apply glaze, creating a subtle, streaked effect.
- Dip the Brush: Dip the tip of a dry brush into the glaze.
- Blot Excess: Blot the brush on a paper towel to remove most of the glaze.
- Apply Lightly: Lightly brush the glaze onto the cabinet surface, following the direction of the wood grain.
- Repeat: Continue applying the glaze in light, even strokes until you achieve the desired effect.
- Dry Time: Allow the glaze to dry completely.
Tips for Glaze Application Methods
- Work in Small Sections: Glaze dries quickly, so work in small sections to prevent it from becoming too difficult to wipe away.
- Experiment: Practice different techniques on a scrap piece of wood to find the one you like best.
- Control the Pressure: Vary the pressure you use when wiping away the glaze to control the amount of color remaining.
- Blend Carefully: Blend the glaze carefully to avoid harsh lines and create a natural look.
- Patience is Key: Don’t rush the process. Take your time and pay attention to detail.
Enhancing the Antiqued Look: How to Distress Cabinets with Glaze
To enhance the antiqued appearance further, consider distressing your cabinets. This involves adding intentional imperfections to mimic the wear and tear of age.
Distressing Techniques:
- Sanding Edges: Lightly sand the edges and corners of the cabinets to reveal the base coat or wood underneath.
- Hammering: Gently tap the surface of the cabinets with a hammer to create small dents and dings.
- Chaining: Lightly tap the cabinet surface with a chain for a randomized distressed pattern.
- Creating Wormholes: Use an awl or small drill bit to create small holes that resemble wormholes.
- Adding Splatters: Flick thinned paint or glaze onto the cabinets to create splatters.
Applying Glaze to Distressed Areas
Once you’ve distressed your cabinets, apply glaze as described above, focusing on the distressed areas. The glaze will settle into the imperfections, highlighting them and enhancing the aged appearance.
Protecting Your Work: Applying a Topcoat
Once the glaze is completely dry, it’s essential to protect it with a topcoat. This will prevent the glaze from scratching or fading and ensure a long-lasting finish.
Choosing a Topcoat
- Polyurethane: A durable, water-resistant option that’s available in various sheens (gloss, semi-gloss, satin, matte).
- Varnish: Another durable option that provides a warm, amber hue.
- Water-Based Acrylic: A low-VOC option that’s easy to clean and dries quickly.
Applying the Topcoat
- Clean the Surface: Make sure the glazed surface is clean and free of dust.
- Apply the Topcoat: Apply a thin, even coat of topcoat with a brush, roller, or sprayer.
- Allow to Dry: Allow the topcoat to dry completely according to the manufacturer’s instructions.
- Sand Lightly (Optional): If desired, lightly sand the surface with fine-grit sandpaper to smooth out any imperfections.
- Apply a Second Coat: Apply a second coat of topcoat for added protection.
Cabinet Glazing Colors: Finding the Perfect Hue
The color of the glaze can dramatically impact the final look of your cabinets. Here are some popular cabinet glazing colors and the effects they create:
- Van Dyke Brown: A classic choice that adds warmth and depth.
- Burnt Umber: Similar to Van Dyke Brown but slightly cooler in tone.
- Raw Umber: A muted brown that creates a more subtle effect.
- Antique White: A soft, creamy white that adds a touch of elegance.
- Black: A dramatic choice that creates a strong contrast.
- Gray: A modern choice that complements contemporary kitchen designs.
Color Combination Tips
- Light Cabinets + Dark Glaze: Creates a high-contrast look that highlights details.
- Dark Cabinets + Light Glaze: Creates a more subtle effect that softens the overall appearance.
- Complementary Colors: Use glazes that complement the base color of your cabinets.
- Test Samples: Always test glaze colors on a sample piece of wood before applying them to your cabinets.
Applying Glaze to Wood Cabinets vs. Glaze for Painted Cabinets
The process of glazing wood cabinets is slightly different than glazing painted cabinets.
Glazing Wood Cabinets
- Preparation: Clean and lightly sand the wood surface. Apply a clear sealer to prevent the glaze from staining the wood.
- Application: Apply the glaze as described above, working in small sections and wiping away the excess.
- Sealing: Apply a topcoat to protect the glaze.
Glazing Painted Cabinets
- Preparation: Clean and lightly sand the painted surface.
- Application: Apply the glaze as described above, working in small sections and wiping away the excess.
- Sealing: Apply a topcoat to protect the glaze.
The main difference is the need for a clear sealer on wood cabinets to prevent staining.
Common Mistakes to Avoid
- Skipping Preparation: Proper cleaning, sanding, and priming are crucial for a successful finish.
- Applying Too Much Glaze: Apply the glaze in thin layers to avoid a muddy or uneven appearance.
- Not Wiping Away Excess: Wiping away the excess glaze is essential for creating the desired effect.
- Rushing the Process: Take your time and pay attention to detail.
- Not Using a Topcoat: A topcoat is essential for protecting the glaze and ensuring a long-lasting finish.
DIY Cabinet Glazing vs. Professional Services
While DIY cabinet glazing can save you money, it requires time, effort, and skill. If you’re not comfortable tackling the project yourself, consider hiring a professional.
Benefits of DIY Cabinet Glazing
- Cost Savings: You’ll save on labor costs.
- Control: You have complete control over the design and finish.
- Satisfaction: You’ll have the satisfaction of completing the project yourself.
Benefits of Professional Services
- Expertise: Professionals have the experience and knowledge to achieve a flawless finish.
- Time Savings: Professionals can complete the project much faster than you could on your own.
- Guaranteed Results: Professionals typically offer a warranty or guarantee on their work.
Troubleshooting Common Issues
- Uneven Glaze: Apply the glaze in thin, even layers and blend carefully.
- Muddy Appearance: Wipe away the excess glaze more thoroughly.
- Streaks: Use a clean brush or rag to blend the glaze and remove any streaks.
- Peeling: Ensure the surface is properly prepared and use a high-quality primer and topcoat.
- Tacky Finish: Allow the glaze and topcoat to dry completely before using the cabinets.
Estimating Costs and Time
The cost of glazing kitchen cabinets varies depending on the size of your kitchen, the type of glaze you use, and whether you hire a professional. DIY projects can range from $50 to $200, while professional services can range from $500 to $2000 or more.
The time required for glazing kitchen cabinets also varies depending on the size of the kitchen and the complexity of the project. DIY projects can take several days or even weeks, while professionals can typically complete the project in a few days.
FAQ Section
What is cabinet glazing?
Cabinet glazing is the process of applying a thin, semi-transparent layer of color over an existing cabinet finish to enhance details and create an aged or antiqued look.
Can I glaze cabinets myself?
Yes, you can glaze cabinets yourself, but it requires patience, attention to detail, and some basic DIY skills.
What type of glaze should I use?
The best type of glaze depends on your preference and the desired effect. Oil-based glazes offer longer working times, while water-based glazes are easier to clean up.
How do I choose the right glaze color?
Choose a glaze color that complements the base color of your cabinets. Darker glazes create a more dramatic effect, while lighter glazes offer a subtle enhancement.
How long does it take for glaze to dry?
Glaze typically takes 24-48 hours to dry completely.
Do I need to apply a topcoat after glazing?
Yes, a topcoat is essential for protecting the glaze and ensuring a long-lasting finish.
How do I clean glazed cabinets?
Clean glazed cabinets with a mild soap and water solution. Avoid using harsh chemicals or abrasive cleaners.
By following these pro tips and techniques, you can successfully glaze your kitchen cabinets and achieve a beautiful, antiqued look that will enhance the style and value of your home. Remember to take your time, experiment with different techniques, and don’t be afraid to ask for help if you need it. Happy glazing!
Hi, I’m Scott Fischer, the voice behind SliceItRight. My passion for food started in my grandmother’s kitchen, where I learned the art of slicing, dicing, and creating delicious meals. Over the years, I’ve explored everything from the perfect kitchen gadgets to mastering culinary techniques, and I’m here to share all of it with you. Whether you’re a beginner or an experienced home chef, my goal is to make cooking easier, more enjoyable, and a lot more fun. So, let’s slice it right and cook up something amazing together!