Can I finish my kitchen cabinets myself? Yes, you can finish your kitchen cabinets yourself! With the right preparation, materials, and techniques, you can achieve a professional-looking finish without breaking the bank. This guide provides easy-to-follow steps for cabinet finishing techniques, refinishing kitchen cabinets DIY, whether you’re staining or painting.
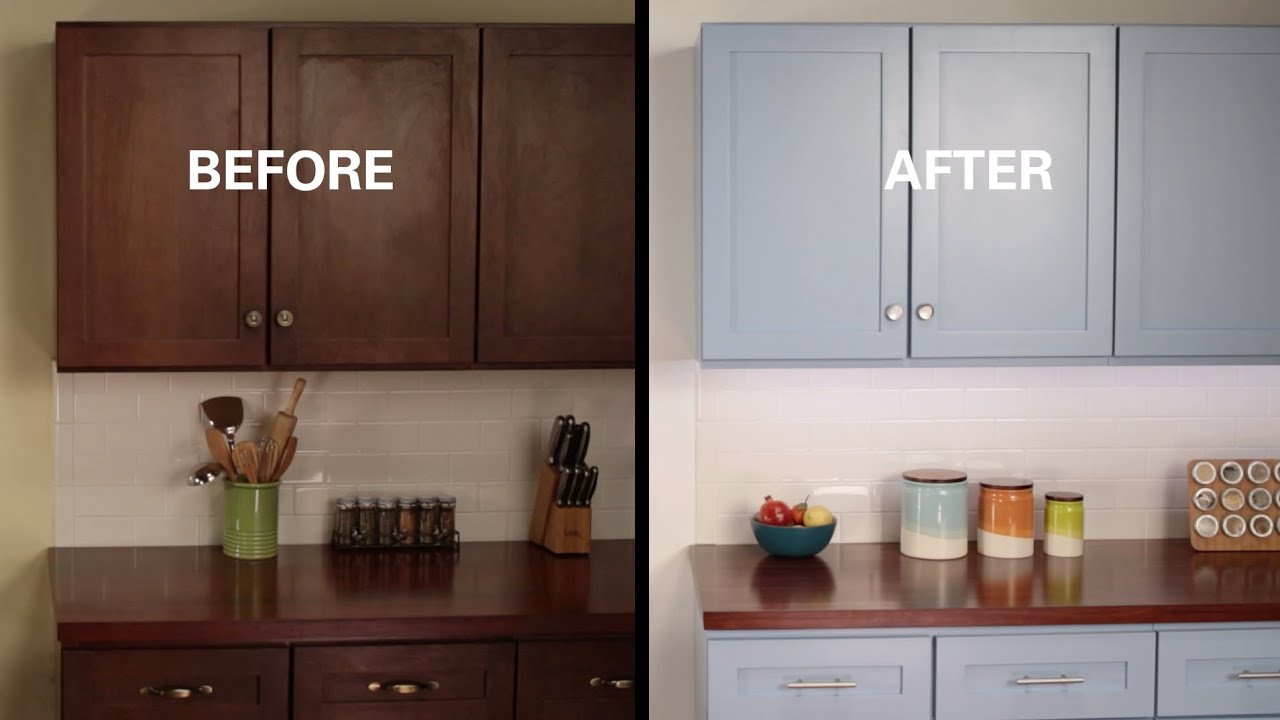
Image Source: i.ytimg.com
Revamping Your Kitchen: A Cabinet Finishing Guide
Kitchen cabinets often dictate the overall style of a kitchen. If they are looking tired and worn, refinishing them can breathe new life into your entire space. This guide will take you through the process step-by-step, covering everything from preparation to the final touches, ensuring you get a durable and beautiful finish.
Planning Your Project: Materials and Tools
Before you start, gather everything you’ll need. This saves time and ensures a smoother workflow.
Here’s a list of essential materials and tools:
- Cleaning Supplies: Degreaser, TSP (trisodium phosphate) or a TSP substitute, clean cloths, sponges
- Safety Gear: Safety glasses, dust mask, gloves
- Sanding Equipment: Sandpaper (various grits: 120, 180, 220), sanding block, orbital sander (optional)
- Wood Filler: For repairing any damages
- Primer: Stain-blocking primer (oil-based or water-based)
- Paint or Stain: Best paint for kitchen cabinets is typically acrylic or enamel; choose a high-quality stain if staining.
- Clear Coat (Optional): Polyurethane or acrylic clear coat for added protection
- Application Tools: Paintbrushes (high-quality, angled), paint rollers (foam or microfiber), paint sprayer (optional, for how to spray paint cabinets)
- Drop Cloths/Plastic Sheeting: To protect your work area
- Painter’s Tape: For masking off areas
- Screwdriver/Drill: For removing and re-installing hardware
- New Cabinet Hardware (Optional): Knobs, pulls, hinges
- Tack Cloth: For removing dust
Step-by-Step Cabinet Refinishing
Follow these steps carefully for a fantastic finish on your kitchen cabinets.
1. Preparing the Workspace
The first step is protecting the surrounding areas. Cover countertops, floors, and appliances with drop cloths or plastic sheeting. Good ventilation is also vital. Open windows and doors, and use fans if needed.
2. Removing Cabinet Doors and Hardware
Use a screwdriver or drill to remove all cabinet doors and drawers. Label each door and drawer with tape to remember their original location. Remove all cabinet hardware, such as knobs, pulls, and hinges. Store the hardware in a safe place, or consider replacing it with new hardware.
3. Thorough Cleaning
Cabinets are often coated in grease and grime. Use a degreaser or TSP solution to clean all surfaces thoroughly. Follow the manufacturer’s instructions for dilution and application. Rinse with clean water and allow to dry completely.
4. Cabinet Sanding Preparation
Sanding is a crucial step for adhesion.
- Lightly Sand: Use 120-grit sandpaper to lightly sand all surfaces. The goal is not to remove the existing finish completely, but to create a slightly rough surface for the primer to grip onto.
- Sanding Flat Surfaces: For flat areas, an orbital sander can speed up the process.
- Detailed Areas: Use a sanding block or sandpaper folded by hand for corners and detailed areas.
- Repairing Damage: If there are any dents, scratches, or chips, fill them with wood filler. Allow the filler to dry completely, then sand it smooth.
- Final Sanding: Follow up with 180-grit and then 220-grit sandpaper to smooth the surface.
- Dust Removal: After sanding, use a tack cloth to remove all dust particles. Vacuuming can also help.
5. Priming the Cabinets
Apply a high-quality stain-blocking primer to all surfaces. Primer creates a uniform surface for the paint or stain and helps prevent bleed-through from the old finish.
- Primer Choice: Choose an oil-based primer for superior stain-blocking, or a water-based primer for easier cleanup.
- Application: Apply the primer in thin, even coats using a brush or roller.
- Drying Time: Allow the primer to dry completely according to the manufacturer’s instructions.
- Light Sanding: Lightly sand the primed surface with 220-grit sandpaper to smooth out any imperfections. Remove dust with a tack cloth.
6. Painting or Staining
This is where you add color and character to your cabinets.
Painting Kitchen Cabinets
- Best Paint for Kitchen Cabinets: Acrylic or enamel paints are popular choices for kitchen cabinets because they are durable and easy to clean.
- Application: Apply the paint in thin, even coats using a brush, roller, or paint sprayer. Avoid drips and runs.
- Number of Coats: Two coats of paint are typically required for full coverage. Allow each coat to dry completely before applying the next.
- Sanding Between Coats: Lightly sand between coats with 320-grit sandpaper for an ultra-smooth finish.
- Spraying Cabinets: To spray paint cabinets, thin the paint according to the sprayer manufacturer’s instructions. Apply even coats, overlapping slightly with each pass.
Staining Kitchen Cabinets Tutorial
- Stain Selection: Choose a stain color that complements your kitchen’s décor. Test the stain on a scrap piece of wood to see how it looks.
- Application: Apply the stain with a brush or cloth, working in the direction of the wood grain.
- Wiping Excess Stain: Allow the stain to sit for a few minutes, then wipe off the excess with a clean cloth. The longer you leave the stain on, the darker the color will be.
- Drying Time: Allow the stain to dry completely.
- Multiple Coats: Apply additional coats of stain if needed to achieve the desired color.
7. Cabinet Clear Coat Application (Optional)
A clear coat adds an extra layer of protection and durability to your finished cabinets. Polyurethane or acrylic clear coats are good choices.
- Application: Apply the clear coat in thin, even coats using a brush, roller, or sprayer.
- Drying Time: Allow the clear coat to dry completely according to the manufacturer’s instructions.
- Light Sanding: Lightly sand the clear-coated surface with 320-grit sandpaper to smooth out any imperfections.
- Multiple Coats: Apply multiple coats for enhanced durability.
8. Re-installing Hardware
Once the paint or stain and clear coat (if used) are fully dry, re-install the cabinet hardware. This includes hinges, knobs, and pulls.
- New Hardware: If you’re replacing the hardware, now is the time to install the new pieces.
- Alignment: Make sure the hardware is aligned properly before tightening the screws.
9. Cabinet Door Finishing Process and Re-hanging
Carefully re-hang the cabinet doors and drawers in their original locations. Adjust the hinges if needed to ensure the doors hang straight and close properly.
Maintaining Your Finished Cabinets
Regular cleaning will help keep your cabinets looking their best. Use a mild soap and water solution to wipe down the surfaces regularly. Avoid harsh chemicals and abrasive cleaners.
Refining Your Technique: Cabinet Finishing Tips
Here are some extra kitchen cabinet painting tips to help you achieve a professional-looking finish:
- Practice: If you’re using a paint sprayer, practice on a scrap piece of wood first to get a feel for the equipment and the paint.
- Thin Coats: Always apply thin coats of paint or stain. Multiple thin coats are better than one thick coat, which can lead to drips and runs.
- Proper Drying Time: Allow each coat to dry completely before applying the next. Rushing the drying process can result in a poor finish.
- Ventilation: Work in a well-ventilated area to avoid inhaling harmful fumes.
- Lighting: Good lighting is essential for seeing any imperfections in the finish.
- Cleanliness: Keep your brushes, rollers, and sprayers clean. Dirty equipment can contaminate the finish.
- Sanding: Sanding is key to a smooth finish. Don’t skip this step.
- Quality Materials: Use high-quality paints, stains, and primers for the best results.
- Patience: Refinishing kitchen cabinets takes time and patience. Don’t rush the process.
- Cabinet Hardware Installation After Painting: Use a template for drilling the holes for new hardware if needed. This ensures consistent placement.
Troubleshooting Common Issues
Even with careful preparation, you might encounter some common issues:
- Drips and Runs: If you get drips or runs in the paint, sand them smooth once the paint is dry and apply another coat.
- Brush Strokes: To minimize brush strokes, use a high-quality brush and apply the paint in the direction of the wood grain.
- Uneven Color: If the color is uneven, apply another coat of paint or stain.
- Bubbling: Bubbling can be caused by moisture or air trapped under the finish. Make sure the cabinets are completely dry before applying primer or paint.
- Peeling: Peeling can be caused by poor adhesion. Make sure the cabinets are properly sanded and primed before painting.
Comparing Different Cabinet Finishing Options
Here’s a table summarizing different cabinet finishing options:
| Finish Type | Pros | Cons | Best For |
|---|---|---|---|
| Painting | Wide range of colors, easy to clean, can cover up imperfections | Can chip or scratch, requires multiple coats | Modern kitchens, covering up old or damaged cabinets |
| Staining | Enhances wood grain, durable, classic look | Limited color options, requires careful preparation, can be messy | Showcasing natural wood, traditional kitchens |
| Glazing | Adds depth and dimension, highlights details | Can be time-consuming, requires practice | Adding character to cabinets, creating an antique look |
| Distressing | Creates a rustic, aged look, forgiving of imperfections | Not suitable for all kitchen styles, can be overdone | Farmhouse kitchens, creating a vintage feel |
| Varnishing | Clear protective coat, enhances durability | Can yellow over time, may require multiple coats | Adding a protective layer to stained or painted cabinets, enhancing the existing finish |
Frequently Asked Questions (FAQ)
- What is the best way to prepare kitchen cabinets for painting?
- The best way to prepare kitchen cabinets for painting is to clean them thoroughly with a degreaser, sand them lightly to create a rough surface, and apply a stain-blocking primer.
- How long does it take to refinish kitchen cabinets DIY?
- Refinishing kitchen cabinets typically takes 3-7 days, depending on the size of your kitchen and the complexity of the project.
- Can I paint over laminate cabinets?
- Yes, you can paint over laminate cabinets, but you’ll need to use a special bonding primer designed for slick surfaces.
- What type of paint should I use for kitchen cabinets?
- Acrylic or enamel paints are the best choice for kitchen cabinets because they are durable, easy to clean, and provide a smooth finish.
- How do I prevent brush strokes when painting cabinets?
- To prevent brush strokes, use a high-quality brush, apply the paint in thin, even coats, and lightly sand between coats.
- Who is the best person to hire to refinish kitchen cabinets?
- If you are not comfortable refinishing your kitchen cabinets yourself, look for a reputable painting contractor or cabinet refinisher with experience in kitchen cabinet finishing techniques.
- Is it cheaper to paint or replace kitchen cabinets?
- Painting kitchen cabinets is almost always cheaper than replacing them. Replacing cabinets can be a significant expense, while painting is a more affordable way to update the look of your kitchen.
Finishing your kitchen cabinets is a rewarding DIY project. With the right tools, materials, and techniques, you can transform your kitchen and give it a fresh new look. Take your time, follow the steps carefully, and enjoy the process. Good luck!
Hi, I’m Scott Fischer, the voice behind SliceItRight. My passion for food started in my grandmother’s kitchen, where I learned the art of slicing, dicing, and creating delicious meals. Over the years, I’ve explored everything from the perfect kitchen gadgets to mastering culinary techniques, and I’m here to share all of it with you. Whether you’re a beginner or an experienced home chef, my goal is to make cooking easier, more enjoyable, and a lot more fun. So, let’s slice it right and cook up something amazing together!