Can you change a kitchen faucet with a sprayer yourself? Yes, you can! Kitchen faucet replacement with sprayer is a manageable DIY project for most homeowners. This guide will walk you through the entire process, from removing the old faucet to connecting kitchen faucet sprayer, ensuring a successful DIY kitchen faucet installation sprayer.
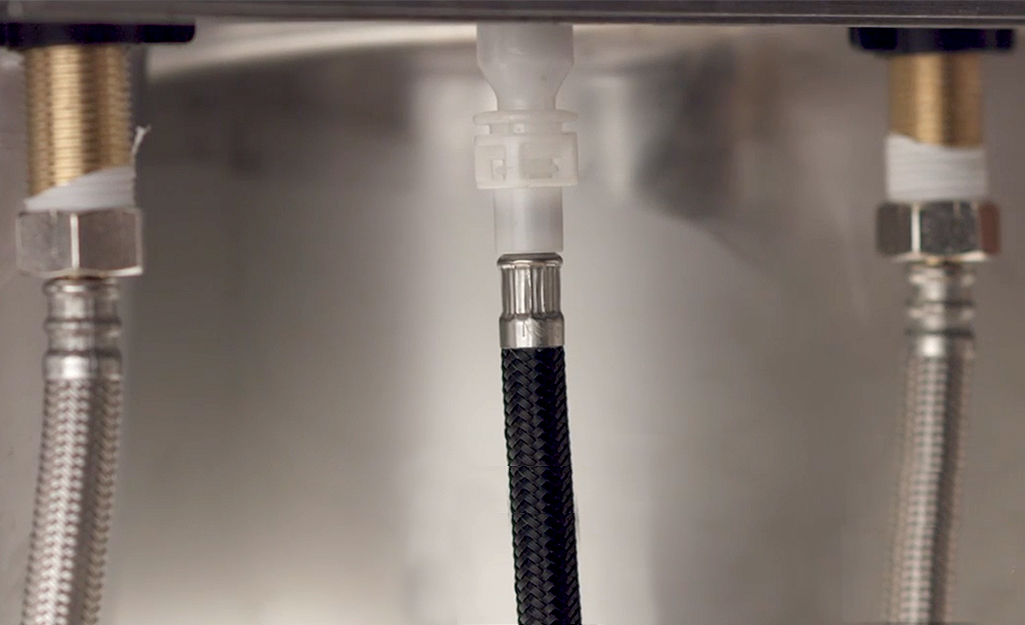
Image Source: contentgrid.homedepot-static.com
Tools and Materials Needed
Before you start, gather all the necessary tools and materials. Having everything on hand will make the job much smoother.
- New kitchen faucet with sprayer
- Basin wrench
- Adjustable wrench
- Pliers
- Screwdrivers (Phillips and flathead)
- Putty knife or scraper
- Plumber’s putty
- Teflon tape
- Towels or rags
- Bucket
- Safety glasses
- Work gloves
- Penetrating oil (if needed)
| Tool/Material | Purpose |
|---|---|
| Basin Wrench | Loosening and tightening hard-to-reach nuts under the sink. |
| Adjustable Wrench | Tightening and loosening supply lines and other connections. |
| Pliers | Gripping and turning small parts. |
| Screwdrivers | Removing and installing screws. |
| Putty Knife/Scraper | Removing old putty or caulk. |
| Plumber’s Putty | Sealing the base of the faucet to the sink. |
| Teflon Tape | Sealing threaded connections to prevent leaks. |
| Towels/Rags | Cleaning up spills and protecting surfaces. |
| Bucket | Catching water from the supply lines. |
| Safety Glasses | Protecting your eyes from debris. |
| Work Gloves | Protecting your hands and providing a better grip. |
| Penetrating Oil | Loosening stubborn nuts and bolts. |
Step-by-Step: Removing the Old Faucet with Sprayer
The first step is how to remove old kitchen faucet with sprayer. This can sometimes be the most challenging part, especially if the faucet has been in place for many years.
1. Shut Off the Water Supply
- Locate the shut-off valves under your sink. There should be one for hot water and one for cold water.
- Turn both valves clockwise until they are completely closed.
- If you don’t have shut-off valves under the sink, you’ll need to shut off the main water supply to your house.
2. Disconnect the Water Supply Lines
- Place a bucket under the supply lines to catch any remaining water.
- Use an adjustable wrench to disconnect the supply lines from the faucet.
- If the connections are corroded or stuck, apply penetrating oil and let it sit for a few minutes before trying again.
3. Disconnect the Sprayer Hose
- Locate where the kitchen faucet sprayer hose connects to the faucet body, usually beneath the sink.
- There will typically be a clip or a quick-connect fitting. Disconnect the sprayer hose carefully.
4. Loosen the Mounting Nuts
- This is where the basin wrench comes in handy.
- Reach under the sink and locate the mounting nuts that hold the faucet in place.
- Use the basin wrench to loosen these nuts. It may take some effort if they are corroded.
- Once the nuts are loose, you should be able to unscrew them by hand.
5. Remove the Old Faucet
- From above the sink, carefully lift the old faucet and sprayer assembly out.
- Use a putty knife or scraper to remove any old plumber’s putty or caulk from the sink surface.
- Clean the sink surface thoroughly.
Preparing for the New Faucet Installation
With the old faucet removed, it’s time to prepare the area for the new one.
1. Clean the Sink Area
- Ensure the sink surface is clean and dry.
- Remove any remaining debris or residue from the old faucet.
2. Inspect the Sprayer Hose Connection
- Check the opening in the sink where the kitchen faucet sprayer hose will pass through.
- Make sure it’s clear of any obstructions.
3. Gather the New Faucet Components
- Unpack your new faucet and sprayer.
- Ensure you have all the necessary parts, including the faucet body, sprayer head, hose, mounting hardware, and any gaskets or washers.
Installing the New Kitchen Faucet with Sprayer
Now comes the exciting part: installing your new faucet! This process involves carefully following the manufacturer’s instructions. However, here are the general steps.
1. Attach the Faucet Spout and Handle
- Follow the manufacturer’s instructions to attach the faucet spout to the faucet body.
- Attach the handle according to the instructions as well.
2. Install the Mounting Hardware
- Most faucets come with a mounting plate or gasket. Place this on the underside of the faucet.
- Insert the faucet through the hole in the sink.
- From underneath the sink, attach the mounting hardware (washers and nuts) to the faucet’s mounting studs.
- Tighten the nuts by hand, then use a wrench to give them an extra turn or two until the faucet is snug and secure. Be careful not to overtighten, as this could damage the sink or faucet.
3. Connecting the Sprayer Hose
Connecting kitchen faucet sprayer is a critical step.
- Attach one end of the kitchen faucet sprayer hose to the sprayer head.
- Feed the other end of the hose through the opening in the sink and connect it to the designated port on the faucet body.
- Make sure the connection is secure. Most hoses use a click-in fitting, so listen for a click.
4. Connecting the Water Supply Lines
- Wrap Teflon tape around the threads of the faucet’s water inlets.
- Attach the hot and cold water supply lines to the corresponding inlets on the faucet.
- Tighten the connections with an adjustable wrench, but be careful not to overtighten.
5. Checking for Leaks
- Slowly turn on the water supply valves under the sink.
- Check all connections for leaks. If you see any leaks, turn off the water and tighten the connections further.
- Test the sprayer by pulling it out and using it. Check for leaks around the sprayer head and hose.
Tips and Tricks for a Smooth Installation
Here are some sprayer faucet installation tips to make the job easier.
- Read the Instructions: Always read the manufacturer’s instructions carefully before you begin. Each faucet model may have slightly different installation requirements.
- Use Teflon Tape: Applying Teflon tape to threaded connections will help prevent leaks.
- Don’t Overtighten: Overtightening nuts and bolts can damage the faucet or sink. Tighten them until they are snug and secure.
- Have a Helper: If possible, have someone help you with the installation. It can be easier to hold the faucet in place while someone else tightens the nuts underneath the sink.
- Take Your Time: Don’t rush the installation. Take your time and double-check your work at each step.
Troubleshooting Common Issues
Even with careful planning, you might encounter some issues during kitchen faucet replacement with sprayer.
- Leaking Connections: If you have leaking connections, try tightening them further. If that doesn’t work, remove the connection, apply fresh Teflon tape, and reassemble.
- Low Water Pressure: If you have low water pressure after installing the new faucet, check the aerator for debris. Clean or replace the aerator if necessary.
- Sprayer Not Working: If the sprayer is not working, make sure the hose is properly connected and not kinked. Also, check the sprayer head for clogs.
- Stuck Mounting Nuts: If the mounting nuts are stuck, apply penetrating oil and let it sit for a while before trying to loosen them.
Fathoming Different Faucet Types with Sprayers
There are several types of kitchen faucets with sprayers available. Choosing the right one for your needs is important.
Pull-Down Faucets
Pull-down faucets have a sprayer head that pulls down from the spout. They are popular for their flexibility and ease of use.
Pull-Out Faucets
Pull-out faucets have a sprayer head that pulls out from the side of the spout. They are similar to pull-down faucets but offer a different aesthetic.
Side Sprayers
Side sprayers are separate from the main faucet and are mounted to the side of the sink. They are a more traditional option.
Touchless Faucets
Touchless faucets use sensors to turn the water on and off. Some models also include a sprayer function.
Maintaining Your New Faucet with Sprayer
To keep your new faucet working properly for years to come, follow these maintenance tips.
- Clean Regularly: Clean the faucet and sprayer with a mild soap and water solution. Avoid using abrasive cleaners, as they can damage the finish.
- Check for Leaks: Periodically check all connections for leaks. Address any leaks promptly to prevent water damage.
- Replace Worn Parts: If you notice any worn or damaged parts, such as the sprayer hose or O-rings, replace them promptly.
- Descale the Sprayer Head: Over time, the sprayer head can become clogged with mineral deposits. Descale the sprayer head regularly by soaking it in vinegar.
Frequently Asked Questions (FAQ)
Here are some common questions about DIY kitchen faucet installation sprayer.
Q: What is the difference between a pull-down and pull-out kitchen faucet?
A: A pull-down faucet has the sprayer head integrated into the spout and pulls down, while a pull-out faucet has the sprayer separate and pulls out horizontally.
Q: Can I reuse my old supply lines?
A: It’s generally recommended to replace the supply lines when installing a new faucet to ensure a secure and leak-free connection.
Q: How do I know what size faucet I need?
A: Measure the number of holes in your sink and the distance between them. This will determine the type and size of faucet you need.
Q: What do I do if the water won’t shut off completely?
A: If the shut-off valves under the sink are not working properly, you may need to replace them or shut off the main water supply to your house.
Q: How often should I replace my kitchen faucet?
A: A good quality kitchen faucet can last 10-15 years. However, if you experience frequent leaks, low water pressure, or other issues, it may be time to replace it.
Conclusion
Replacing kitchen faucet pull down sprayer might seem daunting, but with the right tools, materials, and guidance, it’s a project you can confidently tackle yourself. By following these kitchen faucet installation steps with sprayer, you’ll not only save money but also gain a sense of accomplishment. Remember to take your time, follow the instructions, and don’t hesitate to seek help if needed. Happy plumbing! This kitchen faucet sprayer installation guide has equipped you with the knowledge to successfully complete your faucet sprayer replacement instructions.
Hi, I’m Scott Fischer, the voice behind SliceItRight. My passion for food started in my grandmother’s kitchen, where I learned the art of slicing, dicing, and creating delicious meals. Over the years, I’ve explored everything from the perfect kitchen gadgets to mastering culinary techniques, and I’m here to share all of it with you. Whether you’re a beginner or an experienced home chef, my goal is to make cooking easier, more enjoyable, and a lot more fun. So, let’s slice it right and cook up something amazing together!