Yes, you can stain kitchen cabinets! Staining kitchen cabinets is a great way to update their look without the expense of replacing them. However, it’s crucial to weigh the pros and cons before starting. This guide breaks down everything you need to know, from choosing the best stain for kitchen cabinets to a detailed cabinet staining DIY process.
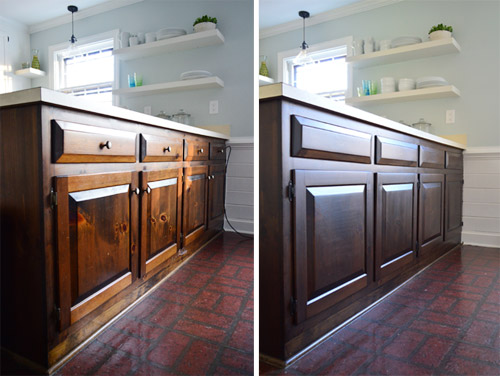
Image Source: images.younghouselove.com
Is Staining Kitchen Cabinets Right for You?
Before diving into how to stain wood cabinets, consider the material and current finish of your cabinets. Not all cabinets are suitable for staining.
Fathoming Your Cabinet Material
- Solid Wood: This is ideal for staining. Wood grain will show beautifully.
- Wood Veneer: Be careful! Thin veneer can be sanded only lightly before you damage it.
- Laminate or Thermofoil: Staining is generally not possible. These materials don’t absorb stain.
- Painted Cabinets: You can stain them, but you need to remove the paint completely first.
Analyzing Your Current Cabinet Finish
- Varnished Cabinets: These can be stained after proper preparation.
- Painted Cabinets: Require more extensive prep work.
Advantages of Staining Kitchen Cabinets
- Cost-Effective: Staining is cheaper than replacing or refacing cabinets.
- Highlights Wood Grain: Staining showcases the natural beauty of wood.
- Customizable Look: Choose from various kitchen cabinet stain colors to match your style.
- Increases Home Value: Updated cabinets can make your kitchen more appealing.
Disadvantages of Staining Kitchen Cabinets
- Time-Consuming: Staining is a multi-step process that takes time and effort.
- Requires Skill: Achieving a professional finish requires patience and attention to detail.
- Not Suitable for All Materials: Laminate and thermofoil cabinets can’t be stained.
- Strong Odors: Some stains have strong odors. Proper ventilation is essential.
- Messy Process: Sanding and staining can create dust and spills.
Tools and Materials for Cabinet Staining DIY
Gather these supplies before starting your cabinet staining DIY project:
- Stain: Choose the best stain for kitchen cabinets (oil-based, water-based, or gel stain).
- Sandpaper: Various grits (120, 180, 220).
- Sandpaper Block or Orbital Sander: To make sanding easier.
- Wood Cleaner or Degreaser: To remove dirt and grease.
- Tack Cloth: To remove sanding dust.
- Painter’s Tape: To protect surrounding areas.
- Drop Cloths: To protect your floors.
- Staining Brushes or Rags: Use high-quality brushes for even application.
- Rubber Gloves: To protect your hands.
- Safety Glasses: To protect your eyes.
- Ventilation: Fans to remove toxic fumes.
- Wood Conditioner (Optional): Helps stain absorb evenly, especially on soft woods.
- Topcoat (Polyurethane or Varnish): To protect the stained surface.
- Screwdriver: For removing hardware.
A Step-by-Step Guide to Staining Kitchen Cabinets
Here’s a detailed how to stain wood cabinets process:
Step 1: Preparation is Key
This is the most important step. A well-prepared surface ensures a beautiful, long-lasting finish.
- Remove Hardware: Take off all knobs, pulls, hinges, and doors. Label everything for easy reassembly.
- Clean Cabinets: Use a wood cleaner or degreaser to remove grease, dirt, and grime.
- Sand the Surfaces:
- Start with 120-grit sandpaper to remove the old finish.
- Move to 180-grit and then 220-grit for a smooth surface.
- Sand with the grain of the wood.
- Remove Sanding Dust: Use a vacuum cleaner and then a tack cloth to remove all dust.
- Tape Off Areas: Use painter’s tape to protect walls, countertops, and other surfaces.
Step 2: Applying Wood Conditioner (Optional)
Wood conditioner helps the stain absorb evenly, especially on woods like pine or maple.
- Apply Conditioner: Use a brush or rag to apply the wood conditioner.
- Wait: Let it sit for the recommended time (usually 5-15 minutes).
- Wipe Off Excess: Use a clean rag to remove any excess conditioner.
Step 3: Staining the Cabinets
Now comes the exciting part! Choosing kitchen cabinet stain colors depends on your preferences and kitchen decor. Dark stain kitchen cabinets are popular for a modern look, while lighter stains can create a more traditional feel.
- Test the Stain: Before applying it to the entire cabinet, test the stain in an inconspicuous area to ensure you like the color.
- Apply Stain Evenly: Use a brush or rag to apply the stain with the grain of the wood.
- Let it Sit: Allow the stain to sit for the recommended time (check the stain’s instructions). The longer it sits, the darker the color will be.
- Wipe Off Excess Stain: Use a clean rag to wipe off any excess stain.
- Second Coat (Optional): If you want a darker color, apply a second coat of stain after the first coat has dried completely.
Step 4: Applying a Protective Topcoat
A topcoat protects the stained surface from scratches, moisture, and wear.
- Let Stain Dry Completely: Allow the stain to dry completely according to the manufacturer’s instructions (usually 24-48 hours).
- Apply Topcoat: Use a brush to apply a thin, even coat of polyurethane or varnish.
- Let it Dry: Let the topcoat dry completely.
- Sand Lightly: Use fine-grit sandpaper (320-grit) to lightly sand the surface. This will help the next coat adhere better.
- Remove Dust: Use a tack cloth to remove all dust.
- Apply Second Coat: Apply a second coat of topcoat.
- Let it Dry: Let the second coat dry completely.
Step 5: Reassembly
- Reattach Hardware: Reattach all knobs, pulls, and hinges.
- Hang Doors: Hang the cabinet doors back on their hinges.
Choosing the Best Stain for Your Kitchen Cabinets
Selecting the right stain is crucial for achieving the desired look.
Types of Stain
- Oil-Based Stain: Provides rich color and good penetration. Dries slowly. Requires mineral spirits for cleanup.
- Water-Based Stain: Dries quickly. Low odor. Easy cleanup with soap and water. May not penetrate as deeply as oil-based stains.
- Gel Stain: Thick consistency. Ideal for vertical surfaces and non-wood materials. Can be used on fiberglass, metal, and veneer. Gel stain kitchen cabinets are a popular choice.
Selecting Kitchen Cabinet Stain Colors
Consider these factors when choosing kitchen cabinet stain colors:
- Kitchen Style: Match the stain color to your overall kitchen style (modern, traditional, farmhouse).
- Existing Decor: Consider the color of your countertops, flooring, and appliances.
- Lighting: Darker stains can make a small kitchen feel smaller. Lighter stains can brighten up a space.
- Wood Type: Different woods absorb stain differently. Always test the stain on a sample piece of wood.
Popular Kitchen Cabinet Stain Colors
| Color | Description | Style Suitability |
|---|---|---|
| Natural | Highlights the natural wood grain. | Farmhouse, Traditional |
| Light Oak | Warm and inviting. | Traditional, Transitional |
| Cherry | Rich and elegant. | Traditional, Formal |
| Walnut | Dark and sophisticated. | Modern, Contemporary |
| Espresso | Very dark and dramatic. | Modern, Minimalist |
| Gray | Cool and contemporary. | Modern, Scandinavian |
| White Wash | Light and airy. | Farmhouse, Coastal |
Staining Kitchen Cabinets Without Sanding: Is it Possible?
While sanding is generally recommended for best results, staining kitchen cabinets without sanding is possible in some cases. This usually involves using a chemical deglosser or a bonding primer to prepare the surface. However, keep in mind that the stain may not adhere as well, and the finish may not be as durable. For refinishing kitchen cabinets with stain, sanding is usually necessary.
Maintaining Your Stained Kitchen Cabinets
- Clean Regularly: Wipe down cabinets regularly with a damp cloth to remove dirt and spills.
- Use Gentle Cleaners: Avoid harsh chemicals or abrasive cleaners.
- Touch Up Scratches: Use a touch-up stain pen to repair small scratches or chips.
- Reapply Topcoat: Every few years, consider reapplying a fresh coat of polyurethane to protect the stained surface.
Common Mistakes to Avoid
- Skipping Preparation: Proper preparation is essential for a good finish. Don’t skip steps like cleaning and sanding.
- Applying Stain Unevenly: Apply stain in thin, even coats.
- Not Wiping Off Excess Stain: Wiping off excess stain is crucial for achieving the desired color.
- Rushing the Drying Process: Allow the stain and topcoat to dry completely before reassembling the cabinets.
- Using the Wrong Type of Stain: Choose a stain that is appropriate for the type of wood and the desired look.
Expert Tips for a Professional Finish
- Practice on Scrap Wood: Before staining your cabinets, practice on a piece of scrap wood to get a feel for the stain and application technique.
- Use High-Quality Brushes: Invest in high-quality brushes for even application.
- Work in a Well-Ventilated Area: Staining can produce strong odors. Work in a well-ventilated area to avoid inhaling harmful fumes.
- Take Your Time: Staining is a time-consuming process. Don’t rush it. Take your time and pay attention to detail.
- Consider Professional Help: If you’re not comfortable staining your cabinets yourself, consider hiring a professional.
FAQ: Frequently Asked Questions
- Can I stain laminate cabinets? No, you cannot stain laminate cabinets. Laminate is a non-porous material that will not absorb stain.
- How long does it take to stain kitchen cabinets? The process can take several days, depending on the size of your kitchen and the number of coats of stain and topcoat you apply.
- What is the best type of stain for kitchen cabinets? The best type of stain depends on your preferences and the type of wood. Oil-based stains provide rich color and good penetration, while water-based stains are low-odor and easy to clean up. Gel stains are good for vertical surfaces and non-wood materials.
- Do I need to sand my cabinets before staining? Yes, sanding is generally recommended for best results. Sanding helps to remove the old finish and create a smooth surface for the stain to adhere to.
- How do I choose the right stain color? Consider your kitchen style, existing decor, and lighting when choosing a stain color. Test the stain on a sample piece of wood before applying it to your cabinets.
- Can I stain over painted cabinets? Yes, you can stain over painted cabinets, but you need to remove the paint completely first.
- What is the best topcoat for stained kitchen cabinets? Polyurethane and varnish are both good options for protecting stained kitchen cabinets.
By following these steps and tips, you can successfully stain your kitchen cabinets and transform your kitchen into a beautiful and inviting space. Remember to take your time, pay attention to detail, and enjoy the process!
Hi, I’m Scott Fischer, the voice behind SliceItRight. My passion for food started in my grandmother’s kitchen, where I learned the art of slicing, dicing, and creating delicious meals. Over the years, I’ve explored everything from the perfect kitchen gadgets to mastering culinary techniques, and I’m here to share all of it with you. Whether you’re a beginner or an experienced home chef, my goal is to make cooking easier, more enjoyable, and a lot more fun. So, let’s slice it right and cook up something amazing together!