Can I remove a Moen kitchen faucet with a sprayer myself? Yes, you absolutely can! Removing a Moen kitchen faucet with a sprayer is a manageable DIY project that can save you money on plumber fees. This guide will walk you through each step, from gathering the right tools to safely detaching the faucet and sprayer.
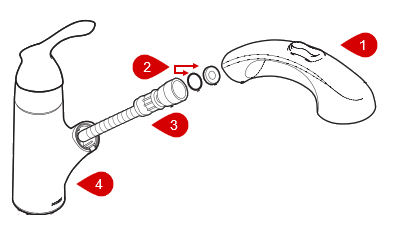
Image Source: solutions.moen.com
Preparing for Your Moen Faucet Removal
Before you start tearing things apart, proper preparation is key. This involves gathering the necessary tools and taking precautions to protect yourself and your plumbing.
Essential Tools and Materials
Having the right tools on hand will make the Moen faucet removal process smoother and more efficient. Here’s a list of what you’ll need:
- Basin Wrench: This specialized wrench is designed to reach up and loosen nuts in tight spaces under the sink. A must-have!
- Adjustable Wrench: For loosening larger nuts and connections.
- Penetrating Oil (e.g., WD-40): To help loosen stubborn, corroded connections.
- Plumber’s Tape: For resealing connections during reinstallation.
- Bucket or Bowl: To catch any water that might drip during the process.
- Old Towels or Rags: To clean up spills and protect the sink.
- Screwdrivers (Phillips and Flathead): For removing screws and accessing faucet components.
- Pliers: For gripping and maneuvering small parts.
- Flashlight or Headlamp: To illuminate the dark spaces under the sink.
- Safety Glasses: To protect your eyes from debris.
- Gloves: To protect your hands.
- Allen Wrench Set: Some Moen faucets use Allen screws.
- Small container or bags: For storing small parts so they are not lost during faucet disassembly.
Safety First: Shutting Off the Water Supply
The most important step before any plumbing work is to shut off the water supply.
- Locate the Shut-Off Valves: These are usually located under the sink, one for hot water and one for cold water.
- Turn Off the Valves: Turn the valves clockwise until they are completely closed.
- Test the Water: Turn on the faucet to make sure the water is indeed shut off. If water continues to flow, you may need to shut off the main water supply to your house. The main shut-off valve is usually located in the basement, garage, or near the water meter.
Clearing the Workspace
Create a comfortable and well-lit workspace under the sink. Remove any items stored there that might get in the way. Place a towel or old sheet on the floor to protect your back and knees.
Step-by-Step: Moen Faucet Removal
Now that you’re prepared, let’s get down to the actual Moen faucet removal. Follow these steps carefully:
Disconnecting the Water Supply Lines
- Place a Bucket: Position a bucket or bowl under the faucet connections to catch any remaining water.
- Loosen the Connections: Use an adjustable wrench to loosen the nuts connecting the supply lines to the faucet tailpieces.
- Detach the Supply Lines: Carefully unscrew the nuts completely and detach the supply lines. Have towels ready to catch any drips.
Sprayer Hose Detachment
Disconnecting the sprayer hose correctly is crucial to avoid damage.
- Locate the Sprayer Hose Connection: This is usually a quick-connect fitting located beneath the sink, where the sprayer hose attaches to the faucet body.
- Release the Clip or Collar: Depending on the Moen model, there may be a clip or collar that needs to be released. Some have a small, horseshoe-shaped clip that needs to be pulled out, while others have a collar that needs to be depressed or twisted.
- Pull the Sprayer Hose Down: Once the clip or collar is released, gently pull the sprayer hose down to detach it from the faucet body.
- Remove the Sprayer Hose: Pull the entire length of the sprayer hose down through the hole in the sink.
Loosening Faucet Connections
This is where the basin wrench comes in handy. These connections can be hard to get to and quite stubborn. Penetrating oil can be your best friend here.
- Identify the Mounting Nuts: These nuts secure the faucet to the sink. They are usually located on the underside of the sink, around the faucet tailpieces.
- Apply Penetrating Oil (If Needed): If the nuts are corroded or difficult to turn, spray them with penetrating oil and let it sit for 15-20 minutes.
- Use the Basin Wrench: Adjust the basin wrench to fit snugly around the mounting nut.
- Loosen the Nuts: Turn the basin wrench counterclockwise to loosen the nuts. This may require some effort, especially if they are tightly secured.
- Remove the Nuts: Once the nuts are loosened, you should be able to remove them by hand.
Removing the Faucet
With all the connections detached, you can now remove the faucet from the sink.
- Gently Push the Faucet Up: From above the sink, gently push the faucet up and away from the sink.
- Clean the Sink Surface: Once the faucet is removed, clean the sink surface around the faucet hole to remove any old putty or sealant.
Dealing with Stuck Faucet Solutions
Sometimes, things don’t go as smoothly as planned. Here are some solutions for dealing with a stuck faucet:
- More Penetrating Oil: Apply more penetrating oil and let it sit for a longer period.
- Heat: Use a heat gun (on a low setting) to gently heat the nuts. This can help to break down corrosion. Be careful not to overheat the pipes or damage the sink.
- Patience: Don’t force anything. Take your time and work slowly.
Cartridge Replacement Moen
While you have the faucet removed, it’s a good opportunity to inspect and, if necessary, replace the cartridge. A faulty cartridge is a common cause of leaks and drips.
Accessing the Cartridge
- Locate the Handle: Depending on the faucet model, the handle may be secured with a screw or Allen screw.
- Remove the Handle: Use a screwdriver or Allen wrench to remove the screw and detach the handle.
- Remove the Retaining Clip or Nut: Some faucets have a retaining clip or nut that holds the cartridge in place. Remove this clip or nut.
Removing the Old Cartridge
- Grip the Cartridge: Use pliers to grip the cartridge.
- Pull Out the Cartridge: Pull the cartridge straight out of the faucet body. You may need to wiggle it gently to loosen it.
Installing the New Cartridge
- Lubricate the New Cartridge: Apply a small amount of silicone grease to the O-rings on the new cartridge.
- Insert the New Cartridge: Align the new cartridge with the faucet body and push it firmly into place.
- Replace the Retaining Clip or Nut: Secure the cartridge with the retaining clip or nut.
- Reattach the Handle: Reattach the handle and secure it with the screw or Allen screw.
Faucet Installation Tips
If you’re replacing the old faucet with a new one, here are some faucet installation tips to keep in mind:
- Read the Instructions: Always read the manufacturer’s instructions carefully before starting the installation process.
- Use Plumber’s Tape: Wrap plumber’s tape around the threads of all connections to prevent leaks.
- Tighten Connections Properly: Tighten all connections snugly, but don’t overtighten them.
- Test for Leaks: After installation, turn on the water supply and check for leaks.
Moen Faucet Troubleshooting
Here are some common Moen faucet problems and how to fix them:
| Problem | Possible Cause | Solution |
|---|---|---|
| Leaky Faucet | Worn-out cartridge, O-rings, or seals | Replace the cartridge, O-rings, or seals. |
| Low Water Pressure | Clogged aerator or cartridge | Clean or replace the aerator or cartridge. |
| Dripping Sprayer | Worn-out diverter valve | Replace the diverter valve. |
| Stiff Handle | Mineral buildup | Disassemble the faucet and clean all parts with vinegar. |
| No Hot Water | Faulty hot water shut-off valve | Check the valve is fully open. If the water is hot somewhere else in the house, consider replacing the valve. |
Grasping Moen Faucet Design
Moen faucets are known for their diverse designs and innovative features, making them a popular choice for kitchens. Each design incorporates unique elements that contribute to its overall aesthetic and functionality. Fathoming these different design features can help to make the faucet disassembly easier, and any further kitchen faucet repair simpler to do.
- One-Handle Faucets: These faucets feature a single lever to control both water flow and temperature.
- Two-Handle Faucets: These faucets have separate handles for hot and cold water.
- Pull-Down Sprayers: These sprayers are integrated into the faucet spout and can be pulled down for extended reach.
- Pull-Out Sprayers: These sprayers are separate from the faucet spout and can be pulled out for more maneuverability.
Maintaining Your Moen Faucet
Regular maintenance can extend the life of your Moen faucet and prevent problems.
- Clean the Faucet Regularly: Wipe down the faucet with a soft cloth and mild cleaner to remove water spots and soap scum.
- Check for Leaks: Periodically check for leaks around the base of the faucet and under the sink.
- Replace Worn Parts: Replace any worn parts, such as cartridges, O-rings, and seals, as soon as they are needed.
- Lubricate Moving Parts: Lubricate moving parts, such as the handle and spout, with silicone grease to keep them working smoothly.
DIY Faucet Removal: A Rewarding Experience
Removing a Moen kitchen faucet with a sprayer is a satisfying DIY project that can save you money and give you a sense of accomplishment. By following these steps carefully and taking the necessary precautions, you can successfully complete the job without calling a plumber.
Frequently Asked Questions (FAQ)
Q: How do I know if I need to replace the faucet cartridge?
A: Common signs include a dripping faucet, difficulty controlling water temperature, or a stiff handle.
Q: What is the best way to loosen a stuck faucet nut?
A: Apply penetrating oil and let it sit for 15-20 minutes. If that doesn’t work, try using a heat gun (on a low setting) to gently heat the nut.
Q: Can I reuse the old supply lines when installing a new faucet?
A: It’s generally recommended to replace the supply lines when installing a new faucet. Old supply lines can be corroded or damaged, which can lead to leaks.
Q: How do I prevent leaks after installing a new faucet?
A: Use plumber’s tape on all threaded connections and tighten the connections properly. After installation, turn on the water supply and check for leaks.
Q: What do I do if the shut-off valves under my sink don’t work?
A: If the shut-off valves are not working, you will need to shut off the main water supply to your house before starting any plumbing work.
Hi, I’m Scott Fischer, the voice behind SliceItRight. My passion for food started in my grandmother’s kitchen, where I learned the art of slicing, dicing, and creating delicious meals. Over the years, I’ve explored everything from the perfect kitchen gadgets to mastering culinary techniques, and I’m here to share all of it with you. Whether you’re a beginner or an experienced home chef, my goal is to make cooking easier, more enjoyable, and a lot more fun. So, let’s slice it right and cook up something amazing together!