Can you paint kitchen floor tiles? Yes, you absolutely can! Painting kitchen floor tiles is a budget-friendly way to transform your kitchen without the mess and expense of a full renovation. This tile floor painting guide provides everything you need to know, from prep work to choosing the best paint for kitchen floor tiles, ensuring a durable and beautiful finish. From how to prep tile for painting to improving painting tile durability, we’ll cover it all for a successful DIY tile floor painting project. Witness stunning painting kitchen tiles before and after transformations! Let’s dive into giving your kitchen a budget-friendly kitchen floor tile makeover. We’ll even touch on the cost to paint kitchen floor tiles.
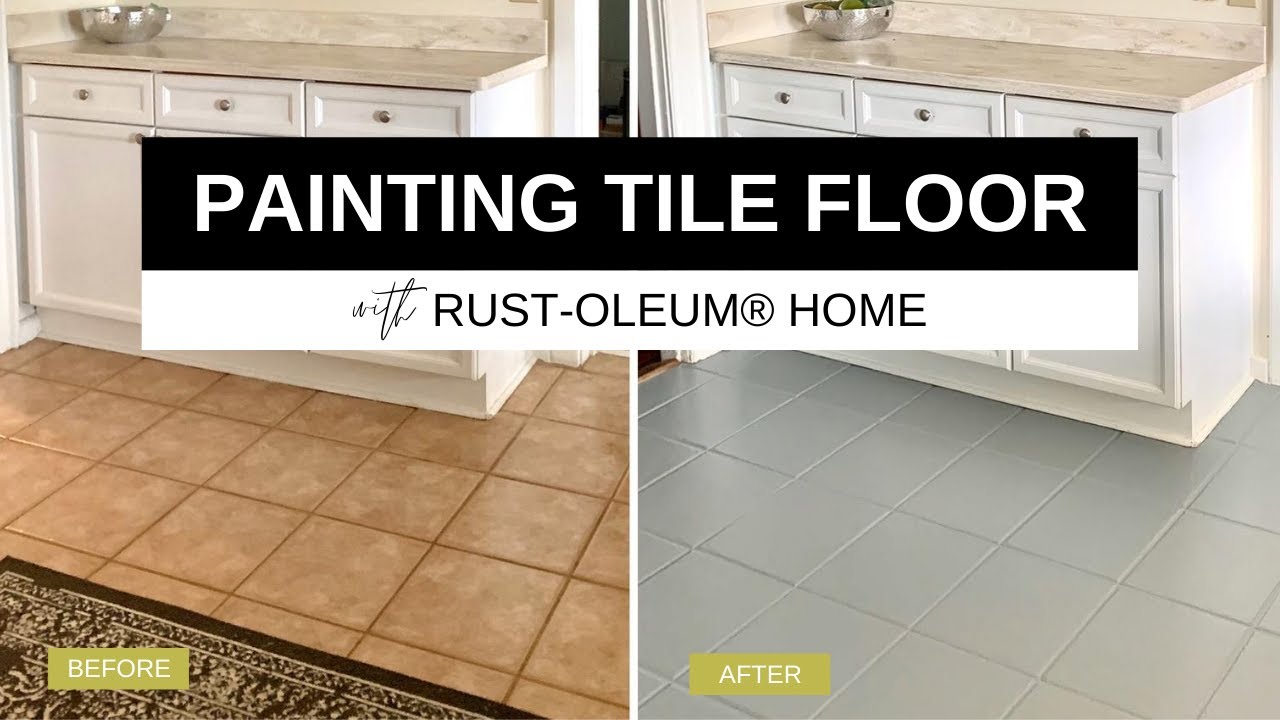
Image Source: i.ytimg.com
Why Paint Kitchen Floor Tiles?
There are several compelling reasons to consider painting kitchen floor tiles instead of replacing them:
- Cost Savings: Replacing tile can be very expensive, considering the cost of new materials and labor. Painting is significantly cheaper.
- Time Savings: A full tile replacement can take days or even weeks. Painting can be completed in a weekend.
- Minimal Disruption: Replacing tile is messy and disruptive. Painting is much less so.
- Aesthetic Update: Painting offers a quick and easy way to update the look of your kitchen.
- DIY Friendly: Painting tile is a project most homeowners can tackle themselves.
Tools & Materials Needed
Before you start, gather these essential supplies:
- Cleaner: Trisodium phosphate (TSP) or a similar heavy-duty cleaner.
- Scrub Brush: For thorough cleaning.
- Sandpaper: 120-grit and 220-grit.
- Painter’s Tape: To protect baseboards and cabinets.
- Primer: Epoxy or bonding primer specifically for tile.
- Paint: Epoxy paint for tile floors or a high-quality porch and floor paint.
- Paintbrushes: Angled brush for edges and a foam roller for larger areas.
- Paint Tray: For easy paint application.
- Drop Cloths: To protect surfaces from spills.
- Safety Glasses: To protect your eyes.
- Gloves: To protect your hands.
- Respirator: To avoid breathing in fumes.
- Etching solution (optional): For particularly glossy tiles.
Step-by-Step Tile Painting Guide
Here’s a detailed breakdown of how to paint your kitchen floor tiles.
Step 1: Cleaning is Key
Proper cleaning is the MOST important step to get ready.
- Sweep and Vacuum: Remove all dirt, dust, and debris from the floor.
- Scrub with TSP: Mix TSP with water according to the manufacturer’s directions. Scrub the floor thoroughly to remove grease, grime, and old wax.
- Rinse: Rinse the floor with clean water to remove all traces of TSP.
- Dry: Allow the floor to dry completely.
Step 2: Prep & Etch the Tile
The second most important part of the process is surface prep.
- Inspect: Look for any cracked or loose tiles. Repair these before painting.
- Etch (If Needed): If your tiles are very glossy, use an etching solution to create a rougher surface for the primer to grip. Follow the product instructions.
- Sand: Lightly sand the tile surface with 120-grit sandpaper to further roughen it up. Focus on areas that feel smooth.
- Clean Again: Remove sanding dust with a damp cloth. Allow to dry.
Step 3: Priming
Primer creates a strong surface for the paint to stick to.
- Tape: Use painter’s tape to protect baseboards, cabinets, and appliances.
- Apply Primer: Apply a thin, even coat of epoxy or bonding primer using a brush and roller. Follow the manufacturer’s drying time.
- Second Coat (Optional): For better adhesion, apply a second coat of primer.
Step 4: Painting
This is where the magic happens.
- Apply First Coat: Apply a thin, even coat of your chosen paint using a brush for the edges and a roller for the main area.
- Allow to Dry: Let the first coat dry completely according to the paint manufacturer’s instructions. This is really important to prevent issues.
- Apply Second Coat: Apply a second coat of paint for full coverage and durability.
- Allow to Dry Completely: This could take 24-72 hours, depending on the paint.
Step 5: Sealing (Optional)
Sealing adds an extra layer of protection.
- Choose a Sealer: Select a clear, water-based polyurethane sealer designed for floors.
- Apply Sealer: Apply a thin, even coat of sealer using a brush and roller.
- Dry: Allow the sealer to dry completely.
- Second Coat (Optional): Apply a second coat of sealer for increased protection.
Choosing the Right Paint
Selecting the best paint for kitchen floor tiles is crucial for a long-lasting finish.
| Paint Type | Pros | Cons | Best For |
|---|---|---|---|
| Epoxy Paint | Extremely durable, excellent adhesion, water-resistant | Strong fumes, shorter working time, may require professional application | High-traffic kitchens, areas prone to spills |
| Porch & Floor Paint | Good durability, easier to apply than epoxy, lower VOCs | Not as durable as epoxy, may require more frequent touch-ups | Low-to-medium traffic kitchens |
| Acrylic Latex Paint with Additive | Easy to apply, low VOCs, readily available | Least durable option, requires a very good primer and sealer | Low-traffic areas, decorative purposes |
Improving Painting Tile Durability
The painting tile durability depends on several factors:
- Proper Prep: Thorough cleaning, etching, and sanding are essential.
- High-Quality Primer: Use an epoxy or bonding primer specifically for tile.
- Durable Paint: Choose epoxy or porch and floor paint.
- Sealer: Apply a protective sealer.
- Cure Time: Allow the paint to cure fully before heavy use.
- Maintenance: Clean regularly and touch up as needed.
DIY Tile Floor Painting: Tips and Tricks
- Test First: Paint a small, inconspicuous area to test the paint’s adhesion and color.
- Thin Coats: Apply thin, even coats of primer and paint to prevent drips and runs.
- Ventilation: Ensure good ventilation while painting and drying.
- Patience: Allow each coat to dry completely before applying the next.
- Consider a Pattern: Use stencils or painter’s tape to create a unique design.
- Grout Lines: You can paint the grout lines the same color as the tiles for a seamless look or choose a contrasting color for definition.
- Clean Spills Immediately: Wipe up spills as soon as they happen to prevent staining.
Painting Kitchen Tiles Before and After: Real Transformations
Seeing is believing! Search online for “painting kitchen tiles before and after” to see the amazing transformations others have achieved. These visual examples can provide inspiration and demonstrate the potential of this DIY project. You will find stunning painting kitchen tiles before and after photos and videos demonstrating the remarkable transformations achievable with this budget-friendly method.
Cost to Paint Kitchen Floor Tiles
The cost to paint kitchen floor tiles is significantly lower than replacing them. Here’s a rough estimate:
| Item | Estimated Cost |
|---|---|
| Cleaner (TSP) | \$10 – \$20 |
| Sandpaper | \$5 – \$10 |
| Painter’s Tape | \$5 – \$10 |
| Primer | \$20 – \$40 |
| Paint | \$30 – \$60 |
| Brushes & Rollers | \$15 – \$30 |
| Sealer (Optional) | \$20 – \$40 |
| Total | \$105 – \$210 |
This cost can vary depending on the size of your kitchen, the quality of the materials you choose, and whether you need to purchase additional tools. Compared to the thousands of dollars a tile replacement can cost, painting is a very budget-friendly option.
Fathoming Potential Problems
- Peeling Paint: This is usually due to poor prep work or using the wrong type of paint. Ensure you clean, sand, and prime properly.
- Chipping: Use a durable paint and sealer, and avoid dropping heavy objects on the floor.
- Uneven Color: Apply thin, even coats of paint and allow each coat to dry completely.
- Fading: Use a paint that is resistant to fading and UV exposure.
- Slippery Surface: If the painted surface is too slippery, add a non-slip additive to the sealer.
Alternatives to Painting
If you’re not sure about painting, consider these alternatives:
- Tile Stickers: These are easy to apply and remove, but they may not be as durable as paint.
- Vinyl Flooring: This is a relatively inexpensive and durable option that can mimic the look of tile.
- Area Rugs: Cover unsightly tile with area rugs to add color and texture to your kitchen.
Frequently Asked Questions (FAQ)
Q: How long does painted tile last?
A: With proper prep and high-quality materials, painted tile can last for several years. However, it may not be as durable as unpainted tile and may require touch-ups over time.
Q: Can I paint over glazed tile?
A: Yes, but you need to etch the surface or use a very strong bonding primer to ensure the paint adheres properly.
Q: What if my tiles have grout?
A: You can paint the grout the same color as the tiles for a seamless look, or choose a contrasting color to highlight the grout lines.
Q: How long should I wait before walking on the painted floor?
A: Wait at least 24-72 hours after the final coat of paint or sealer before walking on the floor. Avoid heavy traffic for at least a week.
Q: Can I use regular wall paint on floor tiles?
A: No, wall paint is not durable enough for floors. Use epoxy paint or porch and floor paint.
Q: How do I clean painted tile floors?
A: Use a mild detergent and a soft mop or cloth. Avoid harsh chemicals or abrasive cleaners.
By following these steps and tips, you can successfully paint your kitchen floor tiles and achieve a beautiful and budget-friendly transformation. Remember to prioritize prep work, choose the right materials, and be patient!
Hi, I’m Scott Fischer, the voice behind SliceItRight. My passion for food started in my grandmother’s kitchen, where I learned the art of slicing, dicing, and creating delicious meals. Over the years, I’ve explored everything from the perfect kitchen gadgets to mastering culinary techniques, and I’m here to share all of it with you. Whether you’re a beginner or an experienced home chef, my goal is to make cooking easier, more enjoyable, and a lot more fun. So, let’s slice it right and cook up something amazing together!