Can you paint floor tiles in a kitchen? Yes, you can paint floor tiles in a kitchen! Painting kitchen floor tiles is a budget-friendly way to give your space a new look. However, it’s vital to do it right to ensure a lasting and beautiful finish. This ultimate guide will take you through everything you need to know for a successful kitchen tile makeover using paint.
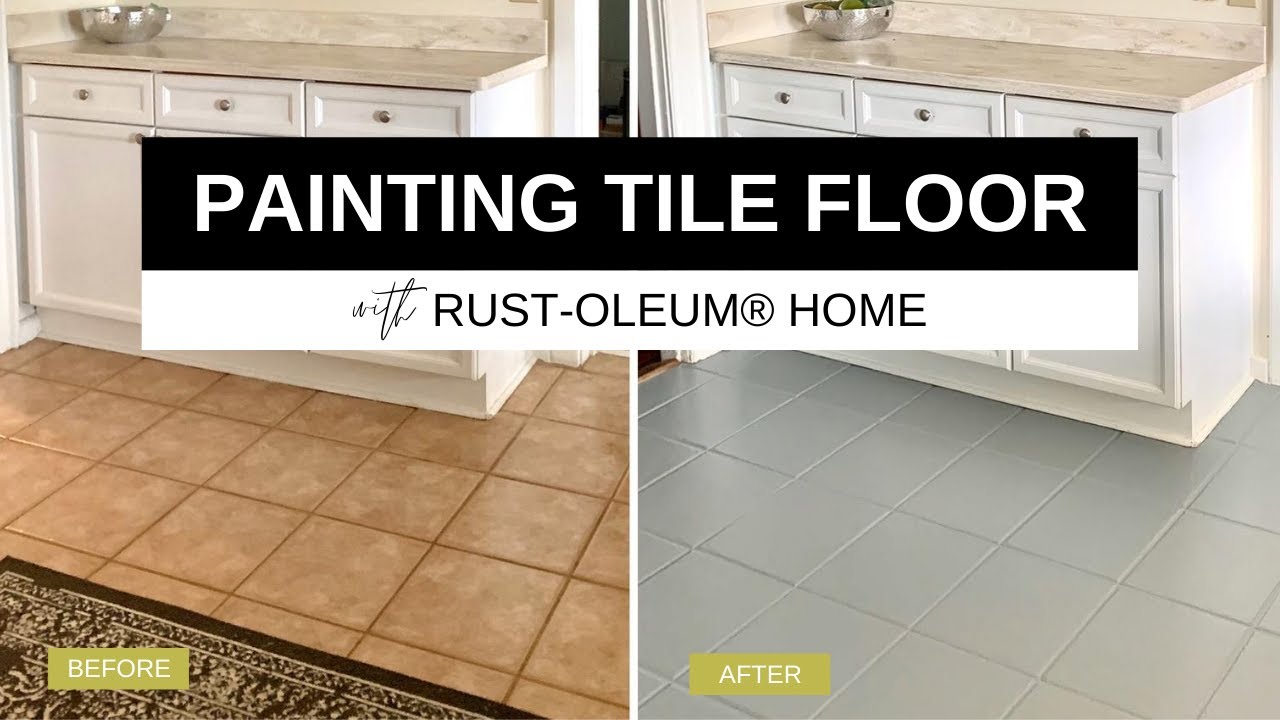
Image Source: i.ytimg.com
Why Consider Painting Kitchen Floor Tiles?
Painting your kitchen floor tiles offers several benefits:
- Cost-Effective: It’s significantly cheaper than replacing the entire floor.
- DIY Friendly: A skilled homeowner can handle the project, saving on labor costs.
- Quick Transformation: It’s a faster process compared to a full renovation.
- Design Flexibility: You can choose any color and create unique patterns.
- Revitalization: Breathe new life into outdated or worn-out tiles.
Is Painting Kitchen Floor Tiles Right for You?
Before diving in, consider these points:
- Painted tile durability is less than that of original, unpainted tiles. Heavy traffic areas may require more frequent touch-ups.
- The quality of the paint job directly impacts the longevity. Proper preparation and sealing are crucial.
- While cost-effective, the process requires time and effort.
- Consider the existing condition of your tiles. Painting won’t fix underlying issues like cracks or significant damage.
Materials and Tools Needed for Your DIY Tile Painting Project
Gather these essential materials and tools before you start your DIY tile painting project:
- Cleaner: A strong degreaser or TSP (trisodium phosphate) cleaner
- Scrub Brush: For thorough cleaning
- Sandpaper: Medium-grit (120-180) and fine-grit (220) sandpaper
- Painter’s Tape: To protect baseboards and cabinets
- Primer: A high-quality bonding primer specifically for tile
- Best paint for floor tiles: Epoxy paint or specialized tile paint
- Paint Rollers: Small foam rollers for smooth application
- Paint Brushes: Angled brush for edges and details
- Paint Tray: For holding paint
- Sealer: A durable polyurethane sealer designed for floors
- Safety Gear: Gloves, mask, and eye protection
Tile Painting Preparation: The Key to Success
Proper preparation is paramount for a long-lasting finish. Rushing this step can lead to peeling, chipping, and disappointment. Here’s how to prepare your kitchen floor tiles for painting:
Step 1: Deep Cleaning
- Thoroughly clean the tile surface with a degreaser or TSP cleaner.
- Scrub vigorously to remove dirt, grease, and grime.
- Rinse with clean water and let it dry completely.
- A clean surface ensures the primer and paint will adhere properly.
Step 2: Sanding
- Lightly sand the tile surface with medium-grit sandpaper. This creates a slightly rough surface for better adhesion.
- Focus on glossy areas to dull the shine.
- Wipe away sanding dust with a damp cloth and let it dry.
- Be careful not to scratch the tile excessively.
Step 3: Taping
- Use painter’s tape to protect baseboards, cabinets, and other surfaces you don’t want to paint.
- Ensure the tape is applied firmly to prevent paint from seeping underneath.
Step 4: Priming
- Apply a thin, even coat of bonding primer specifically designed for tile.
- Use a brush for edges and corners and a roller for the main surface.
- Let the primer dry completely according to the manufacturer’s instructions (usually 24 hours).
- Priming is essential for the paint to adhere properly to the tile.
Choosing the Best Paint for Floor Tiles
Selecting the right type of paint is crucial for the longevity and appearance of your painted floor.
Epoxy Paint
- Pros: Extremely durable, water-resistant, and resistant to chemicals. Ideal for high-traffic areas.
- Cons: Can be more expensive than other options. May require mixing two components.
Specialized Tile Paint
- Pros: Specifically formulated for tile surfaces, offering good adhesion and durability. Often available in a wide range of colors.
- Cons: May not be as durable as epoxy paint in high-traffic areas.
Other Considerations
- Always choose a paint with a satin or semi-gloss finish for better durability and cleanability.
- Read reviews and choose a reputable brand known for quality.
- Consider the color. Lighter colors will show dirt more easily, while darker colors may show scratches more readily.
The Painting Process: Step-by-Step Guide
Follow these steps for a smooth and professional-looking paint job:
Step 1: Apply the First Coat
- Pour a small amount of paint into your paint tray.
- Use a brush to paint the edges and corners of the tiles.
- Use a roller to apply a thin, even coat of paint to the main surface.
- Avoid applying too much paint at once, as this can lead to drips and uneven coverage.
Step 2: Allow to Dry
- Let the first coat dry completely according to the manufacturer’s instructions (usually 24 hours).
- Avoid walking on the painted surface during the drying time.
Step 3: Apply a Second Coat
- Lightly sand the first coat with fine-grit sandpaper to smooth out any imperfections.
- Wipe away sanding dust with a damp cloth and let it dry.
- Apply a second thin, even coat of paint using the same technique as the first coat.
- Two coats provide better coverage and durability.
Step 4: Allow to Dry Again
- Let the second coat dry completely according to the manufacturer’s instructions (usually 48-72 hours).
- The longer you let it dry, the harder and more durable the paint will become.
Painted Tile Sealing: Protecting Your Investment
Sealing the painted tiles is essential to protect the paint from wear, water damage, and stains.
Choosing the Right Sealer
- Use a durable polyurethane sealer specifically designed for floors.
- Choose a water-based sealer for easy cleanup and low odor.
- Select a satin or matte finish for a natural look or a glossy finish for added shine.
Sealing Process
- Apply a thin, even coat of sealer using a new foam roller.
- Follow the manufacturer’s instructions for drying time between coats.
- Apply at least two coats of sealer for optimal protection.
- Allow the sealer to cure completely before heavy use (usually 72 hours or more).
Kitchen Tile Paint Ideas: Unleash Your Creativity
Painting your kitchen floor tiles allows for endless design possibilities. Here are some ideas to inspire you:
- Solid Color: A simple and classic option. Choose a color that complements your kitchen decor.
- Checkerboard Pattern: A timeless and elegant design. Use two contrasting colors for a striking effect.
- Stenciled Design: Create intricate patterns using stencils.
- Geometric Shapes: Paint triangles, squares, or other geometric shapes for a modern look.
- Faux Tile: Paint grout lines to create the illusion of individual tiles.
- Ombre Effect: Blend two or more colors gradually for a unique and eye-catching design.
- Distressed Look: Create a vintage or rustic feel by sanding away some of the paint to reveal the original tile underneath.
Maintaining Your Painted Kitchen Floor Tiles
Proper maintenance is key to extending the life of your painted floor.
- Regular Cleaning: Sweep or vacuum regularly to remove dirt and debris.
- Gentle Cleaning: Use a mild soap and water solution to clean the floor. Avoid harsh chemicals or abrasive cleaners.
- Avoid Scouring: Don’t use scouring pads or abrasive brushes, as they can scratch the paint.
- Protect from Furniture: Use felt pads under furniture legs to prevent scratches.
- Immediate Spill Cleanup: Clean up spills immediately to prevent staining.
- Touch-Ups: Touch up any chipped or scratched areas promptly to prevent further damage.
Floor Tile Painting Cost: What to Expect
The floor tile painting cost varies depending on several factors:
- Size of the kitchen: Larger kitchens require more materials and time.
- Type of paint and sealer: Epoxy paint and high-quality sealers are more expensive.
- Complexity of the design: Intricate patterns and stencils require more time and skill.
- DIY vs. Professional: DIY projects are cheaper, but professional painters charge for labor.
Here’s a general estimate of the costs involved:
| Item | Estimated Cost |
|---|---|
| Cleaner | \$10-20 |
| Sandpaper | \$5-10 |
| Painter’s Tape | \$5-10 |
| Primer | \$20-40 |
| Paint | \$30-60 |
| Sealer | \$30-50 |
| Rollers & Brushes | \$15-30 |
| Total (DIY) | \$115-220 |
Professional painting services can range from \$3 to \$7 per square foot, depending on the complexity of the job and the location.
Common Mistakes to Avoid
- Skipping Preparation: Neglecting proper cleaning and sanding is a major cause of paint failure.
- Using the Wrong Paint: Using paint not designed for floors will result in chipping and peeling.
- Applying Thick Coats: Thick coats of paint are more prone to cracking and peeling.
- Rushing the Drying Time: Not allowing sufficient drying time between coats can compromise the finish.
- Ignoring Sealing: Skipping sealing leaves the paint vulnerable to damage.
Alternatives to Painting Floor Tiles
If you’re unsure about painting, consider these alternatives:
- Vinyl Tiles: Easy to install and come in a variety of styles and patterns.
- Peel-and-Stick Tiles: A quick and affordable option for a temporary makeover.
- Tile Stickers: Decorative stickers that adhere to the tile surface.
- Laminate Flooring: A durable and budget-friendly alternative to real wood.
- New Tile Installation: The most expensive option but provides a long-lasting and high-quality result.
Conclusion: Painting Kitchen Floor Tiles – A Worthwhile Project?
Painting your kitchen floor tiles can be a rewarding and budget-friendly project if done correctly. With careful preparation, the right materials, and a little patience, you can transform your kitchen and give it a fresh new look. Weigh the pros and cons, consider your skill level, and follow this guide to achieve a beautiful and durable painted floor.
Frequently Asked Questions (FAQ)
Q: How long does painted tile last?
A: The lifespan of painted tile durability depends on traffic, paint quality, and maintenance. It can last 1-2 years in high-traffic areas and up to 5 years in low-traffic areas.
Q: Can I paint over grout?
A: Yes, you can paint over grout. Ensure the grout is clean and dry before painting. You can use a small brush or grout pen to paint the grout lines.
Q: Is epoxy paint the best option for kitchen floor tiles?
A: Epoxy paint is one of the best paint for floor tiles due to its durability and resistance to water and chemicals. However, specialized tile paints are also a good option.
Q: How many coats of sealer do I need?
A: Apply at least two coats of sealer for optimal protection. You can apply more coats in high-traffic areas.
Q: Can I use a regular paint roller for floor tiles?
A: No, use a small foam roller for a smooth and even application. Regular rollers can leave a textured finish.
Q: How soon can I walk on the painted floor?
A: Wait at least 24 hours after painting and 72 hours after sealing before walking on the floor. Avoid heavy traffic for the first week.
Q: What if the paint starts to chip?
A: Clean the chipped area, lightly sand it, and apply a new coat of paint and sealer.
Hi, I’m Scott Fischer, the voice behind SliceItRight. My passion for food started in my grandmother’s kitchen, where I learned the art of slicing, dicing, and creating delicious meals. Over the years, I’ve explored everything from the perfect kitchen gadgets to mastering culinary techniques, and I’m here to share all of it with you. Whether you’re a beginner or an experienced home chef, my goal is to make cooking easier, more enjoyable, and a lot more fun. So, let’s slice it right and cook up something amazing together!